Good morning scrappers!
This morning I would like to share with you a layout I have made using your September Prompt of 'Paint'
Now, of course, the ideas for this are endless and it is an easy process to liberally daub paint, either acrylic or watercolours, on to the background paper and see what effect you can achieve. Of course one of the most difficult things about adding any sort of wet medium to your cardstock is that it will have a tendency to curl..which can be very annoying! To counteract this I used tape to stick down the edges to my glass cutting mat before starting adding the moisture to the paper/card.
I used a heavyweight white card for my background which is 300gsm. I bought this in bulk from by 'go to' supplier Crafts4Eternity. Of course you can use specialised watercolour paper for this but it does work out quite expensive and if you follow this simple tip you can use regular cardstock just fine!
Now, I'm no artist, but to me the techniques I used were very basic and I can explain a little of how I created the Lavender stems very simply..just follow along.
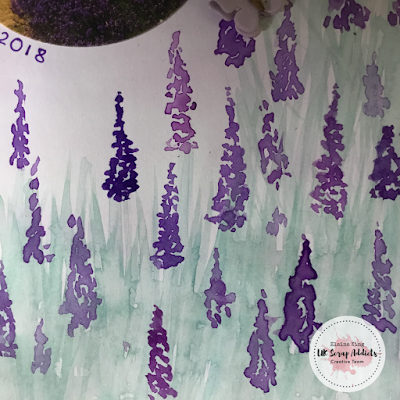
To start I took some inexpensive watercolours and mixed some pale mauve paint using reds and blues and a pale grey/green colour. I watered this down quite heavily and painted soft fluid strokes of the two colours horizontally across the page. I then gently gently painted the stems/leaves onto the background card in upward movements in random directions using a slightly darker, less watered down, grey/green colour. You can see here how I painted across the masking tape that I used to stick the paper to my mat.
Then I mixed deeper mauve colour using red and blue and started on the flower heads. To create these I used 'bobbling' movements with my paint laden brush in elongated triangular shapes. It really wasn't scientific..just keep your paintbrush moving in these shapes. You will see that these are varying shades of the purple I mixed as each flower head has a different amount of water added to my brush each time. This adds depth and field to the painting.
Once I had painted all my Lavenders, and allowed it to dry, I removed the masking tape from the edges. Undoubtedly this will remove some of the layers of the card beneath so at this point I cut a border off the edges and matted the entire piece on a piece of dark mauve cardstock.
I next set about creating the photo clusters. First I die cut two circular photos of varying size. I then used a selection of flowers and leaves to create my clusters and added the title using Puffy Sticker Alphas that I bought from Lottie Loves Paper
I hope you like what you see and that this simple tutorial gives you confidence to have a go..what have you got to lose? Do let us know what you think too!
xx


it looks absolutely beautiful and such a simple method gives such stunning effect
ReplyDeleteThank you. X
DeleteThanks for the tutorial Elaine, very encouraging x
ReplyDeleteThank you. Xx
Deletelove the lavender :-)
ReplyDelete