Showing posts with label kirsteen young. Show all posts

Tuesday, 1 August 2017

CLUSTERING

Our monthly theme for August is clustering. Over the next month our creative teams layouts and blog posts will all feature clustering in some way.

In today's joint post the team are discussing how we use clustering on our layouts...


Lisa-Jane: I love creating clusters on my pages - it gives me a ‘home’ for some gorgeous embellishments and lots of texture. I tend to start with a few larger flatter items and then gradually scale things down by size, allowing me to layer up lots of different items to add interest and dimension. I usually place three clusters around the photos to create a visual triangle leading the eye towards the main focus. Sometimes though I'll use a string of smaller clusters across or down the page, often in a diagonal line. I like to keep to an odd number of repeated elements as this is apparently more pleasing to the eye - psychologists and designers will tell you that if you use an even number then the mind's eye subconsciously looks for another item. That's ‘odd’ isn't it?! 


Pol:  I love a good cluster, the more the better! The best thing is, there are no hard and fast rules to clustering, just go with the flow of whatever you like the look of. If you're struggling where to start, odd numbers of clusters tend to look best, as does an accent colour in each cluster that maybe you've picked out from your photo. Clusters lead your eye around the page whilst keeping your photo as the focal point. The photos below show firstly a page with three clear clusters, and then a page with no clusters.


Maria: Clustering is an art that I haven’t mastered yet. I know the theory, but in practice I always second guess myself and I don’t know if I am doing it “properly”. Yes, yes ... I know that there is no right and wrong in scrapbooking, however, clustering can look a bit of a mess sometimes.


Roxy: I love clustering. I find myself using small clusters most often as it looks good to the eye. You first look at the photo then your eye is drawn to these two or three other points that have things to do with the photo! The photo below shows three clusters around the photo. 
If you find clustering hard, maybe pre-make some embellishments. Have a look on our blog or our Pinterest for inspiration! 


Kirsteen: As a self confessed embellishment junkie and firm believer in more is more, I love to cluster. Clustering allows you to add lots of your favourite embellishments to a layout, creating a pretty focal point, or two, or three  ...


Jess: Looking back at some of my recent layouts I don't do a lot of clustering. I tend to go a bit embellishment crazy and fill in all the spaces. However when I do add clusters I go for balance. In this example I have added clusters along a diagonal line. I have small clusters of flowers in the corners and clusters with labels along the corners of the photos. This diagonal line gives your eye something to follow and adding clusters to the corners kind of closes everything in. 


Terri-Ann: Clustering is something I do on a regular basis. I generally try to stick to the rule of odd numbers so will often go with 3 or 5 clusters depending on my design. I like to start with larger items and then layer on top smaller items, finishing with enamel dots or something similar. 


Sarah: I love to cluster embellishments along with other crafty bits to add texture. Doilies, gauze/cheesecloth, tissue and ribbon all work well. 


Susan: I can totally understand why some scrapbookers might be apprehensive about clustering - especially if you like a lot of white space on your pages. To cluster successfully you need to find just the right quantity, size and colour of elements to fit in a small space and yet, make sure it does not appear as a jumbled mess.  The secret, I think, is to only add a cluster (or two) if it serves a purpose and enhances your page. I am a fan of clustering as a way of ‘finishing off’ a page that I feel is missing something. This is usually because the page is in need of the eye-pleasing ‘triangle’ shape mentioned by other teamies here. You can see this in my page G’day Joey. There are two reasons why I love a cluster - one they are a great way of using up bits of leftover papers and they also make use of the ‘just-a-few’ little dies I have that go through my beloved Diamond Press machine. I like to repeat elements from the main area of the page in the clusters, like the little yellow die-cut banner in my Too Kool for Skool page here to try to avoid a ‘thrown in as an afterthought’ effect, even though they often are!


Gemma: I like to use clustering on a page and I try to focus on using lots of different sized embellishments and dimensions when I do. I start with the bigger die cuts and then add my favourite bit which is tiny wood veneer, buttons and enamel dots. Although I may not use an odd number of clusters every time I do like to work on the diagonal or work them around my photo. 


Michelle: Until recently I’ve not really been an ‘over embellisher’, preferring  the look of stamps on a page than I do a cluster of embellishments; that was until I started to binge watch YouTube. I always thought that too many embellishments would make my page look cluttered and too busy but its actually a really good way of drawing your eye through the layout, its definitely something that I am going to be trying more of from now on!


Thank you for sharing your ideas and tips guys! I hope we've helped and inspired you to have a go at this months new challenge and cluster away!

Saturday, 15 July 2017

INK PADS AND STAMPS

Hi lovely Scrappers! Today the team are having a chat about ink pads and stamps...

Claire: I love stamps! I just do not use them enough, I collect and hoard them. I have done a few layouts that have been focused on stamping and I love the end results. However, I think the reason that I don’t stamp more is the fear of messing it up. Stamping is definitely a technique to master. I also own 15 (yes 15) roller phrase stamps and I use these frequently to add finishing touches to my layouts. I generally just stamp these in black Versafine ink and often do a “ghost” stamp where I stamp multiple times without re-inking to get the ombre stamped effect (I feel I’ve just made that term up - ha ha). I think the general consensus for most scrapbookers is that they own stamps and do not use them enough. So, my commitment from here on in is to use my stamps more!

Gemma: I only have a small selection of stamps, which I really need to use more. My favourites are my two rolling stamps, the Shimelle date stamp and a Dear Lizzy phrase stamp. I like to use these as a final touch to a layout, stamping a few lines near a cluster of embellishments. My favourite ink pad is StazOn which I have in black.
If I want to get messy for a mixed media look, I have some of the large Tim Holtz Distress ink pads. I use these with the packaging technique. To do this I stamp the pad straight onto some plastic packaging, then I spray some water on top, which makes the ink react. The ink applied onto cardstock creates a pretty watery effect for a background.


Lisa-Jane: Using ink pads and stamps either alone or together, can really expand your crafting stash in a cost effective way. You can make your own patterned papers to use as backgrounds or extra layers if you don't have the exact piece that you feel you need or you can add little pops of interest and detail with the smallest of stamps, and anything in between. I do use stamps on my layouts now and then and I really need to use them more as I love the extra layers that they can create. I'm a huge fan of Tim Holtz Distress inks and the new Distress Oxides and I definitely wouldn't be without my Vintage Photo ink pad and blending tools for inking the edges of most of my papers etc on a layout. I used to think they were all about the grunge and eleventy billion shades of brown but as you can see from this layout they can also be nice and bright too. This page is from a holiday album where I used a particular collection right the way through. I was getting short on full pages and I had an idea to make a matching background sheet and I was so happy with how it turned out. I used thin washi tape to make a geometric pattern over some white cardstock and then used the blending tool and two bright colours of Distress Ink over the top. I pulled off the washi tape and hey presto, a full, matching, background sheet for the price of a plain sheet of cardstock! The inks and stamps might be an investment to begin with but as long as you choose generic styles or colours you scrap with a lot then you will definitely get your money's worth.


Sarah T: I love the idea of stamping, especially on Pocket Page layouts. I really like; stamping on photos, repeat stamping, creating stamped embellishments, and a good old date stamps. I did some repeat stamping recently as a title card and really loved it. I used an alpha stamp and black StazOn ink. I'm actually really pleased we've covered this topic because stamping is something I'm always keen to do more of and I've picked up loads of tips from the rest of the ladies. I hope you have too.


Vicci Lou: Stamps are by far my fave thing to use ever! I think every new scrapbooker should invest in a couple of cool sets. They're so versatile; mix that in with some scraps and different coloured inks and you can make lots of embellishments, which is great if you're on a small budget. Stamps are great for adding texture and interest to backgrounds and also for adding those little final touches to layouts instead of say enamel dots or sequins. Yes, they are a flat element on the page but if you use the right contrasting colours you can really make them pop!

Kirsteen: I'm more of a collect and hoard kind of stamper. I love the idea of stamping, being able to reuse an image I really love but the reality is my stamp collection lives in a pretty box that I swoon over every now and then.


Susan: Hmm stamping? Not my favourite technique. I am not good at getting an even pressure and so end up with extra ink, or not enough ink, on the finished image. I recently invested in a We R Memory Keepers Precision Press Tool which should help but I haven’t opened it so can’t report back yet (I bought mine from UK company, Cre8tive Online). I have found that ‘you get what you pay for’ both with stamps and with inks and also that it is worth experimenting to get the right ink for the job. I use a lot of inking on the edges of cut papers on my scrapbook pages; it gives a more finished look, I think. Some inks are just too ‘inky’ for that but Tim Holtz Distress Inks do the job perfectly. However, they are hopeless for stamping a crisp, clear image and, to be fair, they were never intended for that purpose. Cheaper stamps and especially some of the freebies on magazine covers, seem to splay out a little and smudge the image; I am happy to pay a bit extra and buy a really good stamp; those from Stampin’ Up, for example, are excellent. And a wee tip - did you know the little round blending foam pads fit perfectly in the bottom of the mini Distress Inks? So you can store each one with its own colour.


Maria: Confession time! I only have a handful of ink pads. Until recently, my idea of stamping on a layout consisted of adding the date with a date stamp! (and I do this on my layouts 90% of the time). However, I have ventured into making a feature of stamping on my layouts in the last few months. It doesn't happen often, but when it does, I go big! I like stamping directly onto the background, and if the cardstock is textured you have to make sure that you are impressing your stamp correctly, otherwise it may not look sharp. And beware the stampers nemesis: dropping your stamp on your layout by mistake! I must confess that it has happened to me more than once! My favourite ink is Versafine; I use it for stamping my date and for other bits and pieces. For colour inks I have a couple of colours of Distress Inks and a couple of colours of Stampin’ Up pads. I am currently saving a bit to invest on some more pads!


Emma C: OK, one thing to remember is not all ink pads are created equally and the one you choose is totally dependent on what you want to do with the image. First of all there are different formulations of ink. Pigment ink, dye ink, hybrid ink, embossing ink, waterproof ink ... I know, it's a minefield! I would recommend checking out Jennifer Maguire’s YT channel as she has great videos explaining the differences between the lot. From a personal point, I love Tim Holtz Distress Inks for water colouring and blending. I use Ranger Archival Jet Black a fair bit because it gives a fab crisp image. I've also recently started using Clearly Kelly Hybrid ink by Hero Arts, which look blotchy to begin with but smooth out when they dry.
In terms of stamps, I prefer to use clear stamps, usually the ones made from photo polymer are of a higher standard and give a better image when stamped. Clear stamps also let you see where you're stamping as you can see through them - bonus.
*psst* Don't worry if you're like me and never clean off your stamps, it doesn't hurt them!

Jess: So I swore I was never going to be a stamper. I tried it a few times with a variety of bad results. I even sold all my studio calico stamp sets online. Then a pen pal sent me a pad of StazOn black ink. This is now the only ink I use. I have a Project Life roller date stamp and a Heidi Swapp stamp set and that's all I use. The StazOn ink is great and as Emma said, its OK to not clean them, especially if you only use one colour. One technique I do like to do is to repeat the stamp until the ink on it has run out, to give kind of a shadow effect. Its a nice quick and easy way to get an interesting feature on a page.


Michelle: I absolutely love to stamp, it's my favourite thing to do! I don't own a massive variety of stamps but the ones I do have are excellent quality and can be used in a range of techniques. I'm not particularly an arty person so the stamps that make up a scene or the stamps that have two parts (dual stamp) are my favourite, when you combine them with good quality ink pads you can use them again and again without your layouts ever looking the same.


Some great hints and tips there from the team, I know I learnt some new ideas too! 

Saturday, 1 April 2017

SEWING


Hello there!  Our theme for April is Sewing.  Throughout the month you'll see plenty of hand stitching, faux stitching and machine stitching.  We have some cracking guests lined up too!  Here are some of the team to kick off the month chatting about their sewing experiences...

Sheena:  I love to sew on lots of my pages & received a mini sewing machine from John Lewis for Christmas so I can machine sew at crops and retreats. When I hand sew I often use thin crochet thread as unlike embroidery floss it doesn't split.


Pol:  Hand stitching on layouts is one of my favourite techniques!  My mum used to be an avid cross-stitcher but she no longer has time, so she gave me a box full of embroidery threads.  I was in heaven!  I just use standard DMC 25 skeins of embroidery thread, and a bog standard stitching needle.  I’ve found that the blunt cross stitch needles are too big for the holes once you’ve threaded them.
To start, I fix the end of the thread onto the reverse of my card using a little bit of Cosmic Shimmer acrylic glue.  When I’ve finished or am at the other end of the thread, I do the same again and trim any long ends away.
I often use my Silhouette Cameo to convert cut files into stitching templates, this works extremely well on large backgrounds or designs.  For smaller designs, you can easily make a template yourself, or again use a cutting machine with a sketch pen.  I either hand draw my design, print it from the computer, or use my Silhouettes sketch pen feature to draw the design.  Once I’ve got my design, I fix it with low tack masking tape to the area I want it on my card.  I pop a foam mat underneath the card - an old mouse mat works just as well. I then pierce holes at regular intervals on the lines of my design.  I use a cheap pokey tool from eBay for this, again a large drawing pin would work.  Once the design is finished, carefully peel it off, and there you have pierced holes ready to stitch.

Emma C:  Oooh, stitching is such a trend right now and if you choose to hand stitch it can be time-consuming but oh-so-worth it!  When I first tried hand stitching I did it in a very rudimentary way by hot glueing a drawing pin to the end of a pen holder as a way to poke the holes without buying a pokey tool; you can look at this in 2 ways, either I’m cheap or I’m innovative.  Anyhow, it worked and I liked the effect so I then bought a Tonic Craft Pick which is much more comfortable to hold.  You’ve also got to remember to put something under your page when you poke the holes: learn from my mistakes, people!  I have pinpricks in the worktop!  Oops!  To solve this I bought a We R Memory Keepers Piercing Mat from Amazon or when I was being ‘innovative’ I used folded up cardboard; though I wouldn’t recommend this long term (see pinpricks!)
I also occasionally do machine stitching which I use the John Lewis Mini Sewing Machine which I absolutely love!  As a complete sewing machine novice (not even using one in school - a severe gap in my secondary education in my opinion!) I found it really easy to use and with practice I’m gaining much better control, too! Plus it’s a gorgeous minty colour - WIN!


Jess Claire:  Stitching on layouts is a new concept to me.  I am not at all talented with needle and thread.  I failed textiles at school when I broke the sewing machine needle in half so I've always been kind of stitch-avoiding in my scrapbooking which is a shame because it looks so effective.  The solution is faux stitching.  I use my pen and a ruler to draw on small lines to make it look like it’s stitched.  So far I have only used this technique for borders on journal cards and TN layouts but it could certainly work for other things.  My next project is to try it for letters and titles too.

Jackie:  I love to add stitching to my layouts, whether it's hand or machine stitching.  I find hand stitching very therapeutic, especially when it’s a large design.  I do struggle to use large design hand stitched features on my layouts, but seeing what is out there, I’m in awe that other crafters can produce such lovely hand-stitching on a layout. Having a cameo makes the process of hand-stitching large designs easier, as the machine can make the holes for you.  I purchased a large bag of embroidery floss from HomeSense a few years ago and I’ve still got most of it, but I’ve added some lovely two-toned threads that I purchased from Hobbycraft, this gives my layouts an added interest when I hand-stitch.
Last year I got a sewing machine, and I love adding stitching to my layouts, it could just be stitching over Thickers in a straight line, or adding details around the page.  I think it adds another element to the page and gives it more life.


Lisa-Jane - I love the look of stitching on layouts of any kind and to that end, I bought a teeny sewing machine a couple of years ago.  I’ve still not ACTUALLY used it on my scrapbook pages, though! What I have done though is used my Silhouette to create the template and punch the holes for me.  There are lots of tutorials around to show you how to do this but basically, you just select perforate instead of cut.  It means that any shape you design or purchase using the Silhouette software can be made into a stitching template.  Of course, you still have to do the actual stitching yourself but with the holes already punched it’s something you can do curled up on the sofa half watching TV or chatting with friends, like a few of us did on a recent scrapping retreat.  There also may have been cake involved but I hear that it’s not compulsory...

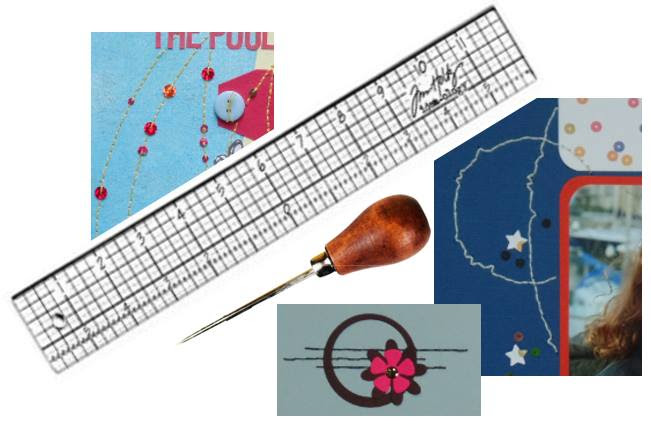
Susan:  Stitching is one of my favourite techniques when scrapping - I like that it gives the page a bit of texture and also ‘brings in’ elements of the page that might otherwise be floating.  I do have a little sewing machine (a £12 jobby from Hobbycraft) but I’ve not had a lot of luck using it on cardstock.  I prefer to hand sew, and like my teamies, I prick holes first, sometimes freehand for a deliberately wonky effect and, sometimes using the holes in a Tom Holtz Idea-ology ruler for a neat and even look.  I find the holes made with a standard pokey tool are a bit too big and I prefer the neater hole you get with the Tattered Lace pokey tool that is intended for getting the unwanted bits out of intricate die cuts.  Occasionally I do faux stitching and my tip for making it look more real is to poke holes just as you would for real stitching then join the holes together with a fine pen. And finally, I like to stitch buttons on my pages; to me, they look unfinished without the stitching, though I have been known to cheat and draw fake stitches with a Sharpie pen.  Oh, I nearly forgot, I’ve put together a board here to save you trawling Pinterest for stitching ideas. 


Kirsteen:  I love hand stitching cardstock.  It’s such a labour of love but so worth it and hugely therapeutic.  I use Bazzill stencils and a pokey tool to make my holes and a regular sewing needle to sew.  I bought a bag of embroidery skeins from Argos years ago and I still have loads of thread left.

Tuesday, 14 March 2017

We are Family | Kirsteen | Multiple Photos

Hello, it's Kirsteen here with my first UK Scrap Addicts blog post. Today I'm sharing a quick home decor project with you using multiple photos.


I set out to create a home decor project for my Mother-in-law including photos of her six Grandchildren.

Inspired by Beth's Totes Aborbs layout I decided to create two 12x12 layouts with three photos on each page. I selected six photos, cropped and converted them to black and white (the top left photo is far too dark - lesson learned - make sure your photos don't need to be lightened before printing). I ordered six 4x4 prints from Truprint last and they arrived in two days.


I placed three boys on one page and three girls on the other. They are arranged by age in a clockwise order as well.


After much faffing with a steel rule, I was happy with the placement of the photos. I might have just been unlucky but my 4x4 prints from Truprint weren't quite 4x4 more 4x {just a little bit smaller than} 4 which made placing them on the page a little tricky.


I added two 4x4 cards from a Simple Stories Family Sn@p Pack (I trimmed them down to match the slightly wonky photo sizes) and some of the die cut pieces from the Sn@p Pack using foam pads. I picked up the Sn@p Pack in my local TK Maxx for a bargain £2.99. I purposely didn't add too many embellishments as I wanted the photos to be the main focus. I layed some of the die cut pieces to give a little depth and a little embellishment in three clusters across the two pages.


I framed the pages in two white Ribba Frames from Ikea (they are £9 each). This is the trickiest part, anyone who has tried to frame a 12x12 layout in one of these frames will feel my pain.


I hope you've enjoyed my quick home decor project today, thanks for stopping by.

Thursday, 2 March 2017

MULTIPLE-PHOTO LAYOUTS

Today some of our creative team share their views tips and tricks to using multiple photos on a single layout... 

Laura R: I have two favourite ways of including multiple photos on one layout. One is to use a series of photos. When my nephew first started moving himself he did a character-full bum shuffle and I caught it on camera. As he moves towards the camera he gets larger in the frame. To show the movement I printed them all in a fairly small size and spread them across my page.


My other favourite is using then and now photos. In this layout it is the same person on the right of both photos, taken 31 years apart.


Jess: As a pocket scrapbooker most of my layouts have multiple photos. I tend to approach this in one of two ways. Most often my layouts will have multiple photos from a range of days and activities that week. When doing this weekly approach I look for similarities in colour in the photos to tie in journal and filler cards to compliment them.

Also I have started doing double page layouts which means I can group photos together where they match, even if it's not chronologically accurate. Occasionally I will use multiple photos all from the same event, these layouts tend to be special occasions like birthdays or if there's a day when I take lots of photo of the same thing, for example a trip away. 

I really like working with multiple photos from the same location and time frame because they tend to include the same colours and finding cards to match is much easier.


Michelle: I started scrapbooking with pocket page layouts which are perfect for multiple photos, especially if they don’t all follow a “theme” so I was a bit dubious of attempting a 12x12 layout with more than one picture as the main focus.  I’m glad I gave it a go as now I love to scrap multiple photos.  I like to trim my pictures so that they are different sizes and focus on the main image with very little background, then I cluster them together; often overlapping them and balance the page by adding embellishments in empty space.


Pol: I don't often use multiple photos on a layout, but when I do I like to get a series of photos printed as a photo booth style strip. That way I don't have to worry about the placement of the photos, just where I want my strip. 

I also like to incorporate the photos into the design. For example here I used different sizes of circle punch for the photos to make them look like the 'bubbles' in the bath. 


Sarah T: By nature pocket scrapbooking uses multiple photos on a layout. When I'm doing my weekly pocket page layouts I sometimes have multiple photos I'd like to use for one event. I'm trying to stick to a one sided layout for each week, but I'm really bad at sticking to one photo. So in this instance I turn to my favourite photo collage app. Picframe. I can group together multiple photos of one event on one 4"x6" photo. 


Roxy: When it comes to scrapbooking I find scrapping multiple photos easier, as the main focus is on the photos rather than the rest of the layout. I like to make my photos different sizes or use a range of small photos, and cluster them together on a layout. To make them stand out, I like to back my favourite photo with foam. The layout below shows this. 


I also like to scrap multiple photos in my travellers notebooks. In this format its easier to do a double spread and span the photos across the pages; this way you can add some journalling or let the photos do the talking. Whatever format you scrap by, don’t be scared to use multiple photos! You will find lots of inspiration in this post!


Lisa-Jane - I’m not very good at limiting my photos and I often use two or more very similar photos on a layout or series just because I can’t bare to not use them! A really quick and simple way that I often use to start a layout with multiple photos is to use the whole width or height of the layout for the photos. Once you’ve placed your 2-3 photos (depending on orientation) you are more limited on your options to use the rest of the real estate which can make decision making a lot easier!
You can fit 3 landscape going vertically...

 ... or two landscape going horizontally...

...or even with a little bit of trimming, 3 x 3inch square photos vertically or horizontally. 

Because these placements don’t involve much decision-making they can be a great way to get me into my creative flow and they can also give me a starting point at a crop too. 


Susan: I find scrapping more than one or two photos quite difficult and the best way for me to include multiple pics is to start with a sketch. You can change any element of a sketch into a photo; the original sketch might have had, for example, squares or rectangles of patterned paper. You can substitute these with photos that layer, tessellate or overlap in exactly the same way as the patterned paper did on the sketch. Your photos do not have to stay as right-angled shapes - try hexagons, circles, ovals, anything you choose! And don’t be worried if part of a photo disappears off the side of your page. One other tip from me; if you want to scrap photos that don’t fit together colour-wise, try matting them all on the same neutral colour to give some cohesion to your page, or you could edit your photos and print them in black and white.

Kirsteen: When telling your story requires a lot of photos have you considered ordering a photo collage from Truprint (other photo printers will have similar products). All the hard work is done for you. All you need to do is cut out the photos and place them on your layout. 


Here's an example of a Truprint collage cut and placed on a 12x12 layout. 

Do you have any tips to share about using multiple photos on a layout?  Leave us a comment... we'd love to hear from you!