Showing posts with label vicci lou. Show all posts

Saturday, 15 July 2017

INK PADS AND STAMPS

Hi lovely Scrappers! Today the team are having a chat about ink pads and stamps...

Claire: I love stamps! I just do not use them enough, I collect and hoard them. I have done a few layouts that have been focused on stamping and I love the end results. However, I think the reason that I don’t stamp more is the fear of messing it up. Stamping is definitely a technique to master. I also own 15 (yes 15) roller phrase stamps and I use these frequently to add finishing touches to my layouts. I generally just stamp these in black Versafine ink and often do a “ghost” stamp where I stamp multiple times without re-inking to get the ombre stamped effect (I feel I’ve just made that term up - ha ha). I think the general consensus for most scrapbookers is that they own stamps and do not use them enough. So, my commitment from here on in is to use my stamps more!

Gemma: I only have a small selection of stamps, which I really need to use more. My favourites are my two rolling stamps, the Shimelle date stamp and a Dear Lizzy phrase stamp. I like to use these as a final touch to a layout, stamping a few lines near a cluster of embellishments. My favourite ink pad is StazOn which I have in black.
If I want to get messy for a mixed media look, I have some of the large Tim Holtz Distress ink pads. I use these with the packaging technique. To do this I stamp the pad straight onto some plastic packaging, then I spray some water on top, which makes the ink react. The ink applied onto cardstock creates a pretty watery effect for a background.


Lisa-Jane: Using ink pads and stamps either alone or together, can really expand your crafting stash in a cost effective way. You can make your own patterned papers to use as backgrounds or extra layers if you don't have the exact piece that you feel you need or you can add little pops of interest and detail with the smallest of stamps, and anything in between. I do use stamps on my layouts now and then and I really need to use them more as I love the extra layers that they can create. I'm a huge fan of Tim Holtz Distress inks and the new Distress Oxides and I definitely wouldn't be without my Vintage Photo ink pad and blending tools for inking the edges of most of my papers etc on a layout. I used to think they were all about the grunge and eleventy billion shades of brown but as you can see from this layout they can also be nice and bright too. This page is from a holiday album where I used a particular collection right the way through. I was getting short on full pages and I had an idea to make a matching background sheet and I was so happy with how it turned out. I used thin washi tape to make a geometric pattern over some white cardstock and then used the blending tool and two bright colours of Distress Ink over the top. I pulled off the washi tape and hey presto, a full, matching, background sheet for the price of a plain sheet of cardstock! The inks and stamps might be an investment to begin with but as long as you choose generic styles or colours you scrap with a lot then you will definitely get your money's worth.


Sarah T: I love the idea of stamping, especially on Pocket Page layouts. I really like; stamping on photos, repeat stamping, creating stamped embellishments, and a good old date stamps. I did some repeat stamping recently as a title card and really loved it. I used an alpha stamp and black StazOn ink. I'm actually really pleased we've covered this topic because stamping is something I'm always keen to do more of and I've picked up loads of tips from the rest of the ladies. I hope you have too.


Vicci Lou: Stamps are by far my fave thing to use ever! I think every new scrapbooker should invest in a couple of cool sets. They're so versatile; mix that in with some scraps and different coloured inks and you can make lots of embellishments, which is great if you're on a small budget. Stamps are great for adding texture and interest to backgrounds and also for adding those little final touches to layouts instead of say enamel dots or sequins. Yes, they are a flat element on the page but if you use the right contrasting colours you can really make them pop!

Kirsteen: I'm more of a collect and hoard kind of stamper. I love the idea of stamping, being able to reuse an image I really love but the reality is my stamp collection lives in a pretty box that I swoon over every now and then.


Susan: Hmm stamping? Not my favourite technique. I am not good at getting an even pressure and so end up with extra ink, or not enough ink, on the finished image. I recently invested in a We R Memory Keepers Precision Press Tool which should help but I haven’t opened it so can’t report back yet (I bought mine from UK company, Cre8tive Online). I have found that ‘you get what you pay for’ both with stamps and with inks and also that it is worth experimenting to get the right ink for the job. I use a lot of inking on the edges of cut papers on my scrapbook pages; it gives a more finished look, I think. Some inks are just too ‘inky’ for that but Tim Holtz Distress Inks do the job perfectly. However, they are hopeless for stamping a crisp, clear image and, to be fair, they were never intended for that purpose. Cheaper stamps and especially some of the freebies on magazine covers, seem to splay out a little and smudge the image; I am happy to pay a bit extra and buy a really good stamp; those from Stampin’ Up, for example, are excellent. And a wee tip - did you know the little round blending foam pads fit perfectly in the bottom of the mini Distress Inks? So you can store each one with its own colour.


Maria: Confession time! I only have a handful of ink pads. Until recently, my idea of stamping on a layout consisted of adding the date with a date stamp! (and I do this on my layouts 90% of the time). However, I have ventured into making a feature of stamping on my layouts in the last few months. It doesn't happen often, but when it does, I go big! I like stamping directly onto the background, and if the cardstock is textured you have to make sure that you are impressing your stamp correctly, otherwise it may not look sharp. And beware the stampers nemesis: dropping your stamp on your layout by mistake! I must confess that it has happened to me more than once! My favourite ink is Versafine; I use it for stamping my date and for other bits and pieces. For colour inks I have a couple of colours of Distress Inks and a couple of colours of Stampin’ Up pads. I am currently saving a bit to invest on some more pads!


Emma C: OK, one thing to remember is not all ink pads are created equally and the one you choose is totally dependent on what you want to do with the image. First of all there are different formulations of ink. Pigment ink, dye ink, hybrid ink, embossing ink, waterproof ink ... I know, it's a minefield! I would recommend checking out Jennifer Maguire’s YT channel as she has great videos explaining the differences between the lot. From a personal point, I love Tim Holtz Distress Inks for water colouring and blending. I use Ranger Archival Jet Black a fair bit because it gives a fab crisp image. I've also recently started using Clearly Kelly Hybrid ink by Hero Arts, which look blotchy to begin with but smooth out when they dry.
In terms of stamps, I prefer to use clear stamps, usually the ones made from photo polymer are of a higher standard and give a better image when stamped. Clear stamps also let you see where you're stamping as you can see through them - bonus.
*psst* Don't worry if you're like me and never clean off your stamps, it doesn't hurt them!

Jess: So I swore I was never going to be a stamper. I tried it a few times with a variety of bad results. I even sold all my studio calico stamp sets online. Then a pen pal sent me a pad of StazOn black ink. This is now the only ink I use. I have a Project Life roller date stamp and a Heidi Swapp stamp set and that's all I use. The StazOn ink is great and as Emma said, its OK to not clean them, especially if you only use one colour. One technique I do like to do is to repeat the stamp until the ink on it has run out, to give kind of a shadow effect. Its a nice quick and easy way to get an interesting feature on a page.


Michelle: I absolutely love to stamp, it's my favourite thing to do! I don't own a massive variety of stamps but the ones I do have are excellent quality and can be used in a range of techniques. I'm not particularly an arty person so the stamps that make up a scene or the stamps that have two parts (dual stamp) are my favourite, when you combine them with good quality ink pads you can use them again and again without your layouts ever looking the same.


Some great hints and tips there from the team, I know I learnt some new ideas too! 

Tuesday, 13 June 2017

Always make you a priority | Vicci Lou | Moodboard


Hey everyone, Vicci Lou here with my take on this months theme which is mood boards. There are two to choose from this month on the UK Scrap Addicts blog, so I'd really love to see what you parts of them inspire your layouts this month.

In general mood boards are definitely one of my favourite things to use to help me create some different pages. I've heard on my travels a lot of people wonder what they are supposed to do with mood boards so firstly before I show you my creation I'd like to try and explain how I designed my page. Basically I sit with a pen and a piece of paper and the mood boards and I jot down the things that jump out to me sometimes it's just colours but more often than not I try to pick out some design elements too. And I often draw little doodles or even a full page idea at the same time as it comes to me. Below I've included my original interpretation (please excuse the handwriting and the bad drawings, haha!) to try and show you what I mean. I've put it alongside a photo of the original sketch so hopefully you can see what I've done.


As you can see from my finished layout below, not every single idea that I originally came to me was used, but that's okay. I love my finished layout and really loved this mood board. So much so I will probably use it again.

This month over at UKSA we have been sponsored by allthingssticky.com. Laura was sent some free goodies and shared them out within the team. so that we could tell you what we thought. We all received some coloured glue dots (more on those in a moment) and i got some double sided tape, which definitely came in handy, as im the worst crafter ever and always run out of adhesive haha. In my opinion the double sided tape is fab, has held my layouts together nicely. and isn't a massive pain when you try to get the backing off which is always a bonus for me as its literally my pet peeve. If you fancy getting your hands on some all things sticky goodies then we have a discount code which will get you 30% off your first order with them just use the code ADDICT30 at the checkout.

On top of all that we have a competition based on our mod boards this month over on the ukscrapaddicts facebook page, enter to be in with a chance of wining a £50 voucher for allthingssticky.com. we hope to see you join us over there for some fun and more competitions i n the following months.

OK, so back to the fun part the layout. this is what i came up with in the end. and i have to say i love it!


Well where to start as it's certainly a busy page even for me, and I have been known to live by Shimelle's quote "more is more, right?!" quite a lot in my scrapping. So, firstly I've not stuck to the exact rainbow colours though there is a variety of colours on the page, but I did decide that a rainbow was going to be a big design element for me so I pulled out the lovely papers from my May Mind the Scrap kit and got to work. I made a basic rainbow shape though it is in no way perfect, but I'm happy with that.


 I then decided that clouds where a must so I hand cut some from pink paper, and punched out some gold glittery hearts from paper that was in my stash. hearts are on the mood board, but i thought that i would be best adding a 'neutral' for want of a better word, which is why i went with gold, well that and its sparkly haha! Once I glued that down I decided I needed to pick some photos. What can I say, the excitement of the rainbow got away with me haha!

So I chose two photos of myself, sometimes you have to scrap yourself and because it was such a girlie mood board I decided to make it all about me. I cut my photos to fit inside the frames and then added a couple more paper layers behind the frames, I decided to have the photos slightly skew-whiff because the rest of the layout was quite whimsical and I didn't want to break away from that. I should mention also that I chose black card stock for my background because I really wanted the colours popping off the page sort of look. I decided to fussy cut some flowers to put behind my photos because that seems to be my thing of the moment (we all have one, what's yours this month? Pop it in the comments on my UK Scrap Addicts Facebook post or in the comments below, if you'd like to share!) I also added a rainbow coloured branding strip at the bottom of the page because it's gorgeous and also because it matched the mood board and also it gives the page some grounding too which I thought worked well with the rainbow.

Next was time for some embellishments, for these I delved into my stash and dug out the arrow and the bird, and the hearts. I also decided to add some embellishments along the branding strip at the bottom so that it would feel a little more connected to the page, rather than it just hanging there.


For the coloured glue dots I tried to stick one onto the background, but with it being black it didn't really show up, and. Also the top side was still sticky which i didn't really want, so i decided to emboss them with some iridescent embossing powder, i love how they turned out. i stuck them to white card stock and smothered them with the embossing powder. once heated up they are like home made enamel dots perhaps a little bigger but the same idea. i decided to use them as raindrops and stick them under my clouds.

i did also add some feathers which i decided to keep black and white, there's already so much colour going on in this page that i felt some black and white elements would complement the other embellishments nicely. I also hand drew my title which is something i never do but i actually like the way it looks, i did it in white pen which i think really made it stand out. it definitely took me a while because normally i would never be so brave, but i did it and i'm please with how it turned out!


 so that's it my finished layout. I think its one of my favourite layouts that I've ever done.

Good luck to anyone who entrees our competition over on the Facebook page, cant wait to see what you all come up with. don't forget to check back the rest of the month and see what the other girls have come up with!

love and bubbles
until next time
Vicci Lou
xxx


Thursday, 1 June 2017

MOOD BOARDS

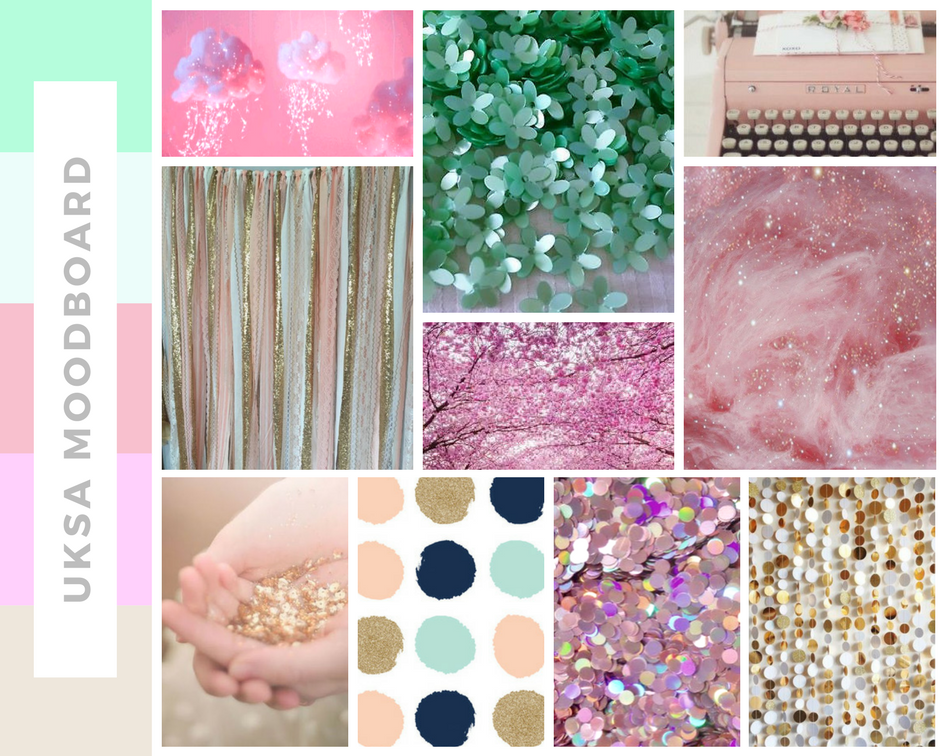
Our monthly theme for June is mood boards. We will all be working with these two gorgeous mood boards over the next few weeks...


In today's joint post we'll talk you through our individual experiences with mood boards and how we use them...

Maria: Mood boards are a brand new discovery for me. I had never used one until just a couple of weeks ago! I had seen them around, especially on challenge blogs and in Facebook groups, but I just never knew what you were supposed to do with them. Now that it has been explained to me and I know what they are, everything is clear and I love the concept. So with a mood board you get a few images that you can take inspiration from. Imagine you have an image of a pink bird, a rainbow and a ballerina ... you could create a layout with birds on it, or feathers, or anything that reminds you of a bird. From the rainbow, you could be literal and use an arch with the rainbow colours, or just be inspired to use the colours in some other way. With the ballerina, you could use a photo of your daughter dancing, or perhaps give your layout lots of texture using fabric or ribbons that resemble a tutu. So there you go, quite easy, as you can make anything you want from it and make it suit your style. I will definitely play along more often with mood boards as it is difficult not to be inspired by them.

Susan: I'm not sure when 'inspiration boards' became 'mood boards' but I do think the former term is more descriptive of the way I like to use them. The first thing I notice when looking at a ready made board is the overall colour scheme and that is the element I am most likely to pick up on for my inspiration. If I don't like the colour palette I probably won't look further into the board. I know some of you will be saying as you read our joint post, "Oh mood boards aren't for me." but I bet you use Pinterest? Pinterest is one huge reference for inspiration and from it you can easily make your own boards. I like to set up boards on Pinterest for different palettes and as I browse I pin things that take my eye - absolutely anything, flower arrangements, postcards, advertisements, room settings, clothing, you name it. I then have ready made inspiration when I need it for my scrapbooking. I noticed recently I have a bit of a stockpile of yellow cardstock, so I've got a yellow inspiration board on the go. Expect a rash of yellow layouts very soon!

Lisa-Jane: As a recent convert to mood boards I am really loving the inspiration they give. When I initially look at the set of pictures, I will usually be drawn to one or two things first and this drives the rest of the inspiration for me. I will probably decide at this point whether the board will be for me or not. You can really quickly get an overall feel (or mood!) for the board just by a quick glance at the colours and textures. Then when I know I definitely want to use that board I will look in more detail at each of the pictures and see what sorts of things I can incorporate and which elements speak to me. I never feel like I have to use all or even most of the elements and I'm happy to add in a rogue colour or texture etc, whatever makes it work for me. There are so many ways to be inspired by the same mood board over and over again by taking the inspiration in different ways and letting the different elements lead you down alternative avenues, for example a single white feather can inspire you to use white, feathers, make you thinking of sleeping on feather pillows, inspire you to scrap about birds, inspire a light and airy feel to your page, encourage you to use fringing, or even to journal about tickling! :)

Jess: I don't often use mood boards as I am more likely to create based on whatever supplies I have available. I have a fairly small stash of products so I go with whatever I have at the time until it's all used up. Saying that though I did create my own mood board on Pinterest. I was falling in love with spring time and spring colours and I wanted to put together a colour scheme to work with. In all honesty it was totally based on some enamel dots that came in a past Studio Calico kit that I loved and couldn't find anywhere again. Pale blue, peach, pink and yellow. All the heart eyes! Putting it together helped me to use products I already had and to choose new products to buy that had the colours that made me happy. When I used a mood board recently for a challenge I found that the finished layout didn't look much like the colour scheme however using at it for inspiration gave me an idea for the layout, a photo I knew I wanted and colours to start with. I still used those colours in my embellishments though and the layout would never have come about if it wasn't for that mood board.


Vicci: mood boards are literally my fave thing to draw inspiration from if I’m feeling I’m out of ideas. I love them because they allow your full creativity and interpretation to roam free but still help to get the creative mojo going. I haven't got a specific thing I always take away from them because each one is different. Sometimes a certain element reminds me of a photo I want to scrap or a story I’d like to tell. Other times it's the colours because often there are colour schemes I would never think to put together myself. More often than not I choose a mixture of the elements and the colours but I also dig deep within the mood board because sometimes there are ‘hidden’ elements that don't always jump out at me straight away. I always draft my layout whilst looking at a mood board for interpretation and I always make notes! Then I go ahead and create my layout!


Laura: I work with mood boards very loosely! Sometimes I get a general overall feel for the board or focus in on just one image; sometimes I'll go with two or three things from a board. This board is lovely, and you'd think you would have to use mint colours. Not so! You could focus in on other things... there are two lots of confetti to inspire you; there are flowers and flowing fabric; there is ombre colour (remember you don't need to use the same mint colour); there are curvy glass vases that could inspire shapes in your layout. Look a little deeper and go with the less obvious choices ...


Sarah: I do love a mood board for inspiration. I was first introduced to them while doing GCSE Graphic Design. We had to produce an A3 sized mood board as part of our coursework; it was my favourite part. I have a board on Pinterest dedicated to mood boards, and often look through the pins to spark some inspiration, be it from the colours or from the images. I find them really useful.

Saturday, 13 May 2017

Vicci Lou | I think I can do I will | Sketch

Hi everyone, I hope that you are all well. Today I'm here to share with you my take on May's theme which is sketches. Over at UKSA "headquarters" (various desks and craftycorners around theUK haha!) we have been working hard on a couple of sketches which I really hope you'll join in with. Don't forget to check back everyday to see what my fellow creative team members have been up to and how they have interpreted the sketches from this month. If you post any layouts based on our sketches be sure to use #ukscrapaddicts as we would all love to see what you do too!

So for me personally sketches are a great way to get out of a crafty slump or get a layout done pretty quickly, which sometimes we all have to do when life is hecktic. I also they that they're great to do with friends as you all have the same starting point but can see where you all differ, with your own personal style. I opted this month to do sketch number one which is a single page layout with a little mixed media thrown in. Mixed media is an avenue of scrapbooking that I'm very new too and therefore I thought of it as a little challenge.

Here is a picture of the original sketch.

Here is a picture of my finished layout.


So being new to mixed media and having many failed attempts before today I decided to just go for blue, I find one colour works best for me at the moment and I'm always much more happy with the results. I used my distress ink in peacock feathers and the good old smooshing or packaging technique whatever you know it as, haha! And smooshed away with some distress ink until I was satisfied with what I had. I then used my march mind the scrap kit for my paper layers and the gold phrase by Heidi Swapp "I think I can" I added the "so I will" with some small letters from a Shimelle Starshine sticker sheet to make my title. The photo is of Spencer when he was around 7 months old in his baby walker which of course is when all the trouble started haha. So I thought the title was pretty fitting.


I kept very close to the sketch for this months page as I was short on time. And just wanted to get a page done to keep the mojo in flow. The only thing I have changed is I added a cluster in the top right hand corner using the same patterned papers I used to layer behind my photo just to add some balance as I felt the page was quite smooshed together (I like that word today... can you tell haha) I also added some phrase stickers to that cluster again from a Shmelle Starshine sticker sheet.


Finally I finished it off with some stars and ink splatters.

All in all I'm happy with this layout and really hope to see what you do with the sketches on the blog this month! 

Speak soon 
Happy scrapping
Love and bubbles
Vicci lou

Saturday, 6 May 2017

NSD | Scrapbook Fails!

For a bit of a giggle on NSD we thought we'd share our biggest scrapbook fails with you!


Emma C: In a layout where I used no photo I wanted the focus to be on a brush script title which I was going to hand letter onto the page.  Great right?  No!  I practised, I sketched it out, I come to do it on camera - nah, not happening!  I’ll link the video here but to quote the lovely Vickie Rich, I went total ‘smudge-mageddon’ on that thing.  The title was not my friend!


Laura: Well, I poke myself with a needle a LOT when I'm hand sewing on a layout.  Fingers, hands, tummy and boobs - nowhere is safe!


Maria: The number one #firstworldscrapproblem for me is size.  Being in the UK, we haven’t got the same variety of products than in the US, so finding something the right size can be an issue sometimes!  Do you want to scrapbook in 8x8?  *Error!*  you will struggle to find decent albums and protectors at a decent price.  Have you heard of 8.5x11 scrapbooking?  You mean A4 in the UK!!  Do you want to buy a lovely single piece of 12x12 paper?  *Error!*  be prepared to pay a hefty price for shipping!  My biggest scrapbook fail so far has been buying albums and page protectors from different manufacturers believing that they would all be compatible. *ERROR!!!*  Each manufacturer will put the holes in slightly different places so you can only use their products.  Not a cheap mistake to make!  I’ve had plenty of little fails too, from smudging ink on a finished layout to pouring half a bottle of Heidi Swapp Color Shine over my page.  Thickers that didn’t glue properly and got lost along the way, or not measuring accurately and cutting the last piece of your favourite patterned paper wrong hence wasting a good chunk of it!  Some people say that there aren’t mistakes in scrapbooking, just opportunities to embellish ... but sometimes not even the biggest embellishment can cover some mistakes!


Susan: Well my first mistake was writing this paragraph then forgetting to save the doc ... grrr!  So, starting again ... I’d like to say all my scrapbooking disasters happened when I first started scrapping but I’d be lying, though there are some Bobby-dazzlers in my early albums!  I am notorious at our crop for cutting, poking or scratching myself and I’ll leave the rest to your imagination, but in future years a forensic scientist will have no trouble in identifying my work.  Any form of liquid is a no-go for me - I cannot get that carefree misting look without it looking too carefree if you know what I mean?  I once knocked over a glass of coke on my desk rendering my laptop useless and, more importantly, drowning a pile of pages waiting for a place in their album.  I have no use for a coffee cup ring stain, stamp or stencil - I can do that all by myself.  And last but not least, please tell me I am not the only person in the world to search through Cricut cartridges for a particular font, pop it in the machine then happily cut the name of the font instead of the title of my page?  Really?  No-one?  Oh dear!


Vicci Lou: Double sided sticky tape the struggle is real.  I walk a very fine line between love and hate for this adhesive.  There's no denying it's cheap and very good at keeping things in place...  So good in fact that half of my scrappy life is spent fighting to get the backing off!  It's like a naughty child though... because as soon as I have my layout complete I sit back and look at it with love and the nail chipped tape struggle is forgotten until next time.


Pol: There was that one time I painstakingly glued tiny confetti hearts in and around a heart shape on my page.  I then decided to tone it down a little by adding watered down Gesso over the top.   Epic FAIL.  It turned the confetti into a sludgy mess and warped my card stock beyond belief.  That one went straight in the bin!  I do a lot of hand stitching on my layouts too, so I've often got one on the go left at the side of the sofa.  I never learn, and they've often had anything from Chinese takeaway to Irn Bru spilled on them.  They've had a few mishaps with small children too! 


Beth: I've had a couple of cat related scrapbook fails...  I've now learnt never to leave the craft room door open if I have layouts on the table!  I've lost count of how many layouts have been ruined by little paw prints, chewed corners or worst of all ... cat sick in the middle of the page!! 


Sarah T: I have more of a confession to make. This is my third year doing Pocket Page scrapping, and I haven't completed the previous two years. Does it bother me!? A little, but all the photos are saved into dated albums on my computer, some are even printed out and in empty page protectors ready to be made pretty. I will finish them, but with a two little ones my hobby takes a sideline sometimes. Plus I'm shocking at time management and procrastinating, I'm sure I could fit more crafty time in if I was a little more disciplined, but thinking about scrapping is part of the hobby too, right?!?


Leave a comment here with your biggest/funniest/most cringe-worthy scrapbook fail (and a way to contact you) and you could win a RAK from one of my wonderful creative team.  Entries close on Sunday 14th May at 9pm.  Winners will be chosen and notified on Monday 15th May 2017.  Prizes posted to UK addresses only.


NSD | Cut File Challenge


Welcome to our next challenge for today... this time we have 4 free digital cut files for you!  We are challenging you to make a new layout based on or featuring any of these cut files.  (I know not everyone has a Silhouette or Cricut, and we cover other ways to use these files in a separate post here.)  There are four prizes up for grabs depending on which file you choose to use - or create 4 layouts each using a different file and be in with a chance of winning all the prizes!!  You can find out how to download our files here.

Here's the break down...

First up is Mandala designed by Emma aka Polly's Papercrafts.  This challenge is sponsored by Hey Little Magpie and the winner will win 1000 Magpie Points which is equal to £10 to spend at Hey Little Magpie!


Please show our sponsor some love: Shop blog Facebook Instagram Pinterest


Here are some examples of the cut file in use...


The second cut file is Flowers designed by Lisa-Jane from Pretty My Page.  Pretty My Page are offering a fun prize bundle to the winner of this challenge.


Please show Lisa-Jane some love: Facebook Instagram

Here are some examples of the cut file in use;


The third free cut file is called Fleur and is designed by Laura.  This challenge is sponsored by Craft Consortium who are offering the winner the Hackney & Co. English Garden premium 12x12 paper pad and stamp set.


You can show Craft Consortium some love here: Website Blog Facebook Instagram Pinterest  

And here is the file in use:


And our last free cut file is Words by Maria.  This challenge is sponsored by Crafty Ribbons who have a £15 voucher for the winner. 


You know the drill by now... please show Crafty Ribbons some love here: website  blog  facebook  instagram  pinterest

And here are some samples from my girls!


and one from Crafty Ribbons DT member Marianne Fisher:


To enter these challenges you need to post a photo of your new layout inspired by one of these cut files in For The Love Of Pretty Paper facebook group on the relevant thread - here.  Entries close on Sunday 14th May at 9pm.  Winners will be chosen and notified on Monday 15th May 2017.  Prizes posted to UK addresses only.