It is the Marmite of the scrapbooking world (and I'm not talking about Fussy cutting!!).
Our theme this month is.......Sewing!!!! (I just heard you groan).
We like to pick themes that really stretch you and push you outside your comfort zone so don't shy away and be sure to join in. We have a whole team of amazingly talented ladies that are ready to show you some ideas as to how you can incorporate sewing (hand or machine) into your scrapbook pages.
I decided to dust off my WeRMemory Keepers Sew Easy tool and put it to work on this layout. I have quite a few attachments for it and it was gathering dust in my drawer so this challenge was the perfect excuse to grab it out and use it!

I decided that I wanted to make my layout 9x12 (I do a mixture of different sizes and I think it helps break up the monotony of 12x12 layouts). I trimmed down my white cardstock to 8.75x11.75 inches and distressed the edges with a distressing tool.
I had already pre chosen my paper that I wanted to back my white cardstock with and it is the rainbow paper from the Rainbow Magic paper pad which is made by Hobbycraft. (It has rainbows, unicorns and clouds in it so this collection is a definite winner for me - hehe).
I used some Heidi Swapp colour shine in Black to add some ink splatters before I began as I didn't want to risk getting the splatters onto my sewing.
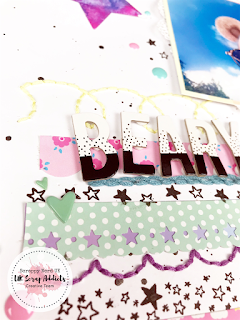
Next I grabbed some border punches and punched out a few strips of paper from the same paper pad. I had this vision in my head of paper strips, stamps and sewing in strips at the bottom half of my page. I can say that it turned out exactly how I imagined it!!
 I layered some paper strips, then I used a star strip stamp with black ink and then my Sew Easy tool pierced the holes for me to add my stitching in. I used 3 different attachments to add different stitching styles. In the straight stitch I did chain stitch and the other 2 I just did a straight back stitch. It created lovely texture and I was really pleased with the result.
I grabbed some black and white Thickers from my stash and added little foam dots underneath each letter to add some dimension for the title. I love the natural shadow it creates underneath the title and stuck these down in a slightly wonky fashion for extra interest.
I finished the layout off with some co-ordinating enamel dots and a couple of 3d stars that I had laying around on my desk from another project I had completed earlier in the day (I love that I managed to put some leftover die cuts to use on another layout).
And here is the finished layout.
So get that sewing needle and thread out and give sewing a go. This shows that a small amount of stitching can still be very effective.
Until next month.......
Claire x


No comments:
Post a Comment
Thanks for your comments...