Showing posts with label sarah toward. Show all posts

Friday, 15 September 2017

PENS

Hi there scrappy friends! Today the team are having a chat about pens...


Laura: I’m a stationery junkie ... I own hundreds of pens.  I’ll share a few of my favourites with you. Generally, for journaling, I want a fine tip.  I love OHTO Graphic Liners for a rich black waterproof ink.  I have them in every width but tend to use the narrowest nib 005 and the widest 10 the most.  I also have a fun novelty kiwi pen that writes beautifully.  For ink that is not black, I reach for my Pigma Micron in blue and brown or my Stabilo Fine Liners which I’ve had for more than a decade! I have a few more favourites too ... a Slick Writer from American Crafts for writing on photos, Pilot Silver and Gold Markers for a touch of metallic (also work well on photos), Faber Castell PITT pens for brush lettering and finally, Derwent’s Graphik Paint Liners.  These are my favourite for art journaling, they are slightly unpredictable and can be ‘incontinent’ which is great for splats and splodges and generally inky fun!


Emma: I’m with Laura, I LOVE stationery - always have, always will! Let’s be honest, there’s nothing quite like the satisfaction of writing with a good pen is there?... No?... Might just be me then - haha! For the rare occasion that I do actually journal on a page, I reach for my Uni-Ball Uni-Pin pens (a bit of a mouthful, I know!). I bought them in a pack of 5 with a range of widths from 0.1mm to 0.5mm. They’re a black, waterproof ink and they write beautifully on cardstock and on glossy photo paper - for me, they’re a good ‘all-rounder’ and I reach for the 0.1mm the most. The Holy Grail of course is The White Pen!  This is a tricky one and it depends what you’re after. I wanted an opaque, bright white pen that would write on cardstock and glossy photo paper and wouldn’t be a pain in the backside (I can say that right?) in terms of smudging. I originally bought the Sakura Gelly Roll pen because so many people had good things to say. However, I made the mistake of buying the Gelly Roll SoufflĂ© pen which writes kind of translucent, goes bright white when dry, which takes ages, and is also kind of raised when dry too. It’s OK for some things but not quite what I was looking for. It also has quite a thick point, making small writing difficult. For a white pen, I would actually recommend the Uni-ball Signo Broad white gel pen. I bought mine from Paperchase but they are widely available I believe. The Signo Broad is the best white pen I’ve found. It writes smoothly. It dries pretty quickly. I have used it on glossy paper with no problems. Although it’s called broad, the tip isn't so big that you can't write small. It’s a nice, opaque, bright white and I would thoroughly recommend!


Michelle: It’s funny that I’m answering this now as I’ve been on the look out for a white pen to write on my photos and have been having a hard time choosing, thanks to Emma I now have a Signo Broad on its way to me which I am super excited to try out! As for what I currently use on my layouts ... I’m not really fussy about brand but it does have to be a gel pen with a fine nib, my writing is awful and that stands out when I use thicker pens. My favourite brand of pens are the Coleto by Pilot and I use a 0.4mm nib for standard journaling. However lately I have fallen in love with brush lettering and although I’ve not been brave enough to try it on a layout I have been adding it to my art journal. I use calligraphy ink, gold is my favourite to use ... it’s so shiny,  and a good quality paint brush, I’m by no means an expert but it does add an interesting dimension to the page!


Lisa-Jane: Another pen hoarder here ;-)  I’m always on the look out for the perfect pen and I actually know what I want, it just doesn’t exist yet!  My favourite pen to write with is a random floral fine tip that I had in my shop last year.  I wouldn’t normally choose a thin pen because I like something more substantial to get hold of but once I used these I fell in love.  Before that I was a huge fan of the common Bic Biro for writing and I will reach for that most often for anything other than on a layout.  The pen I use most often for journaling on my layouts is a Pilot Frixion which can be erased when you make a mistake!  A pen that rubs out??!!  Yes!  Genius!  My only issue with it is that the nib isn’t fine enough for my liking, especially when you are journaling in a small space and have a lot to say.  Ideally I would have a pen that writes like the skinny floral, feels like the Biro, yet has the ability to be rubbed out - if someone could arrange that thanks (or enlighten me as to their existence!).  Colour wise for me it has to be black, I hate writing in any other colour.  I have used a white pen on a black background and I once used a friend’s grey pen on a layout but nothing feels quite right compared to black.


Sarah T: My go-to pens for journaling on my pocket page spreads are definitely my Uni-Pin Fine liners. I use the 0.1 - 0.5 tips as they're super smooth for writing with, I even use them for doodling. I also use the Stabilo coloured pens if I want to journal or doddle in a different colour.


Gemma: So I may not have the pen knowledge of the other Scrap Addicts, but I love to use pens on layouts. I like to outline, add doodle borders and faux stitching in different colours on pages. My favourite pens in my collection are the American Crafts precision pens, Uniball Eye Micro, and for coloured pens I have the Staedtler Triplus fineliners. They all sit in a pen stand on my desk, within arm’s reach.


So there you have it fellow scrappers - the Pen Queens have spoken! 

Friday, 1 September 2017

JOURNALLING

Our monthly theme for September is journalling. Over the next month our creative team's layouts and blog posts will all feature journalling in some way.

In today's joint post the team are discussing if we journal on our layouts, and how we incorporate journalling into our scrapping...


Maria: Journalling is a very important part of scrapbooking for me. 99% of the time I include at least a line or two and the date to my page. On some occasions, I even go the extra mile and tell a whole story behind the photo. Personally, the whole process of scrapbooking is divided 50-50 between memory keeping and a form of art that I get to keep. I have created pages that were all about the art and the products and not so much about the story behind the photo, and those layouts tend to be my least favourite. I spend more time looking at the layouts that tell a story. Unfortunately, though, sometimes journalling comes as an afterthought in the scrapbooking process. If I have a long story to tell, I make sure the journalling is designed into the layout from the beginning. Otherwise, I just find a spot somewhere suitable to add my lines and date.


Michelle: When I create my layouts I create them for future generations of our family, I want them to know who we were, what we felt and the small things that made up our daily lives. I hardly knew my grandparents and have nothing that tells me about the kind of people they were, which is why journalling is so important for me. I tend to journal less on my 12x12 layouts but give short explanations on what was going on in the photograph and why it was important to us at the time. I use a traveller’s notebook as a mini album that I really go all out on the journalling in. I find that I’m not as fussy in my TN and often use scraps from other projects to create my layouts and then I add lots of journalling, sometimes it’s big events, other times I might journal about small things my kids have said or done.


Emma: OK, so in total contrast with the lovely Maria, journalling is really not a priority for me when making a page. It’s the very last thought, and if I do anything it will usually be surface level journalling like; who, where, when, etc. I sometimes feel that I need to make an effort to look a bit deeper and tell more of a story but it doesn't really ever happen. I’ll usually add a couple of lines of journalling, not for the words, but more for the design aspect. For instance, if I feel like the layout needs a bit of balance, I’ll use black pen and write a sentence or two to add weight to certain areas of the page.  I have made more of an effort to journal on pocket page spreads. I have been documenting a trip to Barcelona in a pocket page album and have definitely made more of a conscious effort to record more memories and experiences from the trip. 


Lisa-Jane: I’m guilty of not putting enough journalling on my layouts.  I used to be really good and not consider it finished until I had written a little bit about the event etc.  Now though I do most of my creating at a crop and I find I can’t concentrate enough to write my journalling.  Also I find that I prefer to add my journalling once the layout has been published on-line and then I forget!  I’ve got so many layouts in my albums without their story attached and I really need to go back and sort that out.  Of course, not every layout NEEDS journaling.  Sometimes we take so many pictures and yet we’ve told all the story that there is to tell but we just can’t resist scrapping even more cute photos.   I was scrapping with my little girl the other day and she asked what else she could put on her layout.  I advised her to add some journaling and she said she didn’t really like writing on her layouts because it spoils it and I know what she means.  I know it’s important to have examples of our handwriting etc for future generations but I do find that sometimes the journaling ends up looking untidy.  This is the time to use hidden journaling.  If I’ve wanted to share a particular story but perhaps it is not something I want to share with the world or I don’t want it on the front of the layout for some reason, I have been known to use photos as flaps and then write on the underneath.  Another option is tucking a tag behind one of your layers, and the option I went for in this layout was something called a ‘Scrapalope’.  They probably don’t exist anymore but any envelope will do or you can make a pocket from scrapbooking paper if you are concerned about longevity.  In this layout from quite a few years ago now, I used the Scrapalope to contain a letter to our first baby who we lost a couple of months after this photo was taken.  It’s the only photo of me whilst pregnant with her so I wanted to tuck the journaling away.  It’s still there for me to read  but you have to make an effort to get to it so anyone just browsing my album wouldn’t really bother to read it and would just enjoy the layout as it is.


Jess: For me a page just isn't complete without journalling. The whole reason I scrapbook is to tell my stories. Sometimes that means a whole 6x8 page of text and sometimes it means a few lines on a project life card. I love the creative outlet of scrapbooking but really the words are equally as important as the photo in my eyes. I keep a daily journal that I started for the 100 day project. I use a weekly traveller’s notebook insert from Traveler’s Times on Etsy and each night I fill the 10 lines with a few details of the day. This helps me loads when I'm scrapbooking especially if I get a little behind with project life. I don't always take enough photos so it’s great to look back on what else happened that week that I didn't have photos for. When I'm scrapping one photo at a time I try to think back to how I felt when the photo was taken, what could I hear, what could I smell, what was I feeling, who else was there and what nice or funny moments were there. Doing some of that helps to inform my journalling. Sometimes I will alter the format and write my journalling in the form of a letter, this means I can direct my thoughts to a particular person. I have written letters to my son as well as myself and that makes for much more personal and honest journalling. If all else fails and you just don't know what to write try to imagine you have a friend next to you and they ask, "What is this photo about?" Then write down what you would tell them. 


Pol: I generally add a few lines about the photo, place it was taken etc, to my pages, but because a lot of my layouts are design team work that will be shown to a larger audience, I tend to do my journalling after I've photographed them. Although I scrapbook for the enjoyment of the process, when I do journal I try to include my own handwriting. I never really knew my grandparents and I think how much I'd cherish my Gran's handwriting, or even my mum's when she is no longer here, so I'd like my children and future generations to have a that record of me.


Hidden journaling on the 'Details' tag, a small letter to my daughter tucked away...


Sheena: Journalling on my layouts is a bit hit and miss. Because I also do Project Life I know I’m already telling our stories there so am less concerned what I add to my layouts. If I have something important to record I sometimes write on the back of my layouts.


Susan:  I’m afraid I rarely journal on my pages beyond recording who is on the photo and the date. I am not scrapbooking to record for future generations, and, having read the comments of some of my design team colleagues I wonder if I should be thinking more about recording for posterity. To be honest I regard my scrapbooking  as an artistic hobby; I scrap photos I like, in no particular order, and spend a lot of time on elements of the page such as the title. Occasionally I do write a few lines by way of explanation, but only rarely. I am going to make a determined effort to at least record the circumstances of a photo on the back of my future pages. One thing I do do, though, is incorporate journalling as a feature usually in place of a title, which I will show you more of in my post next week.


Gemma:  Like Susan, I would say I scrapbook as an artistic hobby. I don't journal, but I do always add the date of the photo onto the page, with my roller stamp. This was until recently when I actually tried journalling! I was really pleased with the result, and what it added to the page. I think it's something I want to go back and add to a lot of my layouts as over time I will forget places and events. I do keep a traveller’s notebook which holds stories I want to tell with their photos. I see the journalling in this book as being personal to me, so it's a project I keep for myself. Overall I would definitely say my journalling style is something I am still discovering. 


Sarah:   I like to write a line or two of journalling on my layouts. I go more in depth if I feel there is a story to be told, but as so much of my scrapping is just everyday snaps of my 2 year old there is not always much more to say. I prefer to keep my journalling hidden. Not for privacy, more that my handwriting is a bit hit and miss. I think hiding it on little tags, and in pockets adds a fun interactive element, too. 


Jackie:  I sometimes struggle with journalling straight onto my layouts, but I do like to add hidden journalling on tags when I can. Sometimes if I'm doing a series of layouts from an event, then I will add pocket pages and will use that space to add my journalling. 


Sarah T: As a Pocket Page scrapper journalling is a big part of my layouts. I like to include a little story on each of the photos. Occasionally I need to tell a bit more of the story than I can fit on a little journalling tag, so I'll use a fused on pocket on do some extended journalling on the back.


Thank you for sharing with us! I hope we've helped and inspired you to have a go at this months new challenge featuring journalling!

Saturday, 26 August 2017

Pocket Pages | Sarah Toward | Clustering

Hi there.

It's Sarah T back today sharing a Pocket Page spread featuring this months theme of clustering.  Now if I'm honest every one of my Pocket Page layouts feature clustering.  It's something I do on all my layouts, it helps to tie together all the individual photos and cards and gives it a cohesive look.


As you can see my colour scheme for this layout was red, blue and yellow as well as some pops of black which I added with enamel dots and hearts.


For this insert I actually used a plain white piece of card stock that I embellished.  I used some washi-tape in red, blue and yellow, along with one of the enamel hearts and clustered them together.


I was really keen to use this 3x4" journal card on this layout.  So to tie it in with the other colours I added the washi-tape and enamel hearts again in a cluster.


Here I clustered together a die-cut piece and enamel heart, and added some staples.

This Pocket Page layout features really simple clusters and a look that anyone could achieve easily.  If you head over to my Instagram account @lookwhatsarahcreated, you can see more example of how I use simple clusters across my Pocket Page layouts.

For this layout I used supplies from Elle's Studio, some washi-tape I'd recently picked up from Flying Tiger Copenhagen and some Illustrated Faith enamel hearts.

Thanks for stopping by again today.  Be sure to follow us on Facebook and Instagram, and join in on this months Clustering Challenge with a chance to win a fab prize from this months sponsor Thompsons Craft Supplies.

Hope you can manage to squeeze in some scrappy time today.

xoxo


Wednesday, 26 July 2017

Pocket Page Layout | Sarah Toward | Large Photo

Hi There

Sarah T here today sharing how I used a large photo in my Pocket Page scrapping.  I'll be honest I've never actually used a large photo in my Pocket Page layouts before this one.  I've wanted to, but my weeks are usually very photo heavy, so to take up multiple pockets with one photo wouldn't really be an option.  That is until I went back to finish some of my 2016 Pocket Page album and I came across a week where I only had photos available from two days of that week.

The photo I used needed to fill four pockets totalling an 8x8" area.  I don't have any fancy editing software, so I just used the iPhotos program on my iMac.


In iPhoto I was able to go into the print section, here I was able to choose the size of the photo paper I was going to print on, and then choose a custom size for the photo.


I printed the photo and trimmed it down, and then cut it into 4x4" squares.


Here you can see the photo cut into the four individual sections to go into the pockets.  I chose to embellish the top two sections, including that gorgeous flair from Bramble Fox.


And this is the final layout, featuring the large photo.  These five photos were the only ones I took this week, without the large photo there would have been a lot of empty pockets.

I will definitely use a large photo again in a Pocket Page layout, especially if I don't have a lot of photos available for that week as its a good way to use up pockets.

Here's a few more close ups of the spread.


I used last years Fancy Pants, Millie & June collection to create this weeks layout, along with some Kaitlin Sheaffer free printable labels and Shimelle puffy hearts from the Go Now Go collection.

Thanks for stopping by UK Scrap Addicts again today, don't forget to stop by the UKSA Facebook page where you can have a go at our challenge of using large photos in a layout and be in with a chance of winning a stash of goodies from our sponsor this month Bramble Fox.

See you all again soon.

xoxo


Saturday, 15 July 2017

INK PADS AND STAMPS

Hi lovely Scrappers! Today the team are having a chat about ink pads and stamps...

Claire: I love stamps! I just do not use them enough, I collect and hoard them. I have done a few layouts that have been focused on stamping and I love the end results. However, I think the reason that I don’t stamp more is the fear of messing it up. Stamping is definitely a technique to master. I also own 15 (yes 15) roller phrase stamps and I use these frequently to add finishing touches to my layouts. I generally just stamp these in black Versafine ink and often do a “ghost” stamp where I stamp multiple times without re-inking to get the ombre stamped effect (I feel I’ve just made that term up - ha ha). I think the general consensus for most scrapbookers is that they own stamps and do not use them enough. So, my commitment from here on in is to use my stamps more!

Gemma: I only have a small selection of stamps, which I really need to use more. My favourites are my two rolling stamps, the Shimelle date stamp and a Dear Lizzy phrase stamp. I like to use these as a final touch to a layout, stamping a few lines near a cluster of embellishments. My favourite ink pad is StazOn which I have in black.
If I want to get messy for a mixed media look, I have some of the large Tim Holtz Distress ink pads. I use these with the packaging technique. To do this I stamp the pad straight onto some plastic packaging, then I spray some water on top, which makes the ink react. The ink applied onto cardstock creates a pretty watery effect for a background.


Lisa-Jane: Using ink pads and stamps either alone or together, can really expand your crafting stash in a cost effective way. You can make your own patterned papers to use as backgrounds or extra layers if you don't have the exact piece that you feel you need or you can add little pops of interest and detail with the smallest of stamps, and anything in between. I do use stamps on my layouts now and then and I really need to use them more as I love the extra layers that they can create. I'm a huge fan of Tim Holtz Distress inks and the new Distress Oxides and I definitely wouldn't be without my Vintage Photo ink pad and blending tools for inking the edges of most of my papers etc on a layout. I used to think they were all about the grunge and eleventy billion shades of brown but as you can see from this layout they can also be nice and bright too. This page is from a holiday album where I used a particular collection right the way through. I was getting short on full pages and I had an idea to make a matching background sheet and I was so happy with how it turned out. I used thin washi tape to make a geometric pattern over some white cardstock and then used the blending tool and two bright colours of Distress Ink over the top. I pulled off the washi tape and hey presto, a full, matching, background sheet for the price of a plain sheet of cardstock! The inks and stamps might be an investment to begin with but as long as you choose generic styles or colours you scrap with a lot then you will definitely get your money's worth.


Sarah T: I love the idea of stamping, especially on Pocket Page layouts. I really like; stamping on photos, repeat stamping, creating stamped embellishments, and a good old date stamps. I did some repeat stamping recently as a title card and really loved it. I used an alpha stamp and black StazOn ink. I'm actually really pleased we've covered this topic because stamping is something I'm always keen to do more of and I've picked up loads of tips from the rest of the ladies. I hope you have too.


Vicci Lou: Stamps are by far my fave thing to use ever! I think every new scrapbooker should invest in a couple of cool sets. They're so versatile; mix that in with some scraps and different coloured inks and you can make lots of embellishments, which is great if you're on a small budget. Stamps are great for adding texture and interest to backgrounds and also for adding those little final touches to layouts instead of say enamel dots or sequins. Yes, they are a flat element on the page but if you use the right contrasting colours you can really make them pop!

Kirsteen: I'm more of a collect and hoard kind of stamper. I love the idea of stamping, being able to reuse an image I really love but the reality is my stamp collection lives in a pretty box that I swoon over every now and then.


Susan: Hmm stamping? Not my favourite technique. I am not good at getting an even pressure and so end up with extra ink, or not enough ink, on the finished image. I recently invested in a We R Memory Keepers Precision Press Tool which should help but I haven’t opened it so can’t report back yet (I bought mine from UK company, Cre8tive Online). I have found that ‘you get what you pay for’ both with stamps and with inks and also that it is worth experimenting to get the right ink for the job. I use a lot of inking on the edges of cut papers on my scrapbook pages; it gives a more finished look, I think. Some inks are just too ‘inky’ for that but Tim Holtz Distress Inks do the job perfectly. However, they are hopeless for stamping a crisp, clear image and, to be fair, they were never intended for that purpose. Cheaper stamps and especially some of the freebies on magazine covers, seem to splay out a little and smudge the image; I am happy to pay a bit extra and buy a really good stamp; those from Stampin’ Up, for example, are excellent. And a wee tip - did you know the little round blending foam pads fit perfectly in the bottom of the mini Distress Inks? So you can store each one with its own colour.


Maria: Confession time! I only have a handful of ink pads. Until recently, my idea of stamping on a layout consisted of adding the date with a date stamp! (and I do this on my layouts 90% of the time). However, I have ventured into making a feature of stamping on my layouts in the last few months. It doesn't happen often, but when it does, I go big! I like stamping directly onto the background, and if the cardstock is textured you have to make sure that you are impressing your stamp correctly, otherwise it may not look sharp. And beware the stampers nemesis: dropping your stamp on your layout by mistake! I must confess that it has happened to me more than once! My favourite ink is Versafine; I use it for stamping my date and for other bits and pieces. For colour inks I have a couple of colours of Distress Inks and a couple of colours of Stampin’ Up pads. I am currently saving a bit to invest on some more pads!


Emma C: OK, one thing to remember is not all ink pads are created equally and the one you choose is totally dependent on what you want to do with the image. First of all there are different formulations of ink. Pigment ink, dye ink, hybrid ink, embossing ink, waterproof ink ... I know, it's a minefield! I would recommend checking out Jennifer Maguire’s YT channel as she has great videos explaining the differences between the lot. From a personal point, I love Tim Holtz Distress Inks for water colouring and blending. I use Ranger Archival Jet Black a fair bit because it gives a fab crisp image. I've also recently started using Clearly Kelly Hybrid ink by Hero Arts, which look blotchy to begin with but smooth out when they dry.
In terms of stamps, I prefer to use clear stamps, usually the ones made from photo polymer are of a higher standard and give a better image when stamped. Clear stamps also let you see where you're stamping as you can see through them - bonus.
*psst* Don't worry if you're like me and never clean off your stamps, it doesn't hurt them!

Jess: So I swore I was never going to be a stamper. I tried it a few times with a variety of bad results. I even sold all my studio calico stamp sets online. Then a pen pal sent me a pad of StazOn black ink. This is now the only ink I use. I have a Project Life roller date stamp and a Heidi Swapp stamp set and that's all I use. The StazOn ink is great and as Emma said, its OK to not clean them, especially if you only use one colour. One technique I do like to do is to repeat the stamp until the ink on it has run out, to give kind of a shadow effect. Its a nice quick and easy way to get an interesting feature on a page.


Michelle: I absolutely love to stamp, it's my favourite thing to do! I don't own a massive variety of stamps but the ones I do have are excellent quality and can be used in a range of techniques. I'm not particularly an arty person so the stamps that make up a scene or the stamps that have two parts (dual stamp) are my favourite, when you combine them with good quality ink pads you can use them again and again without your layouts ever looking the same.


Some great hints and tips there from the team, I know I learnt some new ideas too! 

Monday, 26 June 2017

Week 17 | Sarah Toward | Moodboard

Hi there

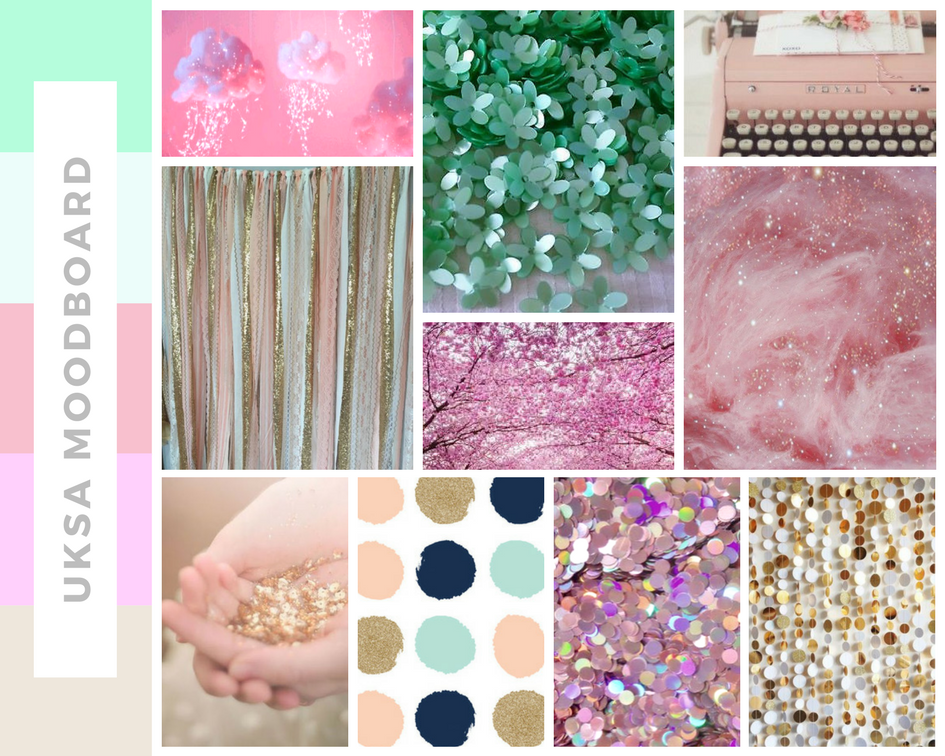
I'm here today sharing my Pocket Page layout based on a moodboard.  I find moodboards really inspiring, not just for the colours but for the different images and shapes they have too.


When I first saw the two moodboards for this months assignment I was instantly drawn to this one.  I just love the pinks and mints, and I really love typewriters and clouds and have no problem using these images in my scrapping.  Oh and that hint of navy in the circular splodges at the bottom, one of my favourite colours.  Seriously, what's not to love about this moodboard?


I went into my stash and had no problem finding pink and mint papers to use.  I also had some die-cuts left from the Dear Lizzy, Fine and Dandy collection and they worked perfectly.


I was so excited to use this typewriter paper again, the tone of pink is spot on too.  I had some navy polka dot washi-tape which I've used throughout the layout as well.


I used my Silhouette Portrait to cut some little clouds, and the stripy mint faux washi strips.


I'd been hanging onto this typewriter die-cut as I really liked it and wanted to save it for the right occasion.  I can't remember what it said underneath, but I used a Tim Holtz word phase sticker as I preferred this sentiment.


I liked all the shiny things on the moodboard (I'm a bit of a magpie), so I knew I wanted to include a shiny element to the layout.  I decided these stickers from Paperchase were just right as they were also the perfect colours too, and not my obvious go to shiny element, sequins.

One of the main reasons I enjoyed using this moodboard is that it has made me go back through my stash and use up papers and embellishments, and I've got plenty to go back and use up.  So if you are looking to use up some stash then have a look at some moodboards and get inspired.

Thanks for dropping in again today, be sure to pop back soon for more moodboard inspiration.

xoxo


Thursday, 1 June 2017

MOOD BOARDS

Our monthly theme for June is mood boards. We will all be working with these two gorgeous mood boards over the next few weeks...


In today's joint post we'll talk you through our individual experiences with mood boards and how we use them...

Maria: Mood boards are a brand new discovery for me. I had never used one until just a couple of weeks ago! I had seen them around, especially on challenge blogs and in Facebook groups, but I just never knew what you were supposed to do with them. Now that it has been explained to me and I know what they are, everything is clear and I love the concept. So with a mood board you get a few images that you can take inspiration from. Imagine you have an image of a pink bird, a rainbow and a ballerina ... you could create a layout with birds on it, or feathers, or anything that reminds you of a bird. From the rainbow, you could be literal and use an arch with the rainbow colours, or just be inspired to use the colours in some other way. With the ballerina, you could use a photo of your daughter dancing, or perhaps give your layout lots of texture using fabric or ribbons that resemble a tutu. So there you go, quite easy, as you can make anything you want from it and make it suit your style. I will definitely play along more often with mood boards as it is difficult not to be inspired by them.

Susan: I'm not sure when 'inspiration boards' became 'mood boards' but I do think the former term is more descriptive of the way I like to use them. The first thing I notice when looking at a ready made board is the overall colour scheme and that is the element I am most likely to pick up on for my inspiration. If I don't like the colour palette I probably won't look further into the board. I know some of you will be saying as you read our joint post, "Oh mood boards aren't for me." but I bet you use Pinterest? Pinterest is one huge reference for inspiration and from it you can easily make your own boards. I like to set up boards on Pinterest for different palettes and as I browse I pin things that take my eye - absolutely anything, flower arrangements, postcards, advertisements, room settings, clothing, you name it. I then have ready made inspiration when I need it for my scrapbooking. I noticed recently I have a bit of a stockpile of yellow cardstock, so I've got a yellow inspiration board on the go. Expect a rash of yellow layouts very soon!

Lisa-Jane: As a recent convert to mood boards I am really loving the inspiration they give. When I initially look at the set of pictures, I will usually be drawn to one or two things first and this drives the rest of the inspiration for me. I will probably decide at this point whether the board will be for me or not. You can really quickly get an overall feel (or mood!) for the board just by a quick glance at the colours and textures. Then when I know I definitely want to use that board I will look in more detail at each of the pictures and see what sorts of things I can incorporate and which elements speak to me. I never feel like I have to use all or even most of the elements and I'm happy to add in a rogue colour or texture etc, whatever makes it work for me. There are so many ways to be inspired by the same mood board over and over again by taking the inspiration in different ways and letting the different elements lead you down alternative avenues, for example a single white feather can inspire you to use white, feathers, make you thinking of sleeping on feather pillows, inspire you to scrap about birds, inspire a light and airy feel to your page, encourage you to use fringing, or even to journal about tickling! :)

Jess: I don't often use mood boards as I am more likely to create based on whatever supplies I have available. I have a fairly small stash of products so I go with whatever I have at the time until it's all used up. Saying that though I did create my own mood board on Pinterest. I was falling in love with spring time and spring colours and I wanted to put together a colour scheme to work with. In all honesty it was totally based on some enamel dots that came in a past Studio Calico kit that I loved and couldn't find anywhere again. Pale blue, peach, pink and yellow. All the heart eyes! Putting it together helped me to use products I already had and to choose new products to buy that had the colours that made me happy. When I used a mood board recently for a challenge I found that the finished layout didn't look much like the colour scheme however using at it for inspiration gave me an idea for the layout, a photo I knew I wanted and colours to start with. I still used those colours in my embellishments though and the layout would never have come about if it wasn't for that mood board.


Vicci: mood boards are literally my fave thing to draw inspiration from if I’m feeling I’m out of ideas. I love them because they allow your full creativity and interpretation to roam free but still help to get the creative mojo going. I haven't got a specific thing I always take away from them because each one is different. Sometimes a certain element reminds me of a photo I want to scrap or a story I’d like to tell. Other times it's the colours because often there are colour schemes I would never think to put together myself. More often than not I choose a mixture of the elements and the colours but I also dig deep within the mood board because sometimes there are ‘hidden’ elements that don't always jump out at me straight away. I always draft my layout whilst looking at a mood board for interpretation and I always make notes! Then I go ahead and create my layout!


Laura: I work with mood boards very loosely! Sometimes I get a general overall feel for the board or focus in on just one image; sometimes I'll go with two or three things from a board. This board is lovely, and you'd think you would have to use mint colours. Not so! You could focus in on other things... there are two lots of confetti to inspire you; there are flowers and flowing fabric; there is ombre colour (remember you don't need to use the same mint colour); there are curvy glass vases that could inspire shapes in your layout. Look a little deeper and go with the less obvious choices ...


Sarah: I do love a mood board for inspiration. I was first introduced to them while doing GCSE Graphic Design. We had to produce an A3 sized mood board as part of our coursework; it was my favourite part. I have a board on Pinterest dedicated to mood boards, and often look through the pins to spark some inspiration, be it from the colours or from the images. I find them really useful.