Showing posts with label niki rowland. Show all posts

Saturday, 21 April 2018

I Believe in Unicorns | Niki Rowland | Tags


Hey there UK Scrap Addicts! Niki here with you today and I am sharing my layout made to this month's theme, which is to use tags on our layouts.

I was away on holiday when I made this layout so was a bit limited on what products I had with me. I pulled out my 'use it or lose it' pouch of embellishments and sorted through to see if I had any pre-made tags. I had four from an older Maggie Holmes collection but together they didn't really work with the look I was going for.


So instead of making those the focus of my layout I pulled out a cut-apart sheet from the Dear Lizzy Stay Colorful collection. There were tags, journaling cards and banner-style tags too. I cut them all out and arranged onto my layout. I also tucked in some of the Maggie Holmes tags I had initially pulled out too, in an effort to use up some of those older embellishments.


I added waxed thread through all the tags - I spiraled them through the holes a few times so I didn't have any loose ends, and then stuck everything down, raising up the top edges of my tags on foam pads for added dimension.

I added a title, my journaling, some splatters and some embellishment clusters as well as some fussy cut flowers.

I have a process video of my layout available for you to view below:

Thanks so much for joining me today. Today is my last post and Process Video for UK Scrap Addicts - I'm expecting a baby in August and need to reduce my Design Team commitments a bit so it seemed sensible to take my break now, just in time for the new Design Team to start - what a talented bunch of ladies are joining us in May, I can't wait to see what amazing inspiration they bring to UK Scrap Addicts.

Thank you so much for having me over the last year or so, I've really enjoyed being on the team - it's been a blast.

Happy scrapping xxx

Wednesday, 21 March 2018

Time for Tea | Niki Rowland | Moodboard


Hey there UK Scrap Addicts! Niki here with my take on the theme for this month which is this gorgeous moodboard.

 Whenever I use a moodboard for inspiration I usually make a list of things I see and this is my list for this one:
cake
birthday
flowers
balloons
confetti
jars
happy/girls/pretty
frames
disco/multicoloured background/bokeh effect
stars
polka dots
Colours: pink, dark pink, turquoise, gold, black, purple and orange

This is why I love moodboards so much - that list is huge!

I decided to scrap photos from a recent afternoon tea and decided to go with a cupcake for my main focus. I absolutely love the free cut file that UKSA are giving away this month but it just didn't go quite right with my photos as it's more of a birthday cake and this wasn't anyone's birthday. So I downloaded a Cupcake cut file from the Silhouette Design Store instead.

I then spent quite a bit of time backfilling all the different parts of the cupcake.


I have used the Shimelle Glitter Girl collection for this layout. I'm doing some stash busting at the moment and this is one of the collections that needs to get used up and the colours were perfect. 

Once the cupcake was filled, I then added clusters of floral stickers to either side of my cupcake and used these as places to put my photos. I built them up and added two titles using small alpha stickers and a large glittery title too - the word 'Happy' to make use of the quote in the moodboard.


I finished off my scattering sequins from the top of the page (inspired by the confetti in the moodboard) and added my journaling around the edge of the cake.

I had great fun making this layout and love the end result. Such a fab moodboard made it very easy. I've made a video of my process for you to view below:


Thank you so much for joining me today, happy scrapping!


Wednesday, 21 February 2018

Happy Heart | Niki Rowland | Choose a Shape


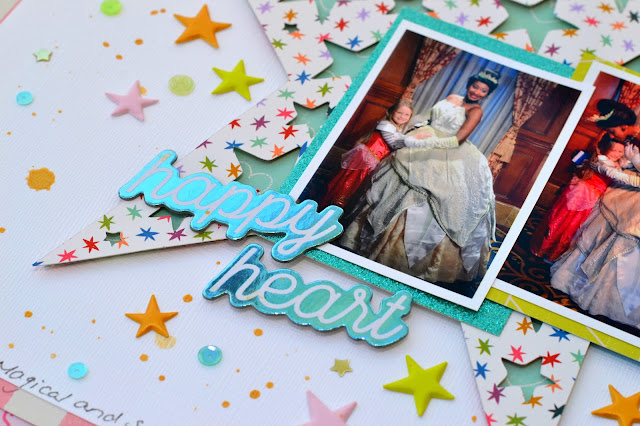
Hey there UK Scrap Addicts! Niki here with you today. This month's theme is to choose one shape and carry that through your layout. I've chosen a star shape. I Started off by cutting a star cut file out of star patterned paper (cut file is a freebie from the Stick it Down challenge blog) which I then backfilled using turquoise paper. Becuase the star cut file was cut from a busy patterned paper the internal stars needed something solid behind them to make them stand out.


Once my cut file was in place, I added my photos and a large star tassle embellishment to the right. These were by Dear Lizzy and the ribbons came in all different colour and this one happened to go really well with my layout and photos.


I then went through my stash and pulled out as many star embellishments as I could find. I was predominantly using the Wild Child collection by Pink Paislee but many of the stars in that were from the boy collection and too dark for my layout but I managed to find a few that worked. I also had three packs of puffy star stickers from Freckled Fawn so I went a bit crazy adding those in coordinating colours.


I added gold Heidi Shine splatters and drops and then went looking for sequins. I pulled out a few sequins in the right colours as well as some tiny gold star sequins too. I dotted these around my background.


And after adding some journaling at the bottom that's my layout complete. I have made a process video for you to view below.


Thank you so much for joining me today, I hope you've enjoyed my layout and my process video - see you next month and happy scrapping xx

Find me on my own blog: Being Scrappy and on Instagram as @nikiclaire


Sunday, 21 January 2018

Love my Boyz | Niki Rowland | Sketch


Hey there, it's Niki here today and this month the Design Team are all following a PageMaps Sketch and what a fabulous sketch it is. The beauty of a sketch is that it can be used in multiple different ways - it can be used in it's original format, rotated, flipped or you could just take some elements from it and use it as a starting point.


I have stayed reasonably close to the original design, in that I have kept to the original orientation. I have adapted it to what I want to scrap though, so instead of two photos, I've used just one and have used a journal card in the place of the other photo. I've left out a layer and the stitching, turned the tag the other way and extended the embellishment areas.


You can still see the sketch within my layout but I've changed it a little to suit my style of scrapping. I've used Crate Paper Main Squeeze for this layout, together with a Paige Evans cut file and some other bits and pieces from my stash.


I've created a process video of this layout which you can view below.


I hope you have enjoyed my layout and video today - see you next month and happy scrapping xx

Find me on my own blog: Being Scrappy and on Instagram as @nikiclaire


Thursday, 21 December 2017

December Album | Niki Rowland | Festive Scrapbooking


Hey there, Niki here with you today and I'm sharing my take on 'Festive Scrapbooking'. I make a December Daily style album each year. I've done the same format for a few years now and this year is no exception. I use a 6x8" album and I complete all my base pages before December and then just add my photos and journalling as I go along in December.

Today I'm sharing four of my December Album pages, Days 21 - 24 and have made a proces video that you can see below.


My numbers are wood veneer shapes by Freckled Fawn and I've used these three times now to make my numbers. I did something different last year but this year I've gone back to these. However this is my last packet so I'll have to do something different next year! They come a numbers 1 - 31 and I simply back them with patterned paper or glitter paper.

When creating my base pages I create clusters and leave myself lots of space for adding photos and journaling.


Here are my pages for Christmas Day. While I only dedicate one single page to each other day, I always do two for Christmas day, with the page on the left being for a whole 6x8 printed photo. I've added the chipboard sticker 'Merry Christmas' and the theory is that this will sit on the photo itself - whether this will actually work ok or not will depend on the photo I take on the day.

Now onto the second part of today's blog post...I did the base pages above by mid-end of November (I like to be all done nice and early). The pages below however, were completed on the 11th December. The base pages had been done in November but on 11th December I sat down to add all my photos and to write in my journaling. I've prepared a process video which includes the making of the base pages above and the adding of photos and journaling on the pages below. You can view it below.


Adding my photos and journaling is a really quick process. I have done all the hard work already by creating the base pages so it is simply a matter of sticking my photos down and adding my writing!


This little page here is an added bonus. I had that gorgeous green tree acetate that you can just see a little bit of, in a 5x7 page protector but I had to put a piece of white card behind it as it didn't look right otherwise. So I have decorated the reverse of the white card and made it into an extra bonus page!


Here I have another bonus page. The page on the right is a piece of 6x6 paper from the FaLaLa Paper pad. I've made it double sided and added hole reinforcers and it sits directly within the book rings of the album rather than in a page protector. These can be added anywhere in my album but this works particularly well here as I have some additional photos for day 9.

And here is the reverse of this page. This brings me right up to date at the date of writing this/filming the video. Hurrah. And it didn't take very long at all.

I absolutely LOVE creating a December Album each year, it is my favourite project of the whole year and I'm alway delighted when it's finished, which is alway very early on in the new year. I find this way of working works so well for me and always results in a finished album.

Thanks so much for joining me today for this epic blog post and video! 
Merry Christmas from me xxx 

Find me on my own blog: Being Scrappy and on Instagram as @nikiclaire


Tuesday, 21 November 2017

Boys will be Boys | Niki Rowland | Black & White Photos


Hi there UK Scrappers! Niki here with you today with a layout and process video. Our theme this month is to use black and white photos.

I often don't use black and white photos becuase I think they lose detail when the colour is gone. I tend to only use them if I have close up portrait shots of faces, rather than pictures of everyday life. I think that black and white can change the mood and tone of a photo, quite dramatically. This is all great, but only on the right sort of photos, so I lean away from converting my photos. BUT I embraced this month's theme of course and didn't have any moody portrait shots available so choose three photos of my little boy, doing boy type things, playing on a play area. The photos look great in black and white and I now officially challenge myself to print more black and white photos!


I started off with my title which I cut on the Silhouette. This cut file is available in the Silhouette Design Store. I stuck it in place and then built the rest of my layout around the title. I arranged my three photos on the right side of the page and then started embellishing.

You can see my process video of this layout below.


 I used the Shimelle Little by Little collection coupled with embelishments from Wish you Were Here by Pretty Little Studio. I added lots of different types of embellishments to my layout so that it had dimension and textures.


I hope you have enjoyed my layout and video - see you next month!
Happy scrapping xx

Find me on my own blog: Being Scrappy and on Instagram as @nikiclaire