Showing posts with label pocket pages. Show all posts

Tuesday, 26 December 2017

Christmas Journal 2017 / Jackie Ashton / Festive Scrapbooking

Hello scrappers, Jackie here, how was your Christmas Day? I do hope you have all had a wonderful time and got some fab presents.

Why not grab a cuppa and have a catch up with my blogpost.

I’m sharing a few of my 2017 Christmas Journal pages.   I decided this year to do a 12 x 6 album which is a completely different size for me, and one I found so easy to do and keep up with  The album is a We R Memory Keepers one, and is blue, which hasn’t bothered me yet, as it not the traditional Christmas colour that you can see on line.

 I started by  prepping for my album at my October crop, by making the date markers, and cutting some of the 12x12 sheets down to size.


 I decided this year to do a 12 x 6 album which is a completely different size for me, and one I found so easy to do.  The album is a We R Memory Keepers one, and is blue, which hasn’t bothered me yet, as it not the traditional Christmas colour.  As well as the 12 x 6 pages, I've also added divided pages.


My albums is a mixture of Christmas prompts and December daily events throughout December, so some days I have added extra filler pages as I wanted to include more photographs and journalling to document what we have been unto.  I've also done some filler pages, like this one 'Red Cup' that doesn't particularly have a place within the month activities but one I wanted to include in the album.


 As you will see from my pages. I’ve used a variety of patterned papers, some new, some old, some Christmas theme and some everyday theme, and I so happy with how it give a different perspective to the album so far.  I did purchase a Christmas Kit, which had a complete mix of patterned papers and embellishments and I used this and more from my stash.


I've also when needed added more than one page and included more photographs, when I wanted to document a particular event, like my 1st of the month, when my friend Julie took me to see 'STEPS' for my birthday, it ended up being 3 sides - a 12 x 6 and both sides of the divided pocket pages opposite.


Then for the 2nd I included the announcement that I had been chosen for the 'Scrap the Boys' DT team ... I'm super excited


4th - wrapping - Christmas prompt regarding wrapping paper and also additional photo of me and James visit to Starbucks.


 We had snow, and quite a lot of it, which lasted a few days, so for the 8th, 9th, 10th & 11th  - I added snow photographs to a more than one of the pages, and also added additional pages for these days which had some general December daily entries.


7th - A divided protector for this entries and I spread the one entry over the 3 pockets.


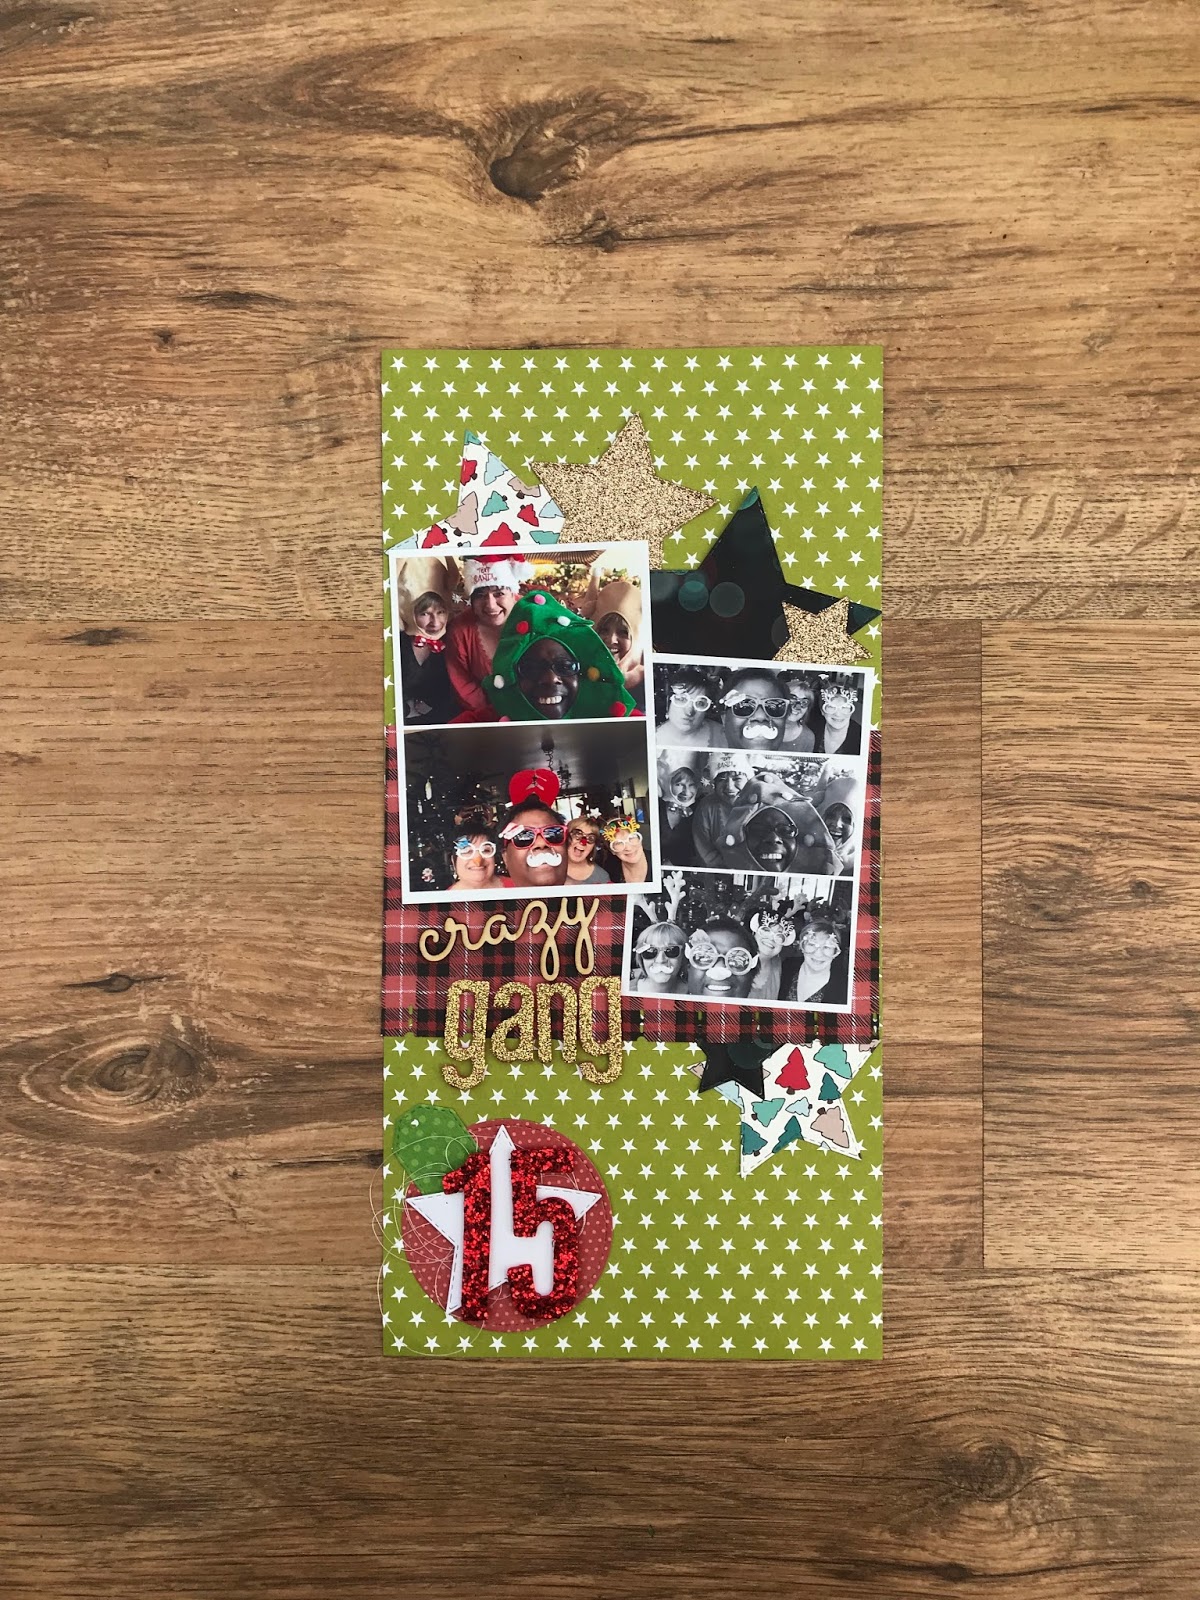
15th - visiting my lovely friend Sue, with Barbara and Julie ended up with us taking some fab selfies in various Christmas headgear.


 I’ve surprised myself by keeping up and hoping that I can complete the pages until the end of the year.  And pleased now full my albums is looking.


Thanks for stopping by, and see you next year

Happy New Year to your all


Sunday, 27 August 2017

Week in the Life | Michelle Mills (UglyBugPlans) | UK Scrap Addicts | Clustering

Hey UKScrapAddicts, I hope you are well? You probably know by now that this months theme that we are covering is "Clustering" as in the clustering of embellishments. To be honest I wasn't really aware that this was a "thing" I just thought we stuck our embellies where we fancied them but since the topic came up I have been noticing patterns in not only my own layouts but the layouts of other YouTubers  and have noticed a few things:


Most of us work in threes, three colours, three embellishments etc, I'm not sure why but it definitely looks more pleasing to the eye.

We use embellishment clusters to draw our eye to certain points in the photo we are scrapping or to draw our eye around the page of a pocket page layout. If my layouts are quite busy in one area yet lack in another I tend to add an embellishment cluster there to bring your eye to that spot.

For this layout I'm using the last LottieLovesPaper kit, its such a bright and fun kit and the puffy stickers are to die for!

https://youtu.be/hV8B-LWp1n8

I hope you enjoy the video, you can find me over on my blog or YouTube channel and of course I will see you back here the same time next month.

Much love
Michelle xx


Saturday, 26 August 2017

Pocket Pages | Sarah Toward | Clustering

Hi there.

It's Sarah T back today sharing a Pocket Page spread featuring this months theme of clustering.  Now if I'm honest every one of my Pocket Page layouts feature clustering.  It's something I do on all my layouts, it helps to tie together all the individual photos and cards and gives it a cohesive look.


As you can see my colour scheme for this layout was red, blue and yellow as well as some pops of black which I added with enamel dots and hearts.


For this insert I actually used a plain white piece of card stock that I embellished.  I used some washi-tape in red, blue and yellow, along with one of the enamel hearts and clustered them together.


I was really keen to use this 3x4" journal card on this layout.  So to tie it in with the other colours I added the washi-tape and enamel hearts again in a cluster.


Here I clustered together a die-cut piece and enamel heart, and added some staples.

This Pocket Page layout features really simple clusters and a look that anyone could achieve easily.  If you head over to my Instagram account @lookwhatsarahcreated, you can see more example of how I use simple clusters across my Pocket Page layouts.

For this layout I used supplies from Elle's Studio, some washi-tape I'd recently picked up from Flying Tiger Copenhagen and some Illustrated Faith enamel hearts.

Thanks for stopping by again today.  Be sure to follow us on Facebook and Instagram, and join in on this months Clustering Challenge with a chance to win a fab prize from this months sponsor Thompsons Craft Supplies.

Hope you can manage to squeeze in some scrappy time today.

xoxo


Thursday, 27 July 2017

Pocket Page Layout | Michelle (UglyBugPlans) | Large Photo

Hey UK Scrap Addicts, Michelle here from UglyBugPlans with this months layout which had the theme "Large Photo".

To be totally honest I have never used such a large photo on any of my layouts before, initially I had intended to create a traditional 12x12 layout but I've been really drawn back to pocket pages lately so decided to take a risk. I am so pleased I did as it really paid off and I love the finished layout!

For a couple of week's I'd been meaning to pop to my local printers to have a photo printed off and had started to worry that I wouldn't get the chance, for some silly reason I hadn't thought of the stack of A4 photo printer sat on my desk.. once I realised that I could print it at home, from my phone I only had to decide which photo to use.

I chose a large photo of my middle daughter and then smaller pictures of my other 2 children all taken at the same birthday party that we attended a week or so ago.

The papers and journalling cards that I used are from the new Stampin' Up! catalogue and the thickers, die cuts and embellishments were from a recent shopping trip to Hobbycraft.

You can check out the process to this layout HERE!


You can find me over on my blog and YouTube where I upload 3 videos a week :) I also hand out on Instagram a lot and would love to connect with you there @uglybugplans

Wednesday, 26 July 2017

Pocket Page Layout | Sarah Toward | Large Photo

Hi There

Sarah T here today sharing how I used a large photo in my Pocket Page scrapping.  I'll be honest I've never actually used a large photo in my Pocket Page layouts before this one.  I've wanted to, but my weeks are usually very photo heavy, so to take up multiple pockets with one photo wouldn't really be an option.  That is until I went back to finish some of my 2016 Pocket Page album and I came across a week where I only had photos available from two days of that week.

The photo I used needed to fill four pockets totalling an 8x8" area.  I don't have any fancy editing software, so I just used the iPhotos program on my iMac.


In iPhoto I was able to go into the print section, here I was able to choose the size of the photo paper I was going to print on, and then choose a custom size for the photo.


I printed the photo and trimmed it down, and then cut it into 4x4" squares.


Here you can see the photo cut into the four individual sections to go into the pockets.  I chose to embellish the top two sections, including that gorgeous flair from Bramble Fox.


And this is the final layout, featuring the large photo.  These five photos were the only ones I took this week, without the large photo there would have been a lot of empty pockets.

I will definitely use a large photo again in a Pocket Page layout, especially if I don't have a lot of photos available for that week as its a good way to use up pockets.

Here's a few more close ups of the spread.


I used last years Fancy Pants, Millie & June collection to create this weeks layout, along with some Kaitlin Sheaffer free printable labels and Shimelle puffy hearts from the Go Now Go collection.

Thanks for stopping by UK Scrap Addicts again today, don't forget to stop by the UKSA Facebook page where you can have a go at our challenge of using large photos in a layout and be in with a chance of winning a stash of goodies from our sponsor this month Bramble Fox.

See you all again soon.

xoxo


Monday, 26 June 2017

Week 17 | Sarah Toward | Moodboard

Hi there

I'm here today sharing my Pocket Page layout based on a moodboard.  I find moodboards really inspiring, not just for the colours but for the different images and shapes they have too.


When I first saw the two moodboards for this months assignment I was instantly drawn to this one.  I just love the pinks and mints, and I really love typewriters and clouds and have no problem using these images in my scrapping.  Oh and that hint of navy in the circular splodges at the bottom, one of my favourite colours.  Seriously, what's not to love about this moodboard?


I went into my stash and had no problem finding pink and mint papers to use.  I also had some die-cuts left from the Dear Lizzy, Fine and Dandy collection and they worked perfectly.


I was so excited to use this typewriter paper again, the tone of pink is spot on too.  I had some navy polka dot washi-tape which I've used throughout the layout as well.


I used my Silhouette Portrait to cut some little clouds, and the stripy mint faux washi strips.


I'd been hanging onto this typewriter die-cut as I really liked it and wanted to save it for the right occasion.  I can't remember what it said underneath, but I used a Tim Holtz word phase sticker as I preferred this sentiment.


I liked all the shiny things on the moodboard (I'm a bit of a magpie), so I knew I wanted to include a shiny element to the layout.  I decided these stickers from Paperchase were just right as they were also the perfect colours too, and not my obvious go to shiny element, sequins.

One of the main reasons I enjoyed using this moodboard is that it has made me go back through my stash and use up papers and embellishments, and I've got plenty to go back and use up.  So if you are looking to use up some stash then have a look at some moodboards and get inspired.

Thanks for dropping in again today, be sure to pop back soon for more moodboard inspiration.

xoxo


Sunday, 25 June 2017

Project Life - Weekend | Jess Claire Creates | Moodboard

Our challenge this month is moodboards and I just fell in love with this one.  The soft pinks and greens are my favourite colours to scrap with and I just loved the glittery look.  I just wish I had a bigger sequin stash but that will have to wait as I am on a no-spend.

Check out my process video for my layout here.

I knew I wanted to use these colours on my weekly Project Life page and I am so happy with the final look.  I've actually put myself a kit together that uses a lot of the same colours and I'm getting a lot of use out of it. 

I used Project Life cards from the Neopolitan edition as well as some from Studio Calico.  I kept one photo full size and added a day word die cut from the Project Life Fresh Edition ephemera.

I like to keep one photo full size without too many embelishments.  For the other 6x4 photo I printed it with a larger border so I could cut it down.  I knew I wanted to add some layers to it. 


For the middle pockets I printed 2x2 photos and added them on to Project Life cards.  This gave more room to embellish.  I used tissue paper, enamel shapes, die cuts and labels that all fit with the colours.  The tissue paper gave a soft ethereal feel that matched what I saw in some of the images.


I had three small photos for the bottom right pocket and I had intended to put them all on one card but it felt a little cramped and in terms of the story I was telling I wanted to separate them. 

I decided instead to create a flip up pocket which gave me more space to tell both stories separately as well as include a filler phrase card that I really liked. 
I used a leftover part of a Project Life pocket page to hold the cards with the photos on and stuck it on to my main pocket page so that it flipped up. 

This is a great way to add more pockets on to your layout while keeping related stories together.  It had been a difficult day with my little boy who was not well.  In the evening I enjoyed a takeaway and a glass of wine.  These two events were linked but I didn't want them on the same page because they happened at different times of the day.  Having them in the same place on the page keeps that link.  Plus I wouldn't have had space for this great card that says 'I have not failed, I have just found ten thousand ways that don't work'.

I don't often scrap negative events so this worked well here.

On my title card I added a gorgeous flair piece from Lottie Loves Paper that says 'Weekend' and I added the date on with my rolling date stamp.

I hope you enjoyed a look at my project life process using a moodbaord, I certainly enjoyed making it :)

Don't forget that the challenge is to join in with our monthly theme and link up your layout on our Facebook page - Facebook.com/UKScrapAddicts/  you could be in with a chance of winning a prize worth £50.
allthingssticky are offering a £50 voucher for the winner to spend on their website.  They stock a terrific range of adhesives - tape runners, double-sided tape, glue dots, foam pads - you name it, they have it!
Make sure to tag @UKscrapaddicts on Instagram and use the #UKscrapaddicts hashtag if you use either of our moodboards.  We love seeing you join in with our challenges. 


See you again next month
Jess :)