Kirei here with my take on this month's UK Scrap Addicts theme which was to use paint on a layout.
I had these lovely shell cut-files that I wanted to use with the Wild Heart paper collection from Crate Paper so decided to back fill them with paper that was painted in coordinating colours. I used an Inklingz paint from Shimmerz and a couple of the Starlights Metallic Paints from Imagination Crafts. Once they were dry I cut them out and then mixed some of the paint with texture paste which I used through a stencil onto each of the shell backgrounds. The cut files were then raised on foam pads to add dimension.
I layered my photo with some of the 'Wild Heart' papers and some of the cut apart tags.
I added embellishments from the coordinating 'Wild Heart' stickers and ephemera.
Finally finishing off with my title using the chipboard stickers and the lovely glittery Thickers from the range.
So why don't you join in with this month's 'Paint' theme and share your layouts over on the UK Scrap Addicts Facebook page and join in with the chat.... we love to see what you create!
It's nearing the end of Summer here so that means one thing - no more super bright layouts! We head into Autumn colours, photos of Hot Chocolate and crisp Autumn mornings and then onto the Big C!!!
But....For now...I bring you one last hurrah of this summer season and who can resist a rainbow layout (I know I can't!).
So this months theme was paint. I decided to use some acrylic paint markers for this layout and I have teamed this layout up with my Alpha Attack series on Youtube to demonstrate that you can use paint to change the colour of any type of Alpha or Thicker (because we usually have lots of those in our stash right!?).
So my thought was rainbow rain. I know this sounds crazy but here is how the layout came together.
I grabbed a whole load of half used Thicker packs from my stash and started sticking them randomly over the lower 2/3 of my page. (I did Gesso my page first knowing I was going to be applying white paint over the Thickers).
Once these were all stuck down, I then added a layer of Gesso (I actually added 2 layers because I wasn't sure how thick the coverage would be from the paint markers).
Once I had let the Gesso dry, and you can use a heat tool to speed the process up (I certainly did), I then applied 2 layers of white acrylic paint over the whole page.
Next came the hard decision as to where I was going to include my photo. I didn't want to cover too much of the background up so I went with a photo that I could cut down to just the subject image (my husband in this case) and I packed the photo with a small amount of 3 different patterned papers around the edges.
This is where the fun part came in. I used the acrylic paint markers to colour in each alpha using the ROYGBIV colours (apart from I had to substitute Indigo for Pink) and I worked my way across the page with each colour. Next I added some of the paint onto a non stick mat and added a little water and went splatter crazy! I tried to keep the coloured splatters within each of their own colour sections. I then went tone on tone with adding some enamel dots in hearts and star shapes.
I did back my white cardstock onto a piece of rainbow(ish) patterned paper. I had used a sheet of Bazzill Marshmallow cardstock which is primed for Mixed Media but it had buckled a little. So cutting down a 1/2 inch from each the top and bottom, I then mounted this onto the patterned paper to held smooth out the warping.
Next I free hand cut some clouds and used a black paint marker to give these a faux stitched border as these were getting lost on the background. Finally, because clearly there were not enough Alphas already on this layout!, I then added my title into the left cloud. I even popped a sun in to the top right cloud to keep with the theme.
In total I used a massive 97 Alpha Stickers!!! And now I need a lie down. Thanks for visiting our blog today. Be sure to head back for more inspiration throughout the month from the other ladies. Oh and we have a new theme on 1st October!!
If you want to watch the process for this layout then you're in luck as there is a process video right here for you. So be sure to head on over to our Youtube channel where you will find hundreds of videos to keep you inspired!
Jackie here with my layout for this months theme - Paint. I decided to do a mixture of two inks on my background.
To add the colour to my background paper, I added oxide ink to a plastic sheet and then added water to the ink which turns it into a colour wash, which can then be added either by using the packaging technique, turning the plastic sheet over and placing it onto the cardstock or by using a paint brush. The ink colours I used were Twisted Citron (green) Mustard Seed (yellow) and a small amount of Tumbled Glass (blue).
I kept my photo to the right of my page, so that the colour wash was visible.
Hello, hello, Karen here with my painty page for September.
As you will have seen, this month our theme is paint and there have been some wonderful pages produced both with watercolour painting and mixed media. Sadly, I don't have those skills and I was a bit stumped as to how I would approach my layout for this month. I was saved by Vicki Boutin - she has a new range called Field Notes and one of the papers has a pattern which is a line drawing of a garland of flowers. My problem was solved I decided that I would add watercolour paint to this paper and make my page from that.
If you would like to see how I built up my page please have a look at my YouTube here.
Please pop back to our blog again soon to see what the other talented ladies have made this month.
Paint was such a fun challenge! I played around for a while before deciding what I wanted to share with you. I went for a technique I think I made up, but you never know!
My best bit of advice for working with paints is to see it through to the end. Sometimes you create a background and maybe you aren't happy with it, but then you add your photos and embellishments and journaling and all of a sudden it all comes together! And if it doesn't, well hopefully you had fun creating anyway!
Today I have a very colourful layout for you. This month is all about celebrating the use of paint on layouts. With this in mind, I decided to choose a black background and keep the embellishments to a minimum.
I used a Prima Silicone brush to create the painted, textured background.
Sarah here today for this months challenge using paint which is something I love to do on most of my scrapbook pages.
I decided to use watercolour so used a watercolour 12x12 paper for my background available at Thompsons Craft Supplies.
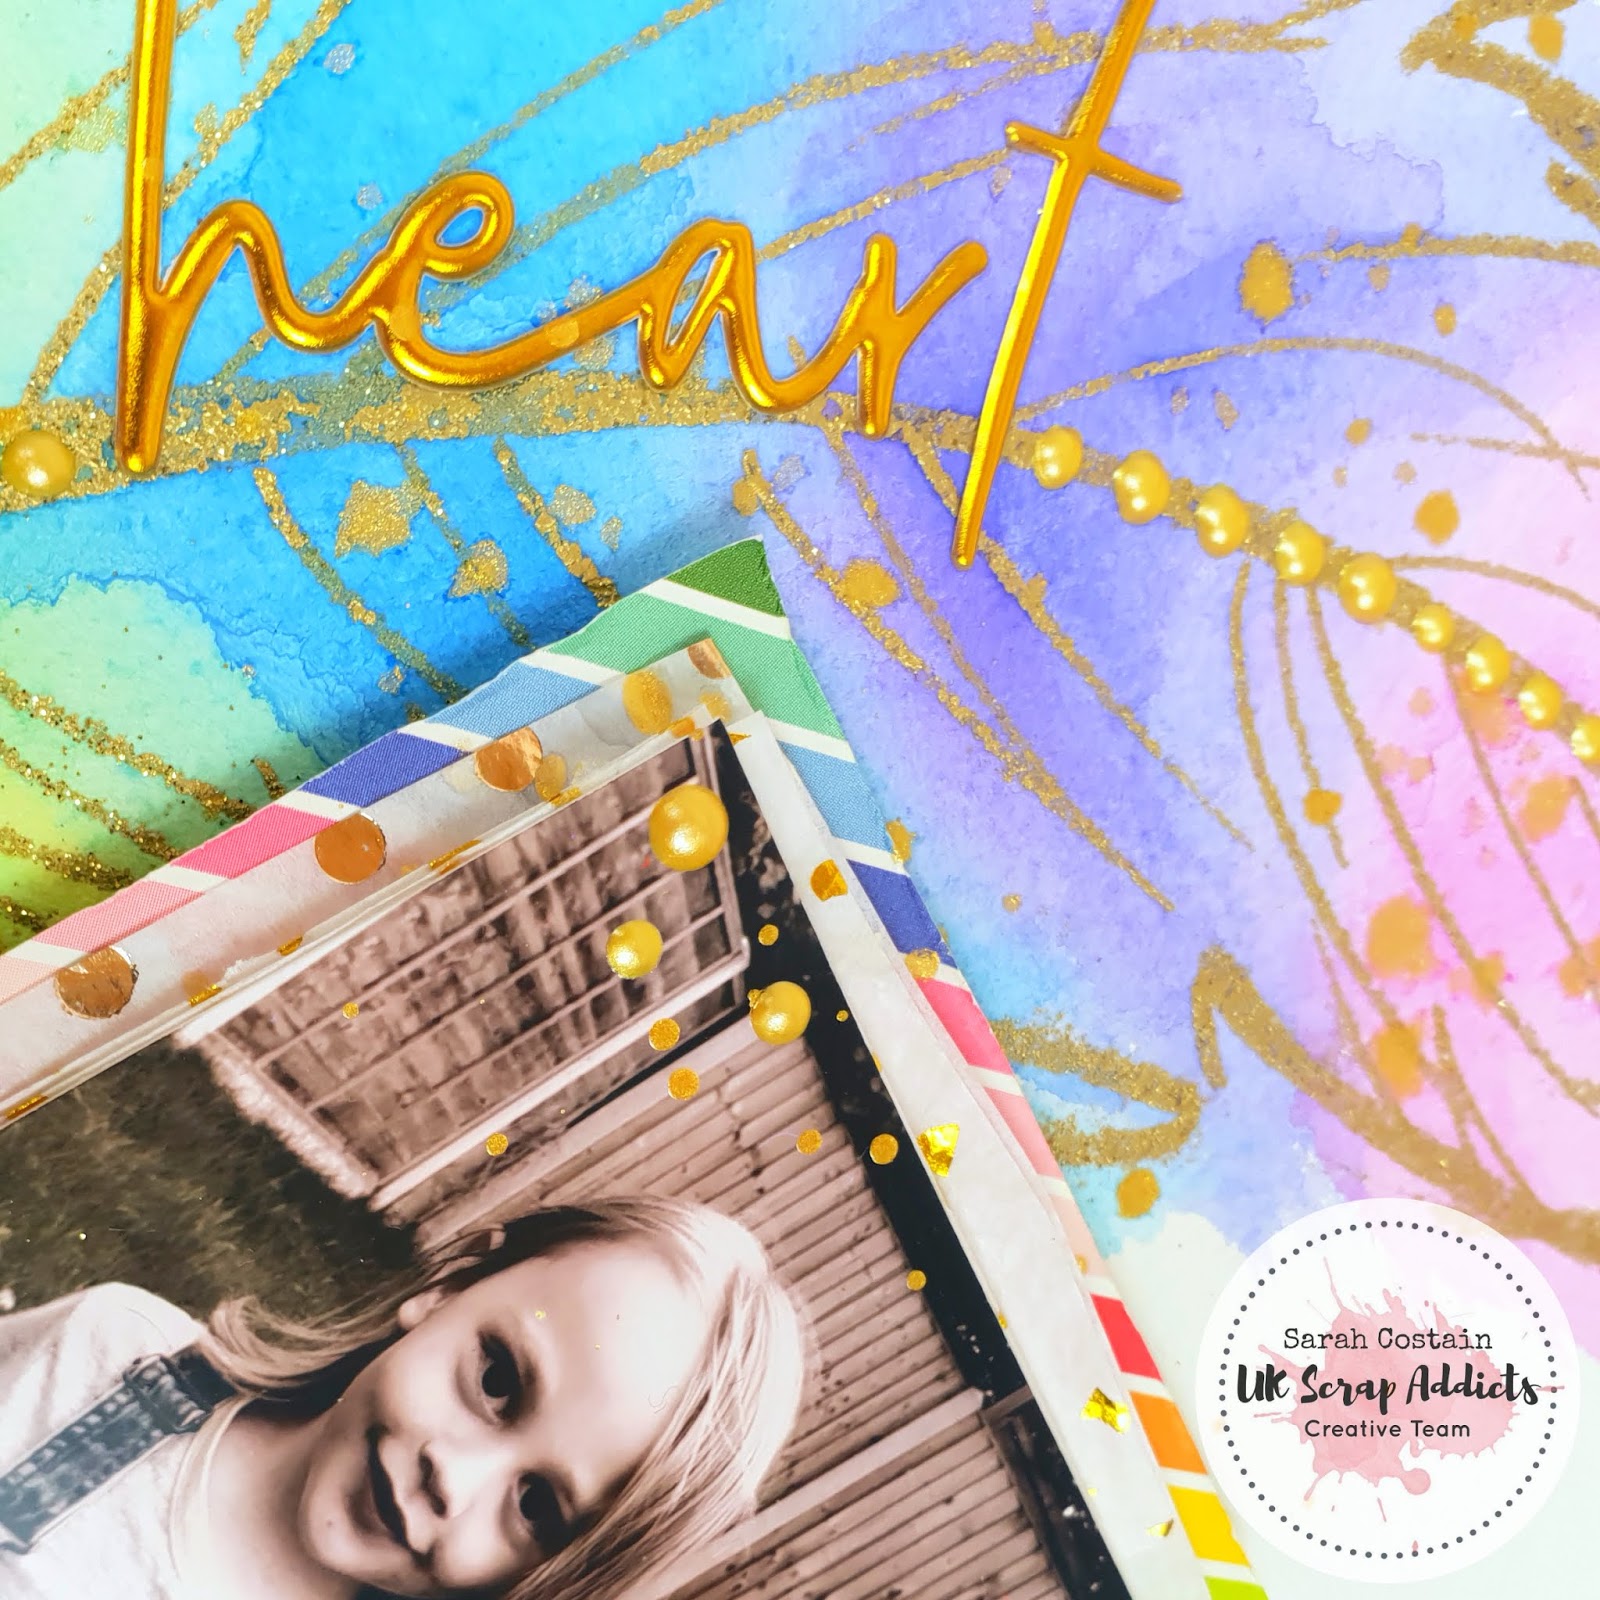
Using an embossing pen I sketched out a feather and coated it in Gold glitter powder. Once melted I added a rainbow of paint over it to fill in the shape.
I layered my photo onto tissue paper and rainbow paper from the July Mind the Scrap kit. I tucked washi behind the photo for added texture and mirrored this down the side of the layout.
Scripty Thickers also from the kit were perfect for my title running along the feather and some splashes of gold Color Shine and pearl drops added a finishing touch.
This morning I would like to share with you a layout I have made using your September Prompt of 'Paint'
Now, of course, the ideas for this are endless and it is an easy process to liberally daub paint, either acrylic or watercolours, on to the background paper and see what effect you can achieve. Of course one of the most difficult things about adding any sort of wet medium to your cardstock is that it will have a tendency to curl..which can be very annoying! To counteract this I used tape to stick down the edges to my glass cutting mat before starting adding the moisture to the paper/card.
I used a heavyweight white card for my background which is 300gsm. I bought this in bulk from by 'go to' supplier Crafts4Eternity. Of course you can use specialised watercolour paper for this but it does work out quite expensive and if you follow this simple tip you can use regular cardstock just fine!
Now, I'm no artist, but to me the techniques I used were very basic and I can explain a little of how I created the Lavender stems very simply..just follow along.
To start I took some inexpensive watercolours and mixed some pale mauve paint using reds and blues and a pale grey/green colour. I watered this down quite heavily and painted soft fluid strokes of the two colours horizontally across the page. I then gently gently painted the stems/leaves onto the background card in upward movements in random directions using a slightly darker, less watered down, grey/green colour. You can see here how I painted across the masking tape that I used to stick the paper to my mat.
Then I mixed deeper mauve colour using red and blue and started on the flower heads. To create these I used 'bobbling' movements with my paint laden brush in elongated triangular shapes. It really wasn't scientific..just keep your paintbrush moving in these shapes. You will see that these are varying shades of the purple I mixed as each flower head has a different amount of water added to my brush each time. This adds depth and field to the painting.
Once I had painted all my Lavenders, and allowed it to dry, I removed the masking tape from the edges. Undoubtedly this will remove some of the layers of the card beneath so at this point I cut a border off the edges and matted the entire piece on a piece of dark mauve cardstock.
I next set about creating the photo clusters. First I die cut two circular photos of varying size. I then used a selection of flowers and leaves to create my clusters and added the title using Puffy Sticker Alphas that I bought from Lottie Loves Paper
I hope you like what you see and that this simple tutorial gives you confidence to have a go..what have you got to lose? Do let us know what you think too!
Hi Everyone, I have used water colours for my paint themed layout, it was a technique i learnt at the Amy Tangerine workshop that Birds of a Feather put on last November. I did the watercolour technique on some water colour paper i had, which i cut down to 12x12 inch. i then cut it smaller to fit inside a full size 12x12 inch paper sheet. I gutted the middle of the paper so i didn't waste any. (you can see all of this on the process video). I used some reeves watercolors (like the ones kids get at school in the red palette)
Here are some close ups for you of the layout.
I have also done a corresponding Smash Book layout to go with this page which you can view here on my own youtube channel - Click here - This was to keep all the memorabila together, like my race number, wrist band, leaflets etc. The process video is here - CLICK HERE
It's time for another free cut file and this month we wanted to incorporate something painty. This design can be used as embellishments in all sorts of colours or even as a stencil for some "controlled" paint effect.
This month we have supplied both the Silhouette file and the SVG file so that all makes of digital die-cutters should easily be able to use our files. You can of course use the file from this image using the instructions here. Please do let us know if you have any issues using the files.
We'd love to see them in action so please do share your creations with us in our Facebook Group and tag us on any social media so that lots more people can be inspired.
As always, these cut files are for your own personal use only. Selling the files either digitally or in die cut form is a breach of copyright and makes us sad.
Hi, Amy here with this months take on our September theme of 'Paints'.
I've created a layout using my watercolour paints to create this rainbow effect background around a heart. I just used a cheap set of watercolours with ready mixed colours, and a good thick white cardstock, but i didn't use gesso or anything. I used plenty of water to make the colours blend into one another, the trick was to not scrub at the paper with the brush, just use light touches to move the colour around. I then let it dry naturally.
Once i had created my background i sketched around the white heart shape that was left on the cardstock to hid the imperfect lines. After i had created this background i became a little stuck in how to finish it. Eventually i stumbled across a floral acetate from Heidi Swapp, which i loved but was also struggling to use. When i layered it up i loved how the flowers seem to fit the heart shape. It took my layout in a totally different direct but i really like the result.
Because the layout's backgrounf is so busy, i just layered my photo with some neutral coloured papers and added a few emblisshments including some brown gem swirls which to be honest, came in a grab bag, and i didnt think were my taste. I love them! Shows how good it is to try new things!
I hope that my layout shows you that you dont need expensive products to use paints on a layout, and you dont need mush skill either! So please, be brave and give it a go....you might just love it!!
We would love to see what you are creating this month, especially those projects involving paints, so do come and join us over on our Facebook group. If you want to watch this layout being created then head over to our UKSA YoutTube channel and watch my short process video.
Thanks for reading, have a great September, and keep your eye out for some amazing painty layouts from the rest of the UK Scrap Addicts Creative Team!
This month we have been challenged to create using paint. I have water colours and some acrylic paints in my stash so I dug them out ready to start.
Happy Together.
I chose to create with the Pretty Little Studio range - Tales and Dreams, so dug out acrylic paints that co ordinated with it. I wanted to channel my inner Wilna Furstenburg so applied paint to the background water colour paper liberally in ombre strips then added some white splats before letting it dry completely.
Once the paint had dried I decided to focus on adding my embellishments and photo down one side so lots of the paint texture remained visible. I matted my square photo on papers from this range and added 2 die cut frames over the top.
I used die cut words from this range to also make my title. Pretty Little Studio make lots of lovely "bits" in their ranges making it easy to add layers and details. I added lots of their die cut flowers to soften the look of the page.
I finished by adding a few silhouette cut leaves in white cardstock which stood out against the paint background and a few resin hearts & bows.
Why not have a go at painting a background, its only paint and paper after all.


