Showing posts with label #stitching. Show all posts

Tuesday, 3 March 2020

Together| Zoe Hailey Zola28 | Vertical Design


I was really looking forward to creating a layout on the theme of vertical design, I even sketched out some ideas (which I hardly ever do!) and then I started creating and made something totally different..... Anyone else do that or is it just me?

I wanted to use up some of my stash before working with new goodies, so this layout was made using the Pink Paislee Paige Evans collection "Truly Grateful".

My design focussed on a central vertical column with different paper layers. I distressed the edges of these and did some random stitching in black. This helped to bring in the black from the glasses that me and my daughter are wearing in this snapchat filter.


I included two ephemera clusters one slightly to the top right and the other to the bottom left to balance it out. Flowers were the obvious choice due to the photo and I ensured I had many dimensions adding things on foam, tucking bits in and including wooden buttons and sequins for even more texture.


I really love the colour in this collection and it was so quick to create this layout. Share your vertical design layouts over on the UKSA Facebook Group for everyone to see.


Happy Scrapping

Zoe Zola28


Thursday, 11 July 2019

Unicorn Smash! | RamblingsofGeo | Sewing

Hello everyone!

Welcome to July, and Happy birthday to me! - Sewing month... not my strongest point, but i have given it a good try!

To celebrate my birthday i have a paper pieced Unicorn to inspire you. I made this by tracing out a unicorn from a template i found on google. I used my smash book this month as it had the perfect page of a unicorn in the cutesy smashbook (purple binder)


I used papers from the Hobbycraft 12x12 Rainbow Magic pad which was a bargain £5 from hobby craft a couple of months ago. Its a must have for unicorn lovers!


I decided to sew around the unicorn around the edge in the style of alot of the cute lisa fonseca animals i have seen her make. Im incredibly proud of how well this turned out, and it goes to show a little bit of patience goes a long way! :) 


There is a corresponding youtube video over on the ukscrapaddicts channel for you to see how i put this together.

I hope you find inspiration in this layout!

Sunday, 7 July 2019

Adventures | Amy Kattenbelt | Sewing

Hello lovely scrappers, Amy here today with my layout that features sewing! I decided to go all out and stitch my title across the whole page. I must apologise that I am not able to create process videos at the moment due to building work at my house, but I tried to take a lot of photos to show you how I created my layout.

I really wanted my title to be in my own handwriting. So the first thing i did was draw some faint straight pencil lines across my white cardstock. I then planned which words i wanted on which line and took my time to hand write the title across the whole of the page in pencil. You also want to remember to leave a gap in your title for your photo, I left some space in to the left hand side for my photo.

When i was happy with my penciled title I used a 'pokey tool' and created holes along the pencil lines. Remember that the more holes you poke the more stitching you will have to do. Placing them too close together will cause the card to rip as you pull the thread through the holes, but too far apart and curves will become angular. If you look carefully you can see that I place holes closer together around tighter corners. You also need to take care at junctions of lines, making sure you put a hole at these intersections. Getting the holes right will make the rest of the stitching so much easier. If its your first time using this technique you may want to start with something smaller. This took me at least 6 hours to stitch, which i quite enjoyed as you can do it whilst sat watching TV.


Once you have all your holes, now is the time to erase your pencil lines. Be careful and work in small areas so as not to crease or rip the card.

Now we can begin with the sewing. I chose to stitch each line in a different colour. I used regular embroidery thread, the kind you would use for cross stitching. These come with 6 individual threads that you can pull apart (usually you use 2 at a time for cross stitching). The more threads you use the thicker the line will be and also the bigger the holes will need to be. I decided to use 3 threads for this layout.

You use a back stitch to recreate your text. If you struggle with this the best thing to do is google for instructions. Once you understand the principle it really is very simple.


I used washi tape on the back of my layout to hold the thread ends in place, both at the start and end of a length of thread.


Once my title was stitched I knew i wanted to keep the rest of the layout simple so it didn't draw attention away from the title. I used some of the gorgeous rainbow paper by Paige Evans to frame my layout (yes i did cut out the middle so i can use this paper on another layout. I mounted my photo in yellow paper (a colour i hadn't used for sewing) and a doily. I added a few little die cuts, a ribbon and a date stamp to complete my layout.


I hope I have inspired you to give hand stitching a go on a layout. If you have any questions just post on our UK Scrap Addicts Facebook group and ill be able to help you further. Thanks for reading and happy sewing!!


Wednesday, 3 July 2019

Love U | Zoe Hailey | Stitching

Who says a layout about a man can't be pink? Anyway, I don't follow those 'rules' as you can see from my layout for July!

This months theme of stitching was great fun, although I'll admit there were definitely times I regretted my decision to include so much chain stitching. In my head I knew I wanted to chain stitch my title as this page goes with a layout I created at Go-Go Getaway in March, which had chain stitching on the design.

I cut the LOVE U title on my cricut, mounted it on white card stock and pierced my paper to create an ombre chain stitch affect, I most certainly underestimated how much time this would take and had a mild panic moment when I thought I was going to run out of my colours.


My top tips for chain stitching (now I am an expert as I have done it twice, ha ha!) are; don't separate your strands of thread, stick to all six it is far neater and pull your chain stitch tight to create a much crisper finish. I quite like an uneven chain length and made some of mine longer and shorter, but you could use a ruler if you want a more even look. I didn't cut around my lettering, leaving my white border, until all my stitching was complete. This definitely helped as some of my stitches went off the coloured paper.


I worked with the La La La Love collection from Crate Paper and because this photograph of my partner Mark, was taken on Valentines Day, I went a little crazy and tried to use every ephemera, sticker or chipboard that used the word Valentines Day! ( You only get the chance once a year, so I went a bit over the top!)

And because I wasn't satisfied with my discrete chain stitched title, I also included running stitch hearts in the background of my layout, stitched hearts in my clusters and white cross stitched kisses on my borders.


I love how busy my layout is with paint splatters and sequins too! The texture from the stitching is definitely my favourite part and was worth the hours..... In the end!


Really hope you enjoy this months theme and I will look forward to seeing what you come up with.

Zoe x


Monday, 1 July 2019

Beary Cool | ScrappyNerdUK (Claire) | Sewing

This month is either going to make you or break you if you're joining in with our monthly themes.

It is the Marmite of the scrapbooking world (and I'm not talking about Fussy cutting!!).

Our theme this month is.......Sewing!!!! (I just heard you groan).

We like to pick themes that really stretch you and push you outside your comfort zone so don't shy away and be sure to join in. We have a whole team of amazingly talented ladies that are ready to show you some ideas as to how you can incorporate sewing (hand or machine) into your scrapbook pages.

I decided to dust off my WeRMemory Keepers Sew Easy tool and put it to work on this layout. I have quite a few attachments for it and it was gathering dust in my drawer so this challenge was the perfect excuse to grab it out and use it!
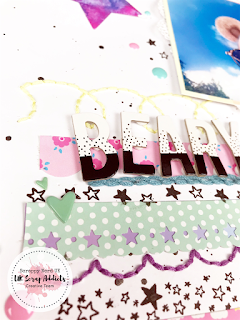
I decided that I wanted to make my layout 9x12 (I do a mixture of different sizes and I think it helps break up the monotony of 12x12 layouts). I trimmed down my white cardstock to 8.75x11.75 inches and distressed the edges with a distressing tool.

I had already pre chosen my paper that I wanted to back my white cardstock with and it is the rainbow paper from the Rainbow Magic paper pad which is made by Hobbycraft. (It has rainbows, unicorns and clouds in it so this collection is a definite winner for me - hehe).

I used some Heidi Swapp colour shine in Black to add some ink splatters before I began as I didn't want to risk getting the splatters onto my sewing.

Next I grabbed some border punches and punched out a few strips of paper from the same paper pad. I had this vision in my head of paper strips, stamps and sewing in strips at the bottom half of my page. I can say that it turned out exactly how I imagined it!!

I layered some paper strips, then I used a star strip stamp with black ink and then my Sew Easy tool pierced the holes for me to add my stitching in. I used 3 different attachments to add different stitching styles. In the straight stitch I did chain stitch and the other 2 I just did a straight back stitch. It created lovely texture and I was really pleased with the result.

I grabbed some black and white Thickers from my stash and added little foam dots underneath each letter to add some dimension for the title. I love the natural shadow it creates underneath the title and stuck these down in a slightly wonky fashion for extra interest.

I finished the layout off with some co-ordinating enamel dots and a couple of 3d stars that I had laying around on my desk from another project I had completed earlier in the day (I love that I managed to put some leftover die cuts to use on another layout).

And here is the finished layout.

So get that sewing needle and thread out and give sewing a go. This shows that a small amount of stitching can still be very effective.


Until next month.......

Claire x