Showing posts with label guest designer. Show all posts

Sunday, 15 September 2019

Rainbow Hair Don't Care | Vik Davies (Guest Designer) | Selfie

Hi it's Vik here and I've been asked to be Guest Designer this month for UKScrapAddicts. The theme for the month is "selfie". This is not something I usually do...selfies or scrap about myself....but I can now say I'm completely hooked with Snapchat filters!!!!!

To create my layout I used the Amy Tangerine "Slice of Life" and Echo Park "I am Mom" collections.


I started by using the "smooshing" technique to add some yellow distress oxide ink spray to my patterned paper background. One of the papers had a bright chevron design on it so I cut out 2 of the chevrons and placed them on opposite sides to dive up my page.

Next I used my Silhouette to cut a Polaroid strip from some black card stock and placed my photos behind the cut file.


I love to fussy cut so started fussy cutting elements from both of the collections to create extra embellishments. I added these to my layout along with some stickers and chipboard pieces from the same collections. I placed these into opposing corners to create a diagonal feature across the page. I then added a few enamel hearts, some blue distress ink splatters, stamping and some journaling to complete all the finishing touches.

Be sure to head on over and follow me on Instagram here - Vik Davies Instagram


I have recently started my YouTube channel too so would love it if you could head on over and take a look  - Vik Davies Youtube

Tuesday, 23 July 2019

Grey Hair Don't Care | Amanda King (Guest Designer) | Sewing

We have a new guest designer this month, Amanda King, and we couldn't wait to see her take on this months theme of sewing.

Over to you Amanda....

When I read that this month's theme was sewing, I immediately thought of hand stitching a cut file. However, I had no idea how to get my Silhouette to cut the template so I decided to go old school instead. I decided on a Spirograph style pattern which I printed from online and started to punch the holes by hand using a paper piercer. I chose a subtle marbled pattern from DCWV's Romantic Life stack for my background and used a variegated embroidery thread.

The stitching took forever, and after four evenings of hand stitching I wondered if this had really been a good idea, but it's just one continuous line of backstitch so wasn't particularly difficult and I could watch TV whilst stitching.

Obviously after all that work I didn't want to cover up much of the stitching so I printed my single photo as a 7cmx7cm square (which is quite small for me). I layered it on a couple of papers from Hot Off the Press and some Pink Paislee Moonstruck which I tore on the top and bottom edges for a softer look. I then tucked various scraps, stickers and labels in on the left edge and cut pieces from another Pink Paislee paper to form a little cluster in the empty space at the top of the photo. I added a Maggie Holmes "Smile" sticker below the photo and cut my title on the Silhouette.

I'd originally placed my Spirograph pattern off-centre, and that gave me a wider space on the left of the page for my journalling, but I wondered if it might look a bit lost there, disconnected the photo, so I added a torn strip of washi tape to the left edge to anchor it and stop it floating off the page. Finally I repeated the washi by tucking a couple of pieces in above and below the photo block.

We love showcasing Guest Designers here on UKScrapAddicts and would love it if you would go and follow Amandas personal blog too - https://amandas-scrapbook-pages.blogspot.com/

Monday, 15 April 2019

Make A Wish | Rebecca Meadows (Guest Designer) | Sparkle

Hello UK Scrap Addicts.

My name is Rebecca Meadows and I am really pleased to have been offered a guest designer slot for this month.


I have been wanting to scrap this photo for quite a while now and this months UKSA theme of "sparkle" is a perfect opportunity to use it.

I have used Carta Bella, Flower Market papers to make my layout. I love to fussy cut and these papers have a great selection of flowers that are perfect for this so this is where I started!

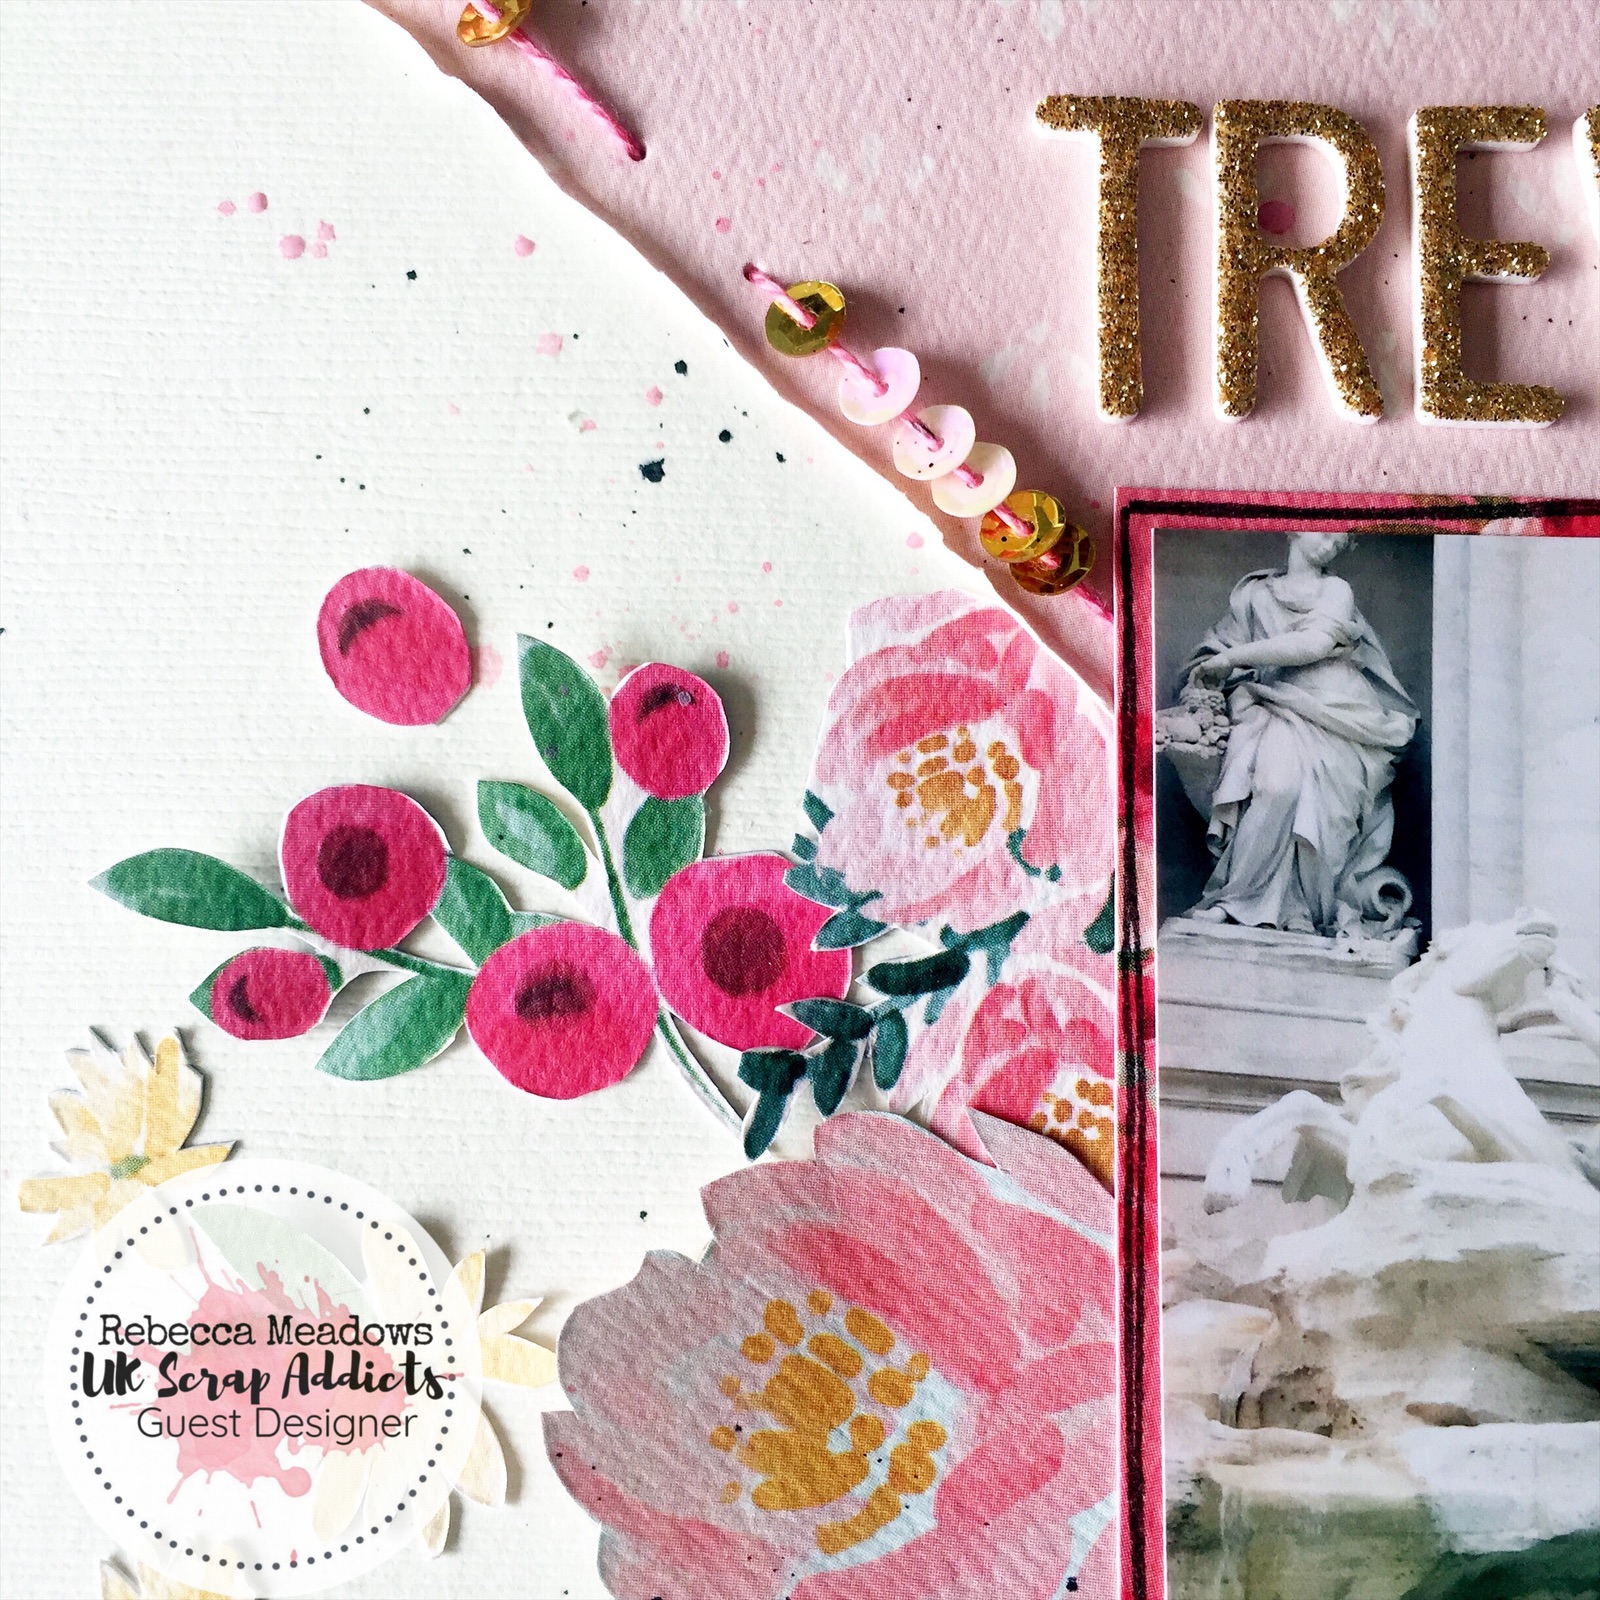
I had a layout plan in mind for this photo. I wanted the threaded sequins to represent coins being thrown into the fountain.

So, here is my process.....

Having fussy cut lots of flowers, I put these to one side while I began working on my background. I chose a pink patterned paper and cut two triangles from the sides. I roughed up the edges using a paper distressed and then marked our with a paper piercer where my thread and sequins would go.

I used a threaded needle to post the sequins on to, if you do this, be sure to check that the sequins will fit over the eye of the needle before continuing. I used a bit of washi tape to hold the thread at the back, then kept the stitches quite tight to help kept the sequins in place, a couple of the sequins still moved and grouped together so I added a small amount of glue to keep them in place.

Next, I added the pink paper to a piece of cardstock and stuck down my matted photo. I wanted similar flowers in each cluster to give a look of symmetry and used foam pads to add definition to some of the flowers. My title was an obvious choice and I think the sparkly alphas really finished off the layout.

Finally, I added pink and black mist to the background and some journalling strips.

I loved creating this layout. I'm really pleased with how it turned out. This months theme has been really inspiring and I hope you are having fun with it too.

Thursday, 11 April 2019

Sunshine and Sparkles | Sarah Kentzer (Guest Designer) | Sparkle

We're really excited to be introducing Guest Designers to the team each month and this month we even have 2 joining us!


First up we have Sarah Kentzer and here at UKScrapAddicts we were excited to see what Sarah would come up with for our monthly theme of Sparkle!

Over to you Sarah.....


I'm a big fan of Crate Paper collections and I treated myself to some of the new Maggie Holmes, Sunny Days collection. It has lots of lovely colours and gold foiled papers. When I heard the theme I would be working with was Sparkle, I had in mind the perfect photo to scrapbook.


I created this layout about my daughter whilst she was wearing her sparkly sunglasses and sequinned top which she loved. From the Sunny Days collection, I used the stickers and some die cuts from the ephemera pack. I also did some fussy cutting which always stretches any collection.


I even managed to add the world "Sparkle" into my title! This layout was all finished off with some splatters of gold paint and a scattering of sequins.

Here at UKScrapAddicts we want to thank Sarah for being a Guest Designer for us this month and we love the layout she has created. Thanks for joining us Sarah - it's been our pleasure!

Saturday, 30 September 2017

Guest Designer | Marie Boyle

Today we welcome our last guest designer (for the time being at least!) Please welcome Marie...

My name is Marie, I'm 28 and I'm from Durham in the UK. I've Scrapbooking and crafting for around 8 years now! I pretty much exclusive scrap Disney holiday photos!

So my layout! I have exclusively used the Simple Stories Say Cheese collections which I got from Hey Little Magpie (my favourite UK based Scrapbooking website!) and obviously the collection is perfect to scrapbook a Walt Disney World photo! My friend snapped these when I was pulling a stupid face with my Mickey Ears on and I just think it's the perfect Disney photo! And the colours in the photos go great with the Say Cheese collection! 

I started with a piece of white 12x12 textured card stock as a nice blank canvas. I then added some yellow and red paint splatters to the background to tie in the colours. I then added some Mickey Mouse print tissue directly in the centre of the page to break up the background. I then cut out the perfect piece of journalling paper from one of the cut apart sheets and pinched holes in the top to make it look like I had taken it from a notepad. Once this was stuck down I angled my photos the opposite way and propped them up with some foam pads.


I then went through the embellishments and added them mainly down the sides of my photos and added red and yellow enamel dots all over the page. I also added in some red thread on either side of my photo to make it look extra fun! 

Then it's time for some journaling! I had quite a big space to fill! Once that was done I went over the page with some black paint splatters to make it look like ink on the journaling (I love that look!) 


I then inked around the edges with a yellow stamp pad and cut a large border piece from one of the cut apart sheets to stick across the bottom.


I hope you enjoy the finished layout!!
Thanks for joining us Marie - love your work! - Laura

Friday, 8 September 2017

Guest Designer | Elaine King

We have the Mum of a hero guesting for us today!  Welcome Elaine and her touching layout...


Hi I'm Elaine and I'm a Scrapaholic! I live in a tiny hamlet called Chiddingstone Hoath in Kent, (somewhere between Sevenoaks and Tunbridge Wells) and I have been scrapping for about 8 years now and I can honestly say it's almost taken over my life! Lol. Fortunately my long suffering husband indulges my hobby and has recently allowed me to commandeer our entire dining room for my craft room! These days I scrap a lot of my little Granddaughter (aged 2 & 1/2) and of course, my husband, two sons and my daughter in law. 


Both my husband and my youngest son are firefighters in the London Fire Brigade and I have journaled about my youngest son in this layout. He (front centre in the photo) recently attended the Grenfell Tower disaster and my journaling reflects the emotions I felt at this time. Journaling is not something that comes easy to me as I don't really like my handwriting but when I do journal it has to be heartfelt, as in this case. I think it is important to use your own handwriting for future generations so I prefer not to print from a computer for this. 


To create the page I used Kaisercrafts Shine Bright collection and I used a Stampin Up punch to create the small patterned hexagons aswell as a diamond Press stitched hexagon die for the black backgrounds for each of them. 


I also matted each piece of patterned paper on black cardstock as well as the photo and added three black gem brads, a couple of wood veneers and a cork hexagon too. To finish I added the title using black and gold Thickers and a smaller sub-title in black beneath the photo. The little 'Hazardous'  Flair badge was a real find from a friend!


Thank you so much Elaine.  You can find more of Elaine's work here: blog and Instagram

Thursday, 31 August 2017

Guest Designer | Sarah Wilkins

Today we welcome Sarah Wilkins as our guest designer...

I am Sarah, married, mum to two boys and two furbabies. I live on the South Coast in Sussex, just outside the city of Chichester.
I have been scrapbooking for over 12 years and my style has changed lots - my main subjects are my boys (but I have less photos of them now they are growing up!) I recently lost my scrapping mojo as we moved house (and, for the first time I had a craft room - but lacked the inspiration to use it), but the mojo is back and I am firing on all cylinders!


I have used Prima papers and embellishments - 'Tales of you and me' collection - I like to use papers and embellishments that co-ordinate as it makes life so much easier when bringing a page together.  I've added a couple of butterflies (I love butterflies and flowers - not that you would guess!) and these are from Etsy.  I often mix alphas as I never have enough letters from the same set.  I normally use a sketch as a starting point (however I didn't this time!) - I like to use sketches from Miniowner and Page Maps, and I just add embellishments (and sometimes have to stop myself from adding too much!)


As you can see below I have added another page - as this page also has a partner 'Hold on to you hat' - and I realised I had used clusters on this page too!


Thank you for guest designing for us this month Sarah. Your pages are truly stunning!

If you'd like to join us as a guest designer drop Laura an email at UKScrapAddicts@gmail.com

Monday, 28 August 2017

Guest Designer | Louise Thompson


Today we welcome the owner of August's sponsor for a guest post...

Louise of Thompson’s Craft Supplies here with this month’s theme, clustering. I am fairly new to scrapbooking, maybe 4 months, and it grew to be a passion as for me, it is an extension of my love for all things mixed media. As such, this was not a term I had heard before so was really excited.

Well, I tell you, this has just revolutionised the way I will scrapbook in the future and I'll tell you why as we go through my creation.

So first of all here is my finished piece:
 

Now let’s talk through the process...

I have been dying for an excuse to crack open the 7 Dots Hazy Days collection and when I hear the theme, I thought this would be perfect. The reason being is that this paper set also comes with stickers and die cut embellishments and tags which I thought would be great to use in the clustering.

I chose out a piece of paper from the range I loved and a photo that matched the colours. I then remembered a really cool piece of packaging I had kept and some hessian which I would use to mat my photo later.


I then looked for some matching items I could use to make the clusters from the 7 Dots set and my other items. I chose out a piece of Tim Holtz  Kraft Resist paper from the Idea-ology Collection and sprayed with some Lindy’s Gang sprays and also chose some cork ribbon and adhesive die cuts.


These items were then used to make the 2 clusters. They were fairly quick to make and is a great way to use up scraps. I loved how it just helps you prep a large part of a layout and you could make several at a time. It really sped up the overall layout making process and I will use this technique again. 


Kaisermist Shiraz and Distress Ink Vintage Photo were used on the edges to finish the clusters.


Stenciling was added using a Tim Holtz Bubble Stencil and Prima Marketing Modelling Paste. Embossed stamped images were also added using G45 and Tim Holtz stamps. Some of the 7 Dots stickers were added to the inked paper to make the titles and a little leaf stamp was added for a final touch in black ink.

Everything was glued together and stuck down using my favourite Prima 3D gloss gel, perfect for heavier items and uneven surfaces.

Here are some close up shots. I really enjoyed making this project and this vintage/grunge collection. I cannot wait to use it again and try out this technique on more layouts. Hope you enjoy and it helps inspire your own cluster layouts.


Thanks for joining us Louise!  Don't forget UKSA fans have until the end of the month to use the code at Thompson's Crafts!


Wednesday, 23 August 2017

Guest Designer | Emily Grant

I'm delighted to share today's guest designer with you... I'm a fan!  Welcome, Emily Grant...

Hey crafters! I’m Emily, I’m 23 and I live in Doncaster. I’ve been scrapping for about 8 years now. I love to stitch and use mixed media. I’m inspired a lot by Inkie Quill, Missy Whidden and Paige Evans!  The best place to follow me is on Instagram.


I created my layout using the ‘Oasis’ collection by Crate Paper. I had to include some clustering on my layout so I immediately thought of the ephemera pack.  The picture is of my boyfriend and I on our 7-year anniversary.  We had a few days in Liverpool and it was fab. 


I chose the background paper because I’m obsessed with flamingos!  I cut a strip of Shimelle ‘Little By Little’ chevron paper to stick down one side, stuck it down and painted on gesso in the area my picture would sit.  On the right of the chevrons, I hand stitched gold thread.  I applied gold Nuvo embellishment mousse through a Prima stencil, and once dry I used the packaging technique on top with a pink gelato. 


I printed my picture at 4x4” and mounted it onto watercolour effect paper (from The Works) and then paper from the First Edition ‘Storyteller’ pad.  The pull-out tag is from the Oasis ephemera pack and I added some Oasis stickers to it, as well as some journalling.


There are three areas of clustering on my layout. The main bit is around my photo where I used some larger embellishments with gold foiling. In the top and bottom left corners, I used washi tape as a base for my embellishments.  I love a bit of sparkle so to finish off I punched tiny hearts from glitter paper.

https://youtu.be/ElEzCeT2cro


Thanks for joining us this month Emily!  You can find more of Emily here: facebook pinterest youtube

If you fancy guest designing for us drop Laura an email at ukscrapaddicts@gmail.com

Monday, 21 August 2017

Guest Designer | Antonia Sherlock

Today we welcome Antonia as our guest designer...

Hi everyone, my name is Antonia and I am absolutely over the moon to be invited to be a guest designing for UK Scrap Addicts this month! I live in the West Midlands with my family - I am a busy mum of two with a full time job and a compulsive need to scrap, so juggling is the word that best
describes my lifestyle...  I've been scrapbooking for years, but only recently mustered the courage to put my work "out there"...

I was so excited to find out that this month the focus is on layering. I love layering, to me more is more when it comes to embellishments. The real challenge is to know when to stop... I use layering as a technique on most of my layouts, and most of the time I use patterned paper as a background. Every now and again though, when I come across super-lovely embellishments, I opt for a cardstock background, so the embellishments can be fully showcased without anything else competing for the attention. This is what I did on the layout I made for this blog post.


I worked with the Lottie Loves Paper August kit, which is thoroughly awesome. It features the new Carousel collection from Maggie Holmes. I purchased the coordinating paper kit and cardstock kit as well as the ephemera pack from the same collection. I chose the pink cardstock as it coordinates with the top I'm wearing on the photo. It's also super-girly... I did some tone-on- tone stamping for the background - it's subtle, but gives texture to the
layout. It can also be considered as the first layer in the clustering process.

On layouts like this, I tend to go for three clusters in a triangle. Two near to the photo and a smaller one, further away. As I didn't use any patterned paper for the background, I placed the third cluster right at the bottom of the page, to ground it.


I had to be careful that the two clusters near the photo don't draw the attention away from it. I went for relatively large pieces of the ephemera, but only a few, with muted colours and no crazy patterns. I took care that the two embellishment clusters were balanced: they both had a bit of pale
pink, a bit of teal, gold glitter and plenty of black and white. I'm not a bow person, but I loved how the dark pink bow popped on the page, so it went on the zebra's neck. To balance it out, I added a puffy heart, same in colour, to the other embellishment cluster.

I struggled a bit with the title. Ideally, I would have liked it near the photo, but it just simply didn't work. I didn't have a specific title in mind, so I tried out various words and phrases. Everything was either too big, dwarfing the photo, or too small, being dwarfed by the clusters. So in the end I made
a decision to include the title in the third embellishment cluster. The word "happy" is from the puffy sticker sheet and it was just right in size and in colour to keep the status quo. 


I was quite happy with how the layout was turning out, but something was still missing. I didn't want to use ink splatters, in fear of making the background too busy, so I opted for sequins. I find them more manageable than ink - you have full control in where they go on the layout. I chose yellow sequins as they complement the layout and they are subtle in colour.

To finish it all, I managed to make a bit of a mess with the date stamp, but I ended up leaving it like that - messing up is part of my style, too... ;-)
Hope you like my layout. I have created a process video making it - this is my first video ever, so needless to say, it's very exciting for me. 


Thank you for this opportunity from the UKSA team, it's been a real pleasure creating this layout for you!


If you'd like to join us as a guest designer drop us an email at UKScrapAddicts@gmail.com