Showing posts with label kaisercraft. Show all posts

Sunday, 13 January 2019

1st Christmas | Elaine King | No Cardstock

Hello everyone

Today I am bringing you a layout made using out monthly prompt of ‘No Cardstock’. At first glance this did seem as though it would be, well, challenging! Lol . However, once you set your mind to it you realise there are lots of papers out there that are ‘neutrals' within a collection so this what I chose to use for my background papers.


The main, pale grey, background piece used here is an ancient piece of paper from my stash and the green heart I used was from a kit I bought from Mind The Scrap last summer.

The rest of the papers are from of one of my favourite collections from Kaisercraft called Mint Wishes. I originally had this collection sent to me when I was on the Design Team for Merly Impressions and it soon became one of my favourite ever collections. There are still some remnants of the kit available from them and some on Charmed Cards and Crafts I believe.

To start with I drew a large freehand heart on the green paper and cut it out using good old fashioned scissors, (you don’t always need fancy tools). Then once I was happy with the positioning I started cutting lots of little banners of varying lengths to create the left hand side of the heart. I always find that using wet glue is preferable in these situations to give you a degree of move-ability when you are figuring out where to place your pieces.

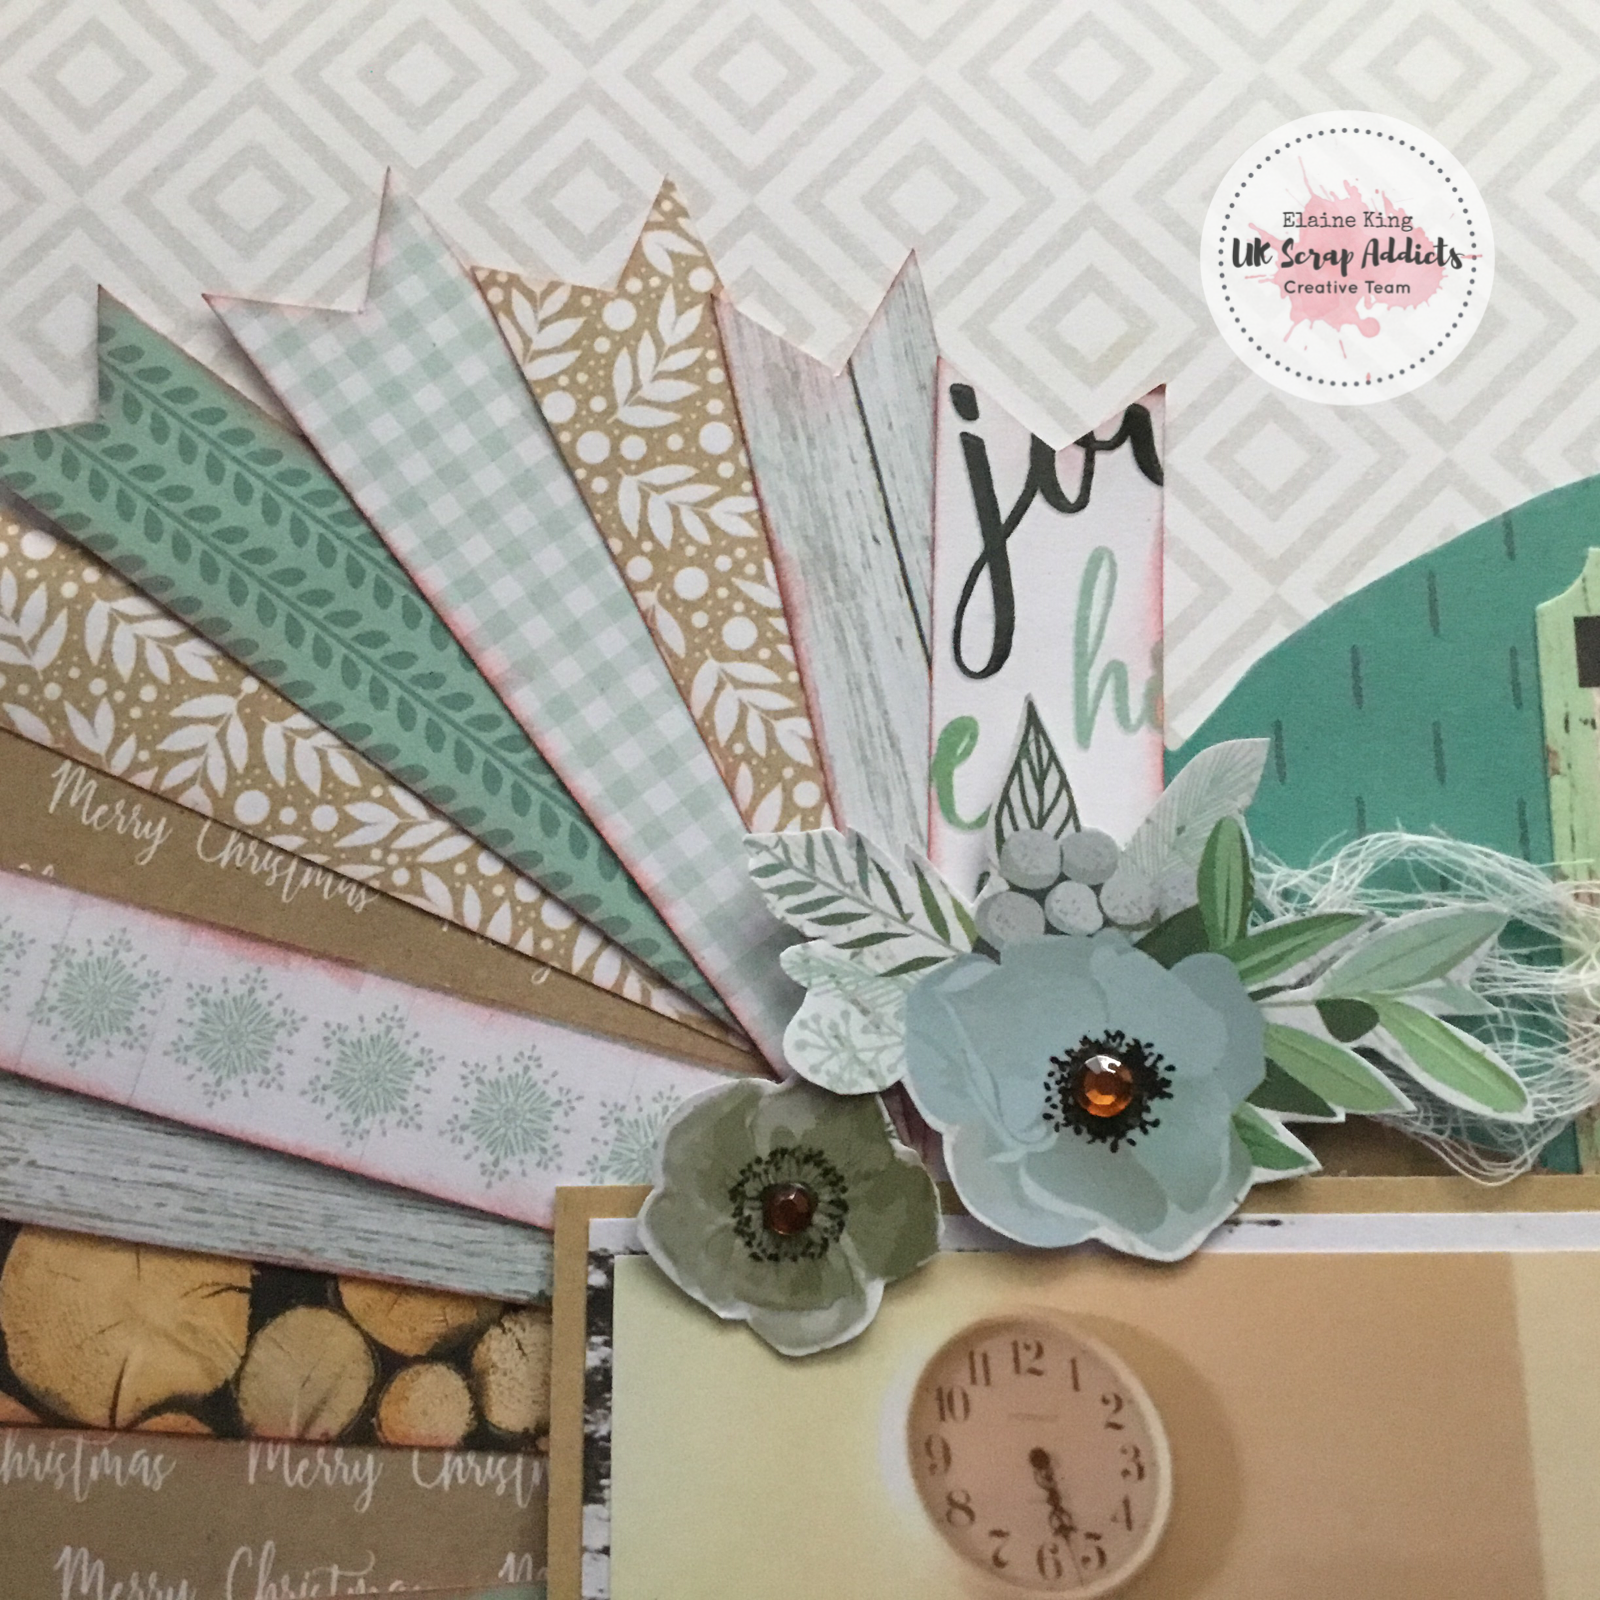
Once I was happy I mounted the photo on more neutral papers from the collection and raised it on foam pads for dimension. I then fussy cut the flowers and arranged them to form clusters. I then added more embellishments and I was done. I confess this was inspired by a layout I saw on Pinterest  but I do hope this has given you more ideas to create a layout using no cardstock and how to use up those neutrals you find in most collections.


One of my friends commented that maybe the layouts may be too flimsy but that has not been my experience at all. The weight of the paper these days is generally very good and with the layering it gives it stability. Once it is in the page protector it will be fine.. trust me! 


anyway.. I do hope you have enjoyed your visit. do remember to come back too though! 


Sunday, 23 December 2018


A Winter's Day | Lou Thompson | Grab 5


For this month's challenge I just had to go wintery and use the Prima Santa Baby collection I love.


I started by splattering some oxide inks on some Bazzill marshmallow heavy cardstock in colours that coordinated with the Prima range.

I started by layering some of the papers around my photo and added foam dots for dimension.

I then added glitter stickers and washi, foam stickers and ephemera from Santa Baby, some American Crafts dot stickers and Kaisercraft die cuts.

I really love this layout its super pretty and perfect for winter.

Here are some close ups. Hope you like it.


Wednesday, 12 December 2018

Love : Elaine King: Grab Five

Good morning all

Today I have pleasure in bringing you a layout made using five of my favourite crafty items in line with the December prompt to 'Grab 5" items from your stash and create a layout. 


Now, I confess, sometimes my Mojo goes walkabout..and for just some occasions, I have a jar with  slips of paper in it with lots of suggestions. This prompt was therefore right up my street! 

First I took my five slips of paper. My selection was as follows: 

1) Patterned Paper
2) Pearls
3) Flowers
4) Punches
5) Die Cuts 


Currently I am making an album for a friend who recently got married and so my first thought was to make a layout for this album. I am mostly going to be using Kaisercafts Misty Mountain range which I got from Charmed Cards and Crafts so this was my first selection. I knew I would be making clusters of floral embellishments so the choice of both flowers and pearls was a lucky one! Lol


I was then wondering how I would include both punches and die cuts?.. so I then chose a sketch that included some bunting so I knew that I could use my punch that I got from a Stampin' Up demonstrator. All I had to do then was choose which die cut to include and I thought this 'Love' one was just perfect as a title for my friend looking at her Mum. 


I hope that you like the idea of choosing five items to kickstart your creativity too. Do pop in and let us know what you have chosen to use!


Saturday, 21 July 2018

Loved | Karen Moss | 6 x 6 Paper Pads


Hello, hello - Karen here with my page for this month's theme - 6in x 6in paper pads.

I have to confess I did cheat a little because I used a Kaisercraft Anthology pad which is in fact 6.5 in x 6.5 in so very slightly larger.


For my page I only used what came in the paper pad (it has die cut borders and shapes as well as sheets of paper) and some cardstock.


I fussy cut some butterflies and flowers from the papers to use as embellishments, along with the die cut tags and borders.


I used my Silhouette software to design the triangle heart and title and then cut them both from adhesive backed cardstock.


As I wanted fringed borders at the bottom of my page and I don't own fringing scissors I also cut these with my Silhouette.


If you would like to see how I made my page - I have a video here.

We hope to see you back soon and keep an eye on our YouTube channel as there are new process videos going up all the time.

Until next time - Happy Scrapping xxx

Thursday, 21 June 2018

Here & Now | Karen Moss | One "6 x 4" Photograph


Hello, hello - Karen here with my page using one 6 x 4 photo. If I am going to  scrap with just one photo I tend to use 7 x 5, or larger or a small square.   So this was a challenge that make me think.


I started by making an inky background in colours that complimented my paper range (Kaisercraft Miss Betty).  If you look at my YouTube here you will see how I did this.


I cut some pennants for the main base of my page and staggered them down the inked cardstock, which I had mounted onto a piece of pink woodgrain paper.


After mounting my photo onto a piece of patterned paper I added a doily to the left of my photo and another one, cut in half, to the top of my page.  


I then placed 'fussy cut' flowers to the bottom right and top left. 


The last thing to do was to add my title and scatter some sequins and sparkly hearts around the page. 


You can catch up with what the other talented ladies have made this month, or in previous months come to that on our YouTube channel, on Instagram or on our Facebook page.

Until next month 'Happy Scrapping' xxx


Sunday, 13 May 2018

Right Now | Elaine King | Monochrome

Good morning Everyone

Thanks for joining me on my first blog post since becoming a member of the UKScrap Addicts Creative Team.

Today I am bringing you a layout using a monochrome colours. There was some discussion in the team as to how we would define Monochrome, but essentially we all agreed that using just one colour, regardless of how many tones there were, and, if you would like to, adding in a tiny amount of black in amongst the colour was the definition. I hope that helps?

So, here is my layout.


For this I decided to use one of my all time favourite collections from Kaisercraft that I originally sourced from Merly Impressions, one of the leading Kaisercraft suppliers in the UK. This collection is called  Indigo Skies and, of course, is predominantly blue! Lol

To start my layout, I used a starry stencil using texture paste that I had added a little denim coloured distress ink too. 


I then used a 3" piece of the collection paper to pace at the left hand side where I then added two further strips of paper too. I then set about fussy cutting several flowers from the patterned papers and created a cluster at the bottom left of the photo and added a tag and some strips of paper on the right.


I added several enamel dots and a twirl of blue and white bakers twine in amongst the cluster and added a couple of wood veneers that I had coloured with distress ink too. 

One of my favourite 'techniques' and one that gets overlooked a lot, is to literally take a few 'chomps' of punched edge from the sides too. Once I had done this I trimmed the paper down to 11" x 11" and backed it onto a piece of blue cardstock too. 
I do hope you will join in our challenge this month..especially as we are in the month of National Scrapbooking Day too! Go on! Have some fun and do let us know what you've been up to. 


Friday, 8 September 2017

Guest Designer | Elaine King

We have the Mum of a hero guesting for us today!  Welcome Elaine and her touching layout...


Hi I'm Elaine and I'm a Scrapaholic! I live in a tiny hamlet called Chiddingstone Hoath in Kent, (somewhere between Sevenoaks and Tunbridge Wells) and I have been scrapping for about 8 years now and I can honestly say it's almost taken over my life! Lol. Fortunately my long suffering husband indulges my hobby and has recently allowed me to commandeer our entire dining room for my craft room! These days I scrap a lot of my little Granddaughter (aged 2 & 1/2) and of course, my husband, two sons and my daughter in law. 


Both my husband and my youngest son are firefighters in the London Fire Brigade and I have journaled about my youngest son in this layout. He (front centre in the photo) recently attended the Grenfell Tower disaster and my journaling reflects the emotions I felt at this time. Journaling is not something that comes easy to me as I don't really like my handwriting but when I do journal it has to be heartfelt, as in this case. I think it is important to use your own handwriting for future generations so I prefer not to print from a computer for this. 


To create the page I used Kaisercrafts Shine Bright collection and I used a Stampin Up punch to create the small patterned hexagons aswell as a diamond Press stitched hexagon die for the black backgrounds for each of them. 


I also matted each piece of patterned paper on black cardstock as well as the photo and added three black gem brads, a couple of wood veneers and a cork hexagon too. To finish I added the title using black and gold Thickers and a smaller sub-title in black beneath the photo. The little 'Hazardous'  Flair badge was a real find from a friend!


Thank you so much Elaine.  You can find more of Elaine's work here: blog and Instagram

Wednesday, 6 September 2017

Sweet Child of Mine | Pol Prince | Journalling

Hi scrappy friends! Pol here today with a new layout I created with this months theme in mind - journaling. 
I'm a bit hit and miss with journaling usually, I tend to add it after I've taken photos of my page since most of my pages are for design team work and will be viewed by a larger audience. Journaling is usually an afterthought for me, because I scrap more for the process and the art. I would like to try and include more journaling on my pages as a record for my children. With this in mind I've created a layout that not only tells a story, but even the photo itself is 'journaling'.


This page documents the sweet and funny messages my 17 year old son and 14 yr old daughter wrote in their Father's Day card to their step dad. We absolutely fell about laughing when we read it!

This month we were given some stencils to try from Lisa-Jane Johnson, who owns the Pretty My Page shop on Facebook, with an exciting new website coming very soon. 

My border paper is Websters Pages - an older collection that I brought up to date with the addition of some mixed media and colourful flair. 
To start with, after I had matted my white card to the border paper, I used the packaging technique to lightly add some light green Distress Ink to the top of my page. I gently sponged a darker shade of Distress Ink through one of the stencils a few times, then applied white texture paste through one of the stencils, gradually building up my base layers.


I matted my photo onto the same paper as my border, and punched out the ripped tap effect at the top. I then used foam tape to adhere my photo and mat over the inky area at the top of my page. 
I used pink and blue Distress Inks to gently sponge through two different stencils onto white cardstock, and cut them out to use as ephemera around my photo. I added enamel dots to the centres, which were also from Lisa-Jane's Pretty My Page shop.


I used three main clusters around my photo area which I defined using white thread. I added Cocoa Vanilla and Elle's Studio woodgrain shapes, fussy cut butterflies from the Kaisercraft Wildflower collection, Heidi Swapp word stickers, and flair from Cutz2luv.


I used blue Bella Blvd puffy heart stickers around my page, peeking out from behind layers. 
I absolutely love the black Pinkfresh alphas that I used for my title, in fact I love them so much I bought four packets! They last ages too because they come with lots of vowels.
I'm a massive fan of using song lyrics for my page titles, so you'll often come across a song title on my layouts!


Finally, last but not least, I wrote my journaling under my title, and splatted black ink around the page to tie it all together. 

Please do have a go at this months challenge featuring journaling, it's a great way to tell a story you've been meaning to write down, or even create a page without photos. Thanks for reading, see you all soon!


Thursday, 10 August 2017

Sweetheart | Laura Rumble | Clustering


Hi Folks!  Laura here today with my clustering layout.  I'll admit that this is my least favourite topic so far!  I pulled out my current favourite papers from Kaisercraft to ease myself into this challenge... you can pick up this collection from this month's sponsor.


I fussy cut a few flowers from patterned paper and used these as the base of my cluster.  I then threw in some lace, sequins, enamel dots and leaf die cuts.


To me the definition of a cluster is a few different materials/shapes/colours very close to/layered on top of each other.


I popped up my large heart background on some foam squares.  I love that this leaves interesting shadows on the patterned paper behind.


When I was finishing off with some splatters I only covered the important part of the photo and let my mist droplets fall on to the background.  What do you think of this effect?  I'm still on the fence about the geren drops on the photo!

Here is the video: https://youtu.be/fk6s_rzCkh4


Thanks for looking