Showing posts with label youtube video. Show all posts

Wednesday, 1 January 2020

Moonlight | ScrappyNerdUK (Claire) | Paper Folding

Happy New Year to you all. 

I am so excited about this months theme which is paper folding. We are going to bring you lots of different techniques that you can incorporate into your scrapbooking pages. 

So without further ado, I am first up. I love making 3d paper folded stars and so thought I would share this with you here.

 The technique is very simple when you know how.

So, first you need to die cut our hand cut out a star. I have used a die through my Sizzix Big Shot and for a little variety I cut a mixture of sizes.

I then used a score board (but you can use most paper trimmers to do this too - be sure to watch the Youtube video linked below for a tutorial on this) and I score from the top of each point to the bottom of each point. I do this for each of the 5 points.


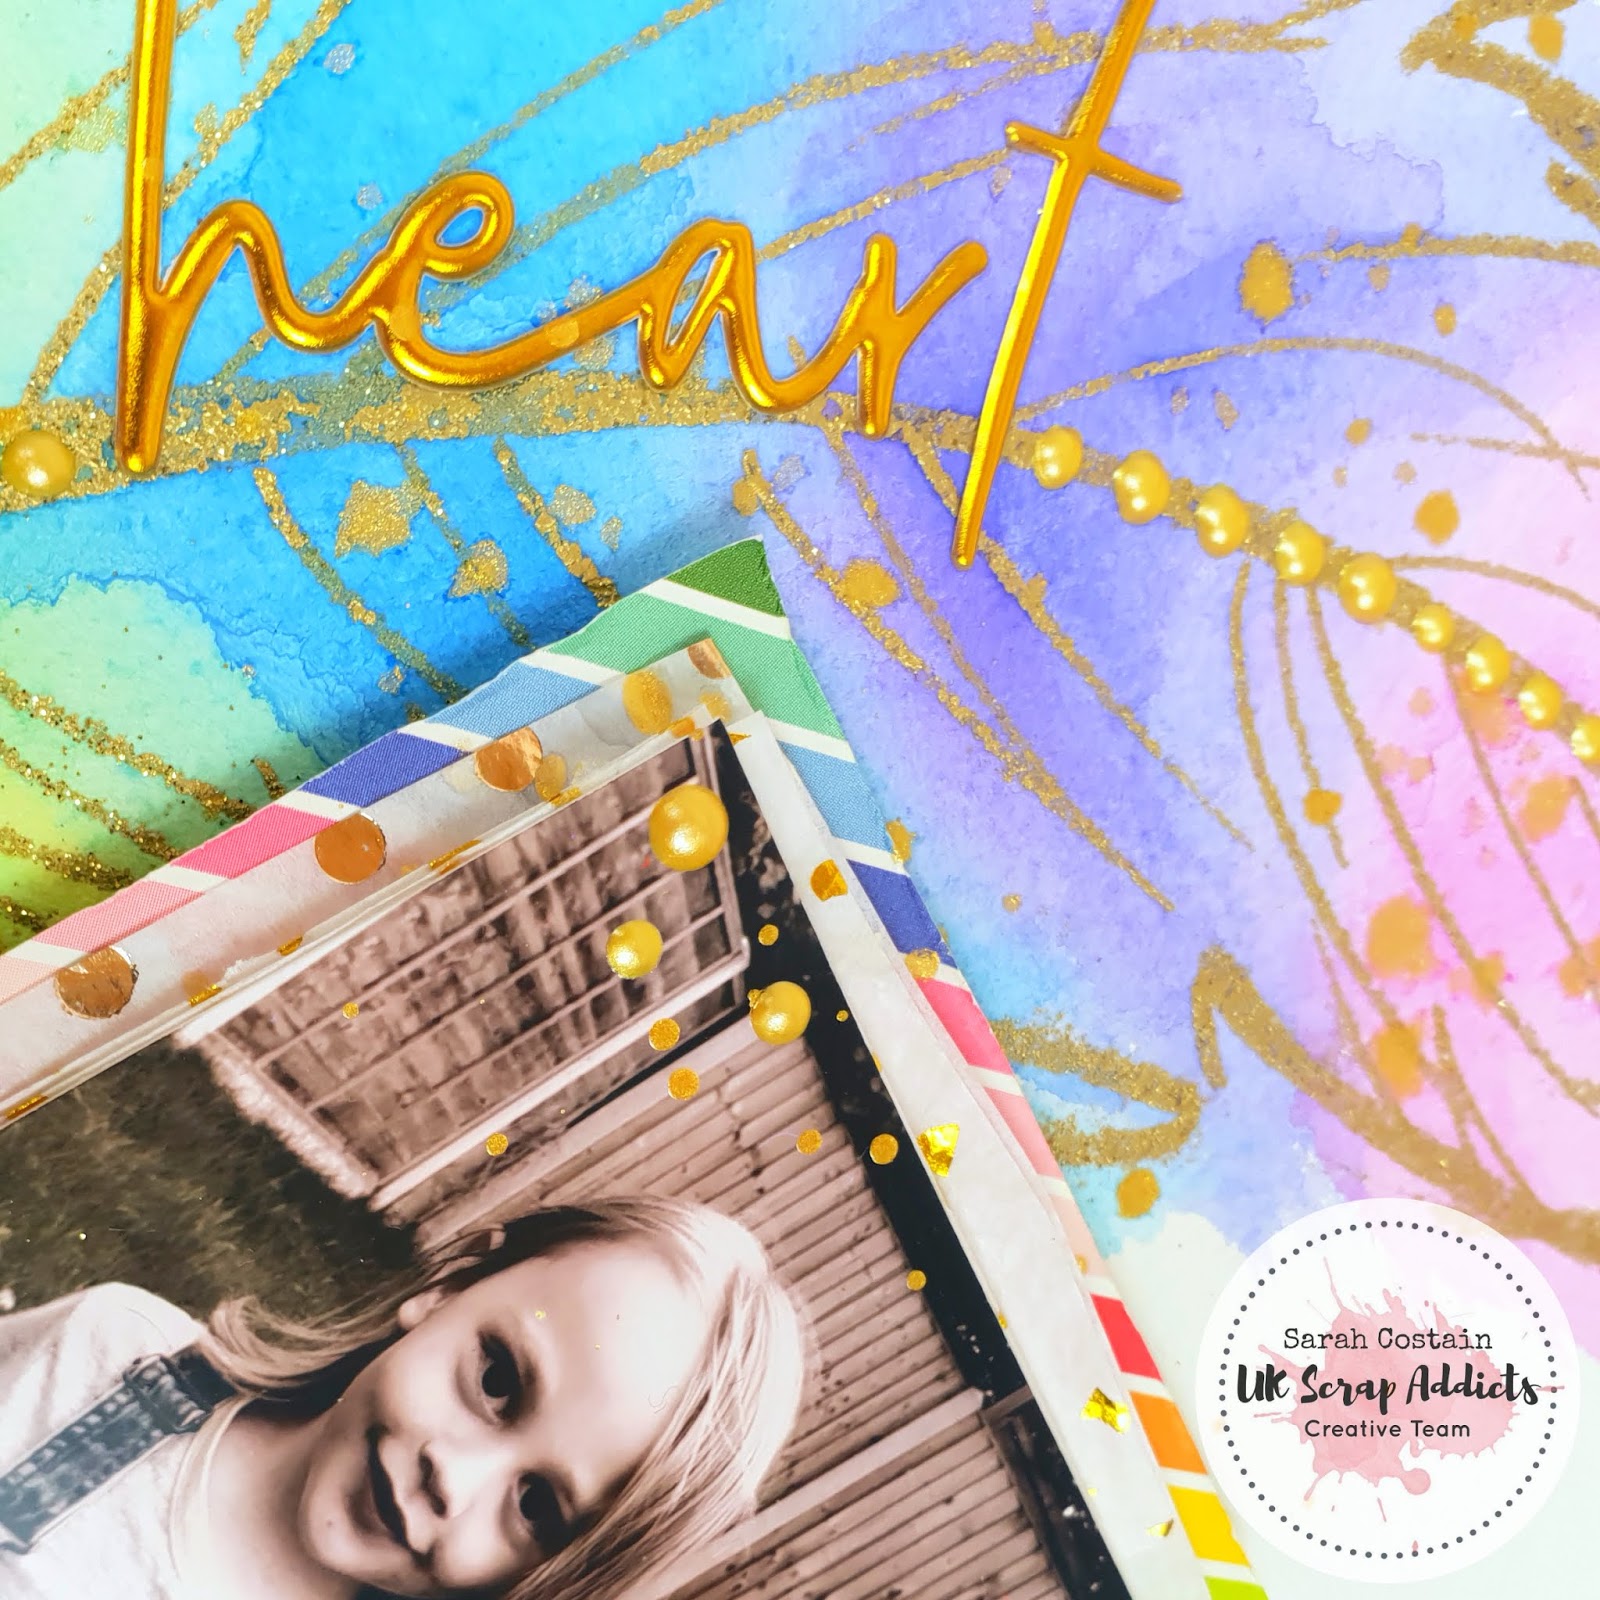
 I also die cut my photo into a star to give this a little more interest too.

Next I folded each of the score lines using a mountain and valley style technique. This meant that the mountain fold was each point of the star. The valley folds will naturally happen when you follow these steps.

I then burnished each score line to help define the star shape.


To adhere these stars to your page you will need to add some dimension into the middle of the star (underneath of course). I stacked 2 small foam pads for my stars as I didn't want them to be too dimensional - us scrapbookers know that dimension is not our friends when trying to squeeze our layouts into albums!!

If you are making these for something like a box frame or off the page project them add more height if you wish.

I then added some double sided tape to each of the 5 points of the star and adhered these to my patterned paper.

My title came from a quote from Lord of the Rings and it worked so well with the style and theme of my photo. I used some small gold glitter alphas (called Happy) and added these on top of the stars. They stick very well as they are foam and bend well over the folds. I wouldn't suggest using puffy or chipboard alphas for this - stick to the foam ones!!

I then added some final flourishes with embellishments from Cocoa Vanilla Studios and some Heidi Swapp colour shine in Gold, Rose and Sweet Mint.


Be sure to head on over to watch the process video here - 


Thursday, 1 August 2019

I Told The Stars About You | ScrappyNerdUK (Claire) | Sketch

I was absolutely thrilled when Laura Rumble agreed to design a sketch for us to use this month!!

Sketches are brilliant if you are ever stuck for inspiration and design as they give you a great starting point. They can be interpreted in so many different ways and it's great to see how different layouts look when all using the same sketch.

So I am kicking off the month with my layout......

I used some papers from CVS and grabbed my Big Shot and some star dies and started die cutting a whole load of layered stars. For the largest star I layered 4 papers and for the medium I layered 3. I also added in a little velum here and there within the star clusters.

I then ran these through my sewing machine to stitch down the middle. This enabled me to be able to lift the edges of my stars to create some shadowing.

I then started work on my background. I used a white Posca paint pen to add some ink splatters in a semi circle shape and added on top some gold Heidi Swapp colour shine.

I then arranged the stars in a semi circle to follow the shape as shown on the sketch. I added some wet glue to the back of the stars and secured them down. I then punched out some smaller stars to fill in the gaps around the larger stars. I added some more ink splatters on top too!

I did a simple mat behind my photo and nestled that in to the bottom of the half circle.

Finally I finished it all off by using a white gel pen to hand doodle some stars into the little gaps that were left.

And I'm chuffed with how this layout came out.

Be sure to check back here again soon for more sketch inspiration. And if you want to join in then please head on over to our Facebook group!!

There is also a process video for this layout which can be found here -https://youtu.be/0HsAbr3mML8

Sunday, 14 July 2019

Be Bright | Sarah Costain | Sewing

Hi it's Sarah here today with a summery layout using this months theme of sewing.

I decided to do one of my favourite techniques of stitched ribbon ruffles. The ribbon is seam binding which comes in loads of colours and works brilliantly at adding texture. I created an ombre sunny glow behind my ribbons with distress oxides and added a few splashes of shimmery ink.


For my papers and embellishments I used a summery kit from my stash by Mind The Scrap. There was a lovely ombre paper which complemented the sunburst perfectly.


My photo was taken at a seaside fair so I surrounded the photo with fairground and beachy themed stickers, tucking some in the layers and adding some on top or popped up on foam to add more dimension.


Finally I added some glasses to the sun and enamel dots and puffy stickers in amongst the stickers.


You can check out the process video here for more details.


Thanks for joining me and have a Happy Scrappy day :)

Sarah
ManxyCatCrafts


Saturday, 4 May 2019

Sleep Amongst The Stars / Di Willcox / Fussy Cutting

May is fussy cutting month for us in UKSA and I think it's fair to say, we're all trying to think creatively about what we fussy cut! A majority of the time it's the floral or butterfly papers that tend to be cut into as they make great embellishments and compliment photos and papers, so I've gone for something a bit different and chosen stars.


I had a cut file backing sheet from The Cocoa Vanilla Studio's Boys rule collection and cut out the stars, some individually and some linked together, and made a crescent/ moon shape with them. 
Before I stuck them down on my white background I used water based crayons and the packaging technique to add some subtle colour splotches. 
After the photo was matted and stuck in place, I sprinkled and stuck some sequins around the page to add a bit more texture and effect. I did have a bit of an accident with the glue and this can be seen in my process video (here)!
Lastly I used a Thickers letter guide to help shape the title around the 'moon'. 


You're welcome to join us over on our Facebook group to join in with the monthly themes!!

And don't forget that we are celebrating (Inter)National Scrapbooking Day this weekend (3rd, 4th + 5th May 2019) and all the details can be found over at our Facebook group. Just search for UKScrapAddicts.


Thanks for reading and see you again next month!
Di x

Sunday, 14 April 2019

Dream | Sarah Costain | Sparkle

Hi Sarah here today with my take on this months theme of Sparkles.

For my layout I used the beautiful Cosmic Galaxy kit by Thompsons Craft Supplies and a night sky dream theme.
The patterened paper was stunning on it own so I just added glittered galaxies and stars using a stencil and heavy body gel by Prima


My picture was layered on top of galaxy washi, holographic patterned paper and velum as well as tulle and white glittered cardstock.


I added the word dream across the bottom of my photo and lots of stars sequins and Nuvo Drops in glitter silver all over the page.


I finished my page with a few splashes of ink in various colours to match.

You can watch the video here for more details of how I created my layout this month.
https://youtu.be/eweEjoEKr7Y


Thanks for joining me and have a Happy Scrappy Day!!

Sarah
ManxyCatCrafts


Friday, 15 February 2019

Choose to Shine | Punches | Sarah Costain

Sarah here today with my layout using punches.

I don't own all that many punches, but for some reason I have about 6 different sized star punches!! So that was my starting point for my layout.


I applied clear gesso to my page which was a night sky scene from a kit by Thompson's Crafts available here. The gesso helps my page withstand any mixed media I throw at it.


I punched out various sized stars from mirror card and the left over trimmings from my photo. I added these on top of a silver texture paste and spray background.


To frame my photo I matted it on more mirror card and added a glitter embossed frame.
I cut apart words from another paper from the kit to create tiny word stickers and quotes.


Some sweet kawaii stickers, nuvo drops and sequins added more sparkle to my page to finish it off.


You can check out the video process over on the UKSA YouTube channel here.

I hope you will dust of those punches and give this challenge a whirl!!
Have a Happy Scrappy day :)

Sarah
ManxyCatCrafts

Saturday, 27 October 2018

Books and more Books | ScrappyNerdUK (Claire) | Small Photos

Hey there!!

So this months theme is small photos. What a great way to include small photos in a travellers notebook. I love scrapping in a travellers notebook when I have photos of something that is a smaller story that I want to document but not necessarily warrant a full 12x12 layout in my album.

I used a paper from Paige Evans Oh My Heart collection (desperately trying to kill this kit!!) as I have had this in my stash for ages and this was the perfect project to get it used up. The shelves reminded me of my book shelves. I have recently moved and wanted to create a little nook area where I can go and read and this photo captured this just perfectly.

So I trimmed the paper to fit into my travellers notebook. I am using a Simple Stories one currently and these ones are a little wider than the standard TN size. This really helps me showcasing the amazing patterned paper and really brings the whole theme together. I fussy cut some elements from another one of the papers which had some cutaparts on and used these as embellishments around my photo. This is a great way to make your collection go so much further when you are running out of ephemera etc.

I knew that in the collection there was a die cut that would be perfect to use as my title - Books and More Books!! I popped this on the opposite side and used a black fineliner to create some faux stitching around it to help it stand out a little more.

I added on a book sticker from the Paige Evans sticker book and 1 chipboard piece that says "all you need is a good book". I also used this area to add some journalling on. I don't journal much on my 12x12 layouts but find myself being drawn to adding more journalling in my travellers notebook - especially those random smaller stories that you want to remember in years to come.

My layout felt almost complete but decided to channel my inner Missy Whidden by adding in some lengths of thread in co-ordinating colours and these are layered behind the top left and bottom right of my photo cluster (along with a couple of flower stickers, also from the PE sticker book).

And the layout is finished. I love how colourful this layout is and really encourage you to try and travellers notebook if you haven't yet. Its a great way to scrap on the go, when you don't have much time or even if you have those smaller photos that would look lost on a 12x12 layout.


Be sure to head on over to Youtube to watch the process video for this one too.....

See you next month with a new theme!!!

Claire xx


Thursday, 27 September 2018

I won't give up on us | ScrappyNerdUK (Claire) | Paint


It's nearing the end of Summer here so that means one thing - no more super bright layouts! We head into Autumn colours, photos of Hot Chocolate and crisp Autumn mornings and then onto the Big C!!!

But....For now...I bring you one last hurrah of this summer season and who can resist a rainbow layout (I know I can't!).

So this months theme was paint. I decided to use some acrylic paint markers for this layout and I have teamed this layout up with my Alpha Attack series on Youtube to demonstrate that you can use paint to change the colour of any type of Alpha or Thicker (because we usually have lots of those in our stash right!?).

So my thought was rainbow rain. I know this sounds crazy but here is how the layout came together.

I grabbed a whole load of half used Thicker packs from my stash and started sticking them randomly over the lower 2/3 of my page. (I did Gesso my page first knowing I was going to be applying white paint over the Thickers).

Once these were all stuck down, I then added a layer of Gesso (I actually added 2 layers because I wasn't sure how thick the coverage would be from the paint markers).

Once I had let the Gesso dry, and you can use a heat tool to speed the process up (I certainly did), I then applied 2 layers of white acrylic paint over the whole page.


Next came the hard decision as to where I was going to include my photo. I didn't want to cover too much of the background up so I went with a photo that I could cut down to just the subject image (my husband in this case) and I packed the photo with a small amount of 3 different patterned papers around the edges.

This is where the fun part came in. I used the acrylic paint markers to colour in each alpha using the ROYGBIV colours (apart from I had to substitute Indigo for Pink) and I worked my way across the page with each colour. Next I added some of the paint onto a non stick mat and added a little water and went splatter crazy! I tried to keep the coloured splatters within each of their own colour sections. I then went tone on tone with adding some enamel dots in hearts and star shapes.

I did back my white cardstock onto a piece of rainbow(ish) patterned paper. I had used a sheet of Bazzill Marshmallow cardstock which is primed for Mixed Media but it had buckled a little. So cutting down a 1/2 inch from each the top and bottom, I then mounted this onto the patterned paper to held smooth out the warping.

Next I free hand cut some clouds and used a black paint marker to give these a faux stitched border as these were getting lost on the background. Finally, because clearly there were not enough Alphas already on this layout!, I then added my title into the left cloud. I even popped a sun in to the top right cloud to keep with the theme.

In total I used a massive 97 Alpha Stickers!!! And now I need a lie down. Thanks for visiting our blog today. Be sure to head back for more inspiration throughout the month from the other ladies. Oh and we have a new theme on 1st October!!


If you want to watch the process for this layout then you're in luck as there is a process video right here for you. So be sure to head on over to our Youtube channel where you will find hundreds of videos to keep you inspired!
Youtube link below.
See you next month!!


Claire xxx

Saturday, 15 September 2018

Amazing Heart | Sarah Costain | Paint

Sarah here today for this months challenge using paint which is something I love to do on most of my scrapbook pages.

I decided to use watercolour so used a watercolour 12x12 paper for my background available at Thompsons Craft Supplies.

Using an embossing pen I sketched out a feather and coated it in Gold glitter powder. Once melted I added a rainbow of paint over it to fill in the shape.

I layered my photo onto tissue paper and rainbow paper from the July Mind the Scrap kit. I tucked washi behind the photo for added texture and mirrored this down the side of the layout.

Scripty Thickers also from the kit were perfect for my title running along the feather and some splashes of gold Color Shine and pearl drops added a finishing touch.

You can check out the process video here.

Thanks for joining me and have a scrappy day :)

Sarah

Monday, 27 August 2018

You Colour My World | ScrappyNerdUK (Claire) | Tic Tac Toe

Hiya friends,

I can't believe we are nearly at the end of August already.....this means its nearly time for a new theme!

We still have a couple more layouts to share with you for this months theme of Tic Tac Toe. And I hope you like bright colourful rainbow layouts?


So I chose to use Circles, Rainbow and Multiple Alphas.

I started with punching different sized circles from blue, red, pink, yellow and blue patterned papers. I used a 3 inch, 2 inch and 1 inch circle and adhered these onto a piece of white cardstock.

I already loved how this layout started out.


Then I set to work on the title and embellishing. I chose to use 3 different alphas and wanted to use all glittered ones but change the font of each word. I love this bright title and different directions the words run make it more interesting too.

The photo, which can be seen just at the bottom of this photo, was layered with co-ordinating patterned papers that match the circles.

Each circle was then drawn around with a 0.8 black fineliner to help make them pop and give them more of a messy look.

I also added in some accent words from Pink Fresh Studio and used the co-ordinating hearts and stars to create a colour on colour embellishing.

It was then all finished off with a couple of tiny word stickers and some splashes of black ink!


Be sure to head on over to Youtube to watch the process video too. 
See you next month!!

Claire x


Tuesday, 21 August 2018

Happy Birthday | Karen Moss | Tic Tac Toe

Hello, hello Karen here, a little later than planned but that's another tale for another day!

This month our challenge was to make a project from the TicTacToe board below.


The idea is to choose a line of three either horizontal, vertical or diagonal.  I chose the horizontal middle line - arrow, circles and washi tape.


For my arrow element I used a font called Dreamland Arrows which is a Silhouette font.  I wrote my journaling, using my Silhouette machine, around the edge of the page.  


I punched circles of patterned paper to add to my tags and the doilies are circles too.


I added three strips of washi tape to each of my tags. 


I have a YouTube process video here if you would like to see how I made this layout. 

I hope you pop back soon to see what the other talented UK Scrap Addict ladies have made and hope you will join in with the challenge over on the UK Scrap Addicts Facebook Page. 

Sunday, 15 July 2018

Cool Kid | Sarah Costain | 6x6 paper pads

Sarah here today with my take on this months challenge.

I have lots of 6x6 pads in my stash from my card making days. I chose to use the Cool Kid collection by Crate Paper as it is so perfect for my numerous pictures of my little boy.


I started my layout by creating a mixed media background using inks and water. I let the ink run through the water to create fun splashes in colours matching the papers.


When my background was dry I added pages from my 6x6 pad across the bottom of the layout. I trimmed of the excess and secured it with some messy machine stitching.

The off cuts from the papers were perfect to create lots of layers behind my photo. I added some vellum and popped it all up on foam for added dimension. 


I used a journaling spot from the sticker sheet and added a silver clip and embellishments in the bottom corner which helped balance the overall look of the page.


You can check out the process video here.

Thanks for joining me have a scrappy day :)

Sarah

Wednesday, 27 June 2018

Beautiful Smile | ScrappyNerdUK (Claire) | 6x4 Photo

Hello ScrapAddicts,

Its my turn on the blog today with my layout based on a single 4x6 photo. This seems pretty easy to work with for me and so I really concentrated on making a big bold title to fill a lot of the space on the page. 


I used the Glitter Girl collection from Shimelle for this layout as in the paper pack there was a 12x12 paper with all of the letters from the alphabet on it and I knew that I wanted to cut these apart to form the basis of my title. 

Once I had cut the paper up, I then had to decide on a title. 

Now, I struggled with this as it was a photograph about myself. I decided to embrace it and call the layout Beautiful Smile.

I only added a couple of areas of embellishments which were located at the top left of my photo, the bottom right of my photo and the bottom right of the page where the title ended. I wanted to maintain a lot of white space on this layout to keep it looking clean and I was happy with the balance of embellishments v. white space on this layout.

You'll see that I tucked in a mixture of die cuts and stickers to each cluster and added a few enamel shapes to finish the page. 


I hope you have enjoyed reading about my layout and be sure to head on over to our Facebook Group here to share what you have been inspired to make.

The process video for this layout is linked here for you - https://youtu.be/kpeNNlyWrX4