Showing posts with label multiple photo layout. Show all posts

Sunday, 13 October 2019

I'm Crafting | Sarah Costain | Multi Photos

Sarah here today with my Multi photo layout for this month.

I decided to create a grid layout with 4 small photos. I knew I wanted to layer lots of papers behind each one and wanted a nice gap between them so didn't print them very large.

To begin with I created my background with texture paste and ink spray in white to contrast with the black background.


Whilst this dried I added my layers of paper and some raffia ribbon to the back of each photo with layers of foam to add some height.


The photos were added to the dry background with a T ruler to help keep them straight and I added a title ephemera piece to the centre popped up on more foam.


I used some crafty stickers around the edge of my photos and some button stickers instead of sequins or enamel dots around my background.


Finally I added some golden yellow ink splashes to my background for a little more colour and my layout was done.
You can check out the process in the video link here.


Thanks for joining me and have a Happy Scrappy Day :)

Sarah
ManxyCatCrafts


Saturday, 29 April 2017

1, 2, 3 & Pose | Jackie Ashton | Sewing

Hello, Jackie here with my post following the theme for the month - stitching.  For my layout this month I decided to hand-stitch my title.  

I started this layout by using the packaging technique and Tim Holtz Distress Ink in Worn Lipstick to my white cardstock.

For the papers on this layouts I used a selection of papers from Shimelle - Little by Little collection, Maggie Holmes - Chasing Dreams collection, and I wanted the colour of the embroidery cotton to coordinate with the papers.

I used a stitching template by Amy Tangerine.


By hand stitching my title in a variegated yellow thread, as the outline of the letters, and a soft pink for the inside, it made the title stand out more from the page.


I added three clusters around the photographs and adding some embellishments from Shimelle - Little by Little collection as well as some hand cut butterflies from Maggie Holmes - Chasing Dreams collection.


I love how stitching on your layouts can give it a whole new dimension.

Hope you give it a try


Thursday, 20 April 2017

Oh Those Toes | Lisa-Jane Johnson | Stitching

Hi lovelies!  Can you believe we are over half way through April already?  The good news is that this means it is nearly National Scrapbooking Day so that means there is a lot going on behind the scenes here at UK Scrap Addicts.  National Scrapbooking Day is on Saturday 6th May this year and we have a whole day of challenges, videos, chats and inspiration for you along with the chance to win some lovely prizes.  Maybe you'll be inspired by this month's theme of stitching on your layouts?  I've seen some really wonderful layouts from the other ladies highlighting different styles and techniques and I have another one for you today.
       
  
My intention was to use this cut file from my shop Pretty My Page and to stitch both the inside and outside lines to use with these photos.  Most cut files can be turned into stitching layouts on your Silhouette machine and I had done a few previously so knew it was quite easy.  However, for some reason, I like to call it a happy accident, the outer lines did a full cut and only the inner lines gave me my stitching template.  There are a number of ways you can change a cut file into a stitching template - either by changing the solid lines to dashes, selecting perforate rather than cut when you select your cut settings, and even tracing the perforated image to give you bigger stitching holes.  There are some really good tutorials around the web on the different ways to create sewing patterns using cut files on your Silhouette Cameo and they are all quick and easy to achieve.  I won't lie though, the stitching itself is not quick.

In order to save a bit of time, I try and work out where I'm going to put the photos and only stitch the bits that won't be covered up.  The flower in the photo above was cut from the middle of the template but you can see the little holes that give you your stitching line.  This is the effect you get when you select perforate rather than cut - the dashed lines do go through the paper so you can stitch directly straight from taking it off the mat.  However, I do find it easier to use a pokey tool and just quickly go over the template again to make it easier to see.
You can see the difference in this photo between the dashed holes and my added piercings.  It makes the actual sewing much easier on the hands and the eyes, especially if you have something dark underneath your work to show the holes up better.

I'm really happy that I'm getting some use out of my collection of cross stitch threads and embroidery needle again.  I split the skeins into 2 sets of 3 threads for most of my paper stitching and keep the lengths to about wrist to elbow measurement.  
With this much stitching you need to have a decent weight of cardstock so that it stands up to being handled well, especially if you have a partially cut design like these flowers.  It does take a fair old while to complete the stitching but I tend to do it in stages and I always have it with me so I can do bits here and there.  You can often see me in the car at school pick up time stitching away, or sitting chatting to friends with my head down!
I actually didn't stick much of the design down in the end because I liked the way it looked with the extra dimension from being handled.  I used large glue dots on the odd petal here and there trying to avoid smooshing it down too much so that I could take advantage of the shadows and added texture.
Now that I've got myself a little bag to keep with me, I can see me always having a stiching project on the go.  They may not be the quickest layouts to do but the effort is well rewarded by the extra details in the finished layout.  Just make sure to keep it in the bag when you are eating and drinking... #askmehowIknow ;-)

Bye for now.
x

Wednesday, 29 March 2017

Week 9 I Sarah Toward I Multi-Photo Layout

Hi there.

I'm super excited to be here with you today to share my take on a Multi-Photo layout.  To be fair I've got it easy as I'm a Pocket Page scrapper which by nature is all about multi photos.  But I want to share with you how I squeeze in as many photos as possible, only using one page protector.


One way I include more photos is to do photo collages.  I usually do these using the PicFrame app on my iPhone and use my Canon Selphy to print them out.  You can see that I've used photo collages for four of the photos on my Week 9 pocket page layout.  However one of the days this week was a particularly busy one and I took far too many photographs and couldn't choose just one to use.


Step in my Photo Fuse Tool, and two 4x6" photo collages. 


The Fuse tool allows you to adhere a clear photo sleeve to your page protector and enables you to insert more photos onto your layout.  


The extra pocket has enabled me to fit two extra photo collages in and I have been able to use more photos from a very photo heavy day without missing any out.


Of course if you haven't got a Fuse Tool and sleeves you could always attach a photo with a bit of washi-tape on the top edge acting as a hinge. 


For my Week 9 pocket page layout I used papers from the Crate Paper, Chasing Dreams collection, some puffy stickers from Paperchase, alpha stickers from Hobby Craft and created some extra embellishments on my Silhouette Portrait.  Anything else has been dug out of my stash.

Pocket Page scrapping really is my favourite way of memory keeping.  I hope that I have given you some ideas for including even more photos in your Pocket Pages.

Thanks so much for stopping by today and checking out my first Creative Team post.  Please keep coming back to see what this wonderful UK scrap team are up to.

Hugs
Sarah xoxo


Saturday, 25 March 2017

Photobooth Mayhem | Laura Jane Thomson | Multiple Photos

Hello fellow scrapbookers!  How are you all?  I’m Laura Jane and I'm so excited to be here with my first Creative Team member post on the UK Scrap Addicts blog.  This month we are focusing on layouts using multiple photographs.

All of my scrapbook layouts are 12x12inch pages and a lot of them do contain more than one photograph so when looking at ideas for this month’s blog post I decided to use photos which were taken at the recent www.hugsfornoah.co.uk Gala Dinner which we attended as we have lots of pictures from this event to scrapbook.

I decided to use a double page layout, with multiple photographs on each page but each page has a different photograph layout format...


On the left hand page I have used four photographs which are 4x3inch in size; these have been arranged in a two by two grid format.  The top of the page has the first half of the title and a flair badge embellishment.


The right hand page I have used a photo-strip of four photographs which we received from the photo booth at the event.  This page also has the second half of the title and some journalling about how Noah had chosen what we were to wear for our photographs with embellishments cut from patterned paper and wood veneer pieces.


All scrapbooking materials and products used within this layout are from my stash, some recent and some from 7+ years ago – I love to mix old with new when using stash items rather than a kit as I think it gives a unique feel.

Thank you for visiting and don’t forget to check back regularly for lots of Design Team posts here on our blog and our YouTube channel.

Love Laura Jane Thomson xx


Friday, 24 March 2017

Say Cheese! | Lisa-Jane | Multiple Photos

Hello lovelies!  I've been patiently waiting for my turn to share my first layout for UK Scrap Addicts and here we are!  I'm so pleased and honoured to be part of this amazing team promoting UK designers and craft businesses and I hope you are enjoying all the inspiration so far.

So I thought I'd start with a confession...  I can't dismiss photos.  Even when they are virtually identical.  If I take lots of pictures of an event trying to get a handful of good ones, I can never decide which ones to actually print.  So I print them all intending to sift them when I see them in the flesh.  And then I can't...  This means many of my pages need to have room for more than one photo - enter the double page spread!


I get my photos printed in bulk once a month using one of the on-line deals such as Snapfish on Living Social.  This means that prints work out to less than 2p per print including postage so I don't feel like I'm wasting money if I don't end up using the image after all.  I'm teaching myself to be really ruthless with my photos and not try and scrap every single one of them so I quickly write "spare" on the back and then give them to my little girl to scrap or send them to relatives (thanks to the lovely Shimelle Laine for that tip).     However I still end up with far too many pictures of certain events.  I choose some of the best ones to do single pages and tell the bulk of the story and then I squeeze the rest onto either double pages or side by side pages.


With many people using the D Ring scrapbook albums, the layouts don't fit together snugly when you open the pages.  This means that a true double page spread doesn't need to have the lines matching up across the whole format as they tend to be seen more separately by the eye.


While they may not be 12x24 in format, there are a few tricks to help the eyes see them as two parts of one whole.  Here I've used the same papers in similar proportions on both sides and echoed the embellishments just as you would if it was all on the same page.


On the first side I've matted the white die-cut background from my shop onto a thin black cardstock border.  On the facing page I've matted the black patterned paper onto a thin white cardstock background and added the negatives from the die-cuts.


Both pages have very similar clusters of embellishments to draw the eye across the whole 24 inch canvas - enamel dots, bottle top flairs, stickers and a smidge of washi tape.


I really loved using the new Say Cheese III collection from Simple Stories for these pictures of my children playing rugby as they match their strips wonderfully.  There's actually very little in the kits that I can't use because it is too Disney specific, I even managed to use the "Goofy" stickers for these pictures!

Don't forget to add #UKScrapaddicts to any posts on social media if any of our layouts have inspired you - we'd love to see what you've been creating too!

Until my next post, bye for now!
x

Thursday, 23 March 2017

Crazy Cousins | Roxy | Multiple Photos

Morning scrap addicts!! I'm Roxy and welcome to my first post and video, as part of the UKSA Creative team! So Exciting! 

When I found out our theme for the month was multiple photos, my heart sank a little. I had only ever scrapped with one photo! How was I going to do this? But in fact, I found it relativitly easy! I decided to use some old photos of myself and my cousins.

I made a 12x12 layout, using 3 2.5x4inch photos. The fact that the photos were small made it easier for me to scrap. I decided that the 'Bloom' collection by Maggie Holmes would be perfect to go with the colours in my photos.


I knew that I didn't have much ephemra left for this collection, so decided to mostly use stickers. I love the dimension that the puffy stickers add. 


I decided that my layout needed some splatters to pull it all together. I chose to use Heidi Swapp colour shine in 'blush'. The perfect colour for the background.


Don't forget to check out the process video over on our Youtube channel!!  


Thanks for reading! Don't forget to check back soon!

Tuesday, 21 March 2017

Park life | Vicci Lou | Multiple photos

Hey hey hey fellow scrappers. Hope that you are all well today! I'm super duper excited to show you my layout on this months theme "multiple photo layouts". Over here on the UKSA blog me and my fellow creative team members have been working uber hard on designing and making layouts with multiple photos to share with you all in the hope that you will enjoy our thoughts and processes but most importantly that you will get some useful tips and inspiration to make your own layouts with multiple photos! I hope to see you all play along! Don't forget to share your projects with us on Instagram #ukscrapaddicts

Anyway, I love using more than one photo in a layout especially when I've had a day out where I've been very photo happy (let's face it we all have them haha) or when I've been to a big life event such as a holiday. For this layout, I decided to scrap a day in the park over the half term with my son and his cousin. 

To get my multiple photos in different sizes, which is how I prefer to do it, I simply used the collage app by Instagram selected my photos and the format and printed them out. 

Here is my final layout.


I used a mixture of Alex by Bella Boulevard and Cool Kid by Crate Paper. I quickly decided that I would like to have a film strip as an element to put some of my photos on. That's where I had to get inventive, I mounted my photos on to white card stock and cut a small border. I then stuck them onto some black paper and trimmed it to the size I wanted my film strip to be. Now, of course, film strips have holes in them running all the way down both sides so for that I took my single hole punch and punched out the circles all along both edges. It took me some time but I'm really happy with the result and it was a great way to get the bulk of my photos in one place and make them into their own element.


Next, I decided that I would need to incorporate some more black onto the layout so I opted to mat the larger 2 photos onto black cardstock to bring it all together. My latest obsession is large photo mats. Mostly because I really struggle covering up the pretty pattern papers (I'm sure I'm not the only one haha). Once I had all my photos in place I choose my title and adhered that down with some extra PVA style sticky glue just to make sure they stay stuck to my page for years to come.

Next, it was time for the really fun part, embellishing! I've done my embellishments in a diagonal because I have to scrap around my large photo cluster but the large piece that says "wild child" was just too big to be next to my photos. However, I then needed to balance that with an embellishment cluster at the bottom of the age so that it felt balanced and cohesive. In order to make all my embellishments feel connected, I used similar things for all 3 areas. And I used the paper that is like a banner behind my photo as a chevron pattern for both the top and bottom cluster simply by following the pattern already provided and cutting it up. I added a star and a circle to the top and bottom of my page allowing the circles to run off the edge slightly in order to make it feel a bit more framed. Finally, I finished it off with a couple of asterisks stamped in black (Another recent obsession of mine, haha).


All in all, I'm pretty in love with this layout. I really enjoy making the most of the supplies I have in hand and getting creative with the pattern paper to create little bits of embellishments using my punches. I think it's a great way to stretch your supplies but also a thrifty way to work as you don't have to buy all of the embellishments in a set!

Thank you very much for reading and don't forget to check back every day for more inspiration, hints and tips and even the odd discussion on a variety of different topics!

Much love, until next time!
xoxo 

Monday, 20 March 2017

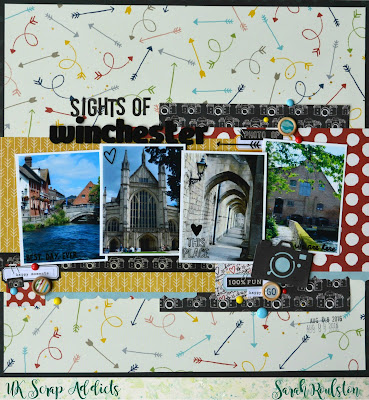
Sights Of Winchester | Sarah (Lottie Loves Paper) | Multiple Photos

Hello everyone!
It's Sarah here today with my first blog post for UK Scrap Addicts and there's a process video over on YouTube as well. I hope you are enjoying the posts and videos from the UKSA Creative Team.

As I am sure you know by now, our theme this month is "Multiple Photos" so I got busy printing off some photos on my Canon Selphy. I had loads of photos taken on a weekend away in Winchester so a layout with multiple photos was perfect for getting some of them into my album.

I used the new Simple Stories collection, "Say Cheese 3" and picked out a 12 x 12 paper with an arrows design, from an older Simple Stories collection to use for my background.


Using a few papers from the 6" x 8" Say Cheese 3 paper pad I layered up patterned papers to create a mat for my four photos to lay on and added some of the gorgeous camera washi tape to "anchor" the photos. The two middle photos are raised up on foam to give added dimension to my layout.


When I'm scrapping with more than two photos I often slightly overlap the edges as I find it easier on the eye - it's almost as if we see multiple photos as one large photo rather than separate photos.


I kept my embellishments quite simple as the papers are busy patterns, just adding some clear stickers to each of the photos and using a few stickers and buttons to create three areas of embellishment.


The day I made this layout I had just purchased a really cute, little camera die, so I quickly put it to use, and added it to one of the embellishment clusters.


You can see how the whole layout came together in a process video over on YouTube


Thanks for visiting today!

Wednesday, 15 March 2017

Hedwig Hugs | Polly's Papercrafts (Emma) | Multiple Photos


Hello lovelies! It's Emma here with my first video and blog post for UK Scrap Addicts... eek! Exciting! 

This month we are all focusing on multiple photo layouts, which isn't usually something I do and let me tell you, I didn't find it easy! In fact, this layout (though I genuinely love the end result) took me ages because I could not make a decision for the life of me! 

I made a 12x12 layout and used 2 standard 6x4 photos which is another thing I don't usually do! First post and being pushed out of my comfort zone already - love it! I used Pink Paislee's Moonstruck collection which is just stunning, so much so I didn't really want to cut it up! 


I realised as well, that I didn't actually have an ephemera pack for this collection so I decided fussy cutting was my friend and made elements from some of the other papers. 


The gold splatters, believe it or not, are NOT Heidi Swapp Colour Shine. They were actually created using my watercolour set from Kuretake. I love the set so much I haven't used it much - oops! Haha!


Head on over to the YouTube Channel too!


Until next time...

Emma x