Showing posts with label #fussycutting. Show all posts

Sunday, 3 November 2019

Pair Of Jokers| Zoe Hailey| Masculine Layout

Hi Everyone

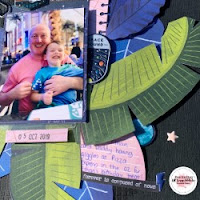
Zoe back again with another masculine layout, this time I've had some fun with Shimelle's Field Trip collection.

My definition of masculine for this page includes black cardstock, blues, greens, leaves and Astronauts!


I had this photo of my husband and our youngest son,  both of them were giggling and laughing hysterically;  I just Love It! So much in fact, I printed it twice (once in colour and once in black and white) and I couldn't decide which photograph to use. So I included both by adding a flip up on my photo.


I took inspiration from the tress in the background of the image which was taken at the O2 so the leaves seemed a good starting point. I pulled in the pink from my husbands T shirt and included that in some of my clusters (who says pink isn't masculine!?)


I love how this page came together, especially the flip up photo of my pair of jokers!

Thanks for reading and I look forward to seeing what you create this month.

Zoe (find me on Instagram zola28)

Tuesday, 3 September 2019

Create Happy Times | Zoe Hailey (Zola28) | Selfie

What a great theme for September; Selfies!


Personally,  I am not a massive selfie taker so this month I have forced myself to take more photographs of me and I have actually ended up scrapping three pages of myself! ( I have even made my layout for our December theme, which is really fun!)

With so many gorgeous new collections coming out, I'm challenging myself to use up some of my older stuff, mainly to make room for the new! So I have worked with Cocoa Vanilla Studio's gorgeous collection; Happiness. I just love this flower reef paper and I had four sheets of it, so on this page, I used two up in my layering.


If fussy cutting isn't your thing (and it isn't usually mine) then this may not be a page for you. I fussy cut two pages of the reef paper and then mounted them on black card and cut them both out again. Adding the outer reef up on foam pads, for even more dimension. I really wanted to bring in the black from my sunglasses and I am pleased with how it turned out.

Of course once I had done that on the reefs, I decided I needed to do the same on the butterflies and it really helps them stand out on a very busy colourful page. I love the shadows they create too.


I really enjoyed making this layout, I love the florals and the beautiful colour palette in the Happiness collection. I hope you enjoy scrapping a selfie or two this month and look forward to seeing your creations in our Facebook Group UK Scrap Addicts.


Zoe ( Follow me on Instagram Zola28)

Monday, 5 August 2019

Together | Sheena Rowlands | Sketch

Hi there UK Scrap Addicts x

This month our challenge is to use a fabulous sketch created especially for us by Laura Rumble. I love a good sketch so was well up for this challenge.

Together.


When I first looked at the sketch I turned it around a few times but in fact I settled on using it exactly as it was.


I'm not really a star person but a sketch is just a guide or starting point so I thought about layering hearts instead I had a good look through my stash and dug out any ranges with hearts on including Pebbles - Forever my Always, Crate Paper - Main Squeeze and Heart Day.


I picked out stickers, chipboard pieces, fringed and tasselled hearts and then cut a few more from patterned papers then layered them together on foam pads up the left side of my patterned paper background. I added in a few sentiment banners in between.


I only wanted to use one photo so I added a couple of journalling cards to help balance it & give me a small place to write on. I found a padlock stick as I was finishing this page so added a cluster around my title so I could use it on here.

I finished up with a Perspective title and mini hearts to add another pop of blue.


I hope this sketch and my layout provide some inspiration to get scrapping. Please share your creations with us over on our Facebook group page.

Till next time x


Tuesday, 9 July 2019

Hello lovely | Stephanie Squires | Double page Sewing


Hello Scrapbookers!

A very warm welcome to this months blog post!!

So hand sewing...it's a funny one, some people love it, some people hate it...Well I sit on the fence with it...in one way I love it whilst sitting on the sofa in the evening chilling out sewing on a layout - But sewing at a class or on a retreat - No thanks lol I'll draw it on or sew it at a later date!

So it's as much of a surprise to me as it is to you that this layout is a double....I certainly didn't plan it that way!  I started with the page on the left, gutted the yellow and pink spotty paper with a one inch boarder and I cut the pink bazzill cardstock down to an eleven inch square.  I added a fringe of pink netting to the left hand side of the bazzill cardstock and stuck it on to the spotty boarder.


I sewed the paper down the left hand side and along the top.  Unfortunately my bobbin ran out whilst sewing on the right.  I knew from past experience if I'd sewn over the top of the holes it would have missed some and looked a bit messy so I opted for some glitter card to cover up my mistake - I added a small amount of glitter card to the left hand-side too to balance out the bling!


I cut a stripy piece of paper 8 x 5 and popped it onto my layout just off centre.  I then organised my photos all on foam risers and started adding tuckers (tuckers are small pieces of paper or embellishments you tuck round or under your photos or other pieces of paper) I added a rosette embellishment, a slice of fruit, a bumble bee, sunglasses and flamingo stickers and a gold perspective heart and the word "Hello" to complete this layout...now onto the new one...…………


So I had all these scraps left in a pile on top of another sheet of pink cardstock...It was begging to be made into a layout so who was I to refuse...

I trimmed the manufacturing strip off of the pink card stock before popping the spotty piece of paper (10 x 6) onto my layout.  I splattered gold paint onto the page before I added a piece of the glitter card (6 3/4 x 5 1/2)


I decided to stagger my photos on the page so they were in a different formation to the other page.  I added lots of bright floral embellishments to the page and another rosette.  I added the title Lovely and a bunting stickers  before adding the smaller sub titles, the hand signals, camera and balloons.

Once I'd done all of the above I had forgotten that I needed some stitching!  I punched holes all around the edge before chain stitching round the edge with white embroidery floss and that was it....my surprise double page was finished!


Thank you very much for reading...…….until next month.

Best wishes

Steph xoxo

Friday, 5 July 2019

Sweet | Sheena Rowlands | Sewing

Hi there UK Scrappers x Sheena here again x

This months challenge is sewing. I know this isn't something everyone likes to do but it can be a great way to add some texture and interest to your scrapbook pages.

Sweet.


For this page featuring my new Nephew and a crocheted horse I've just made him I decided to use both machine and hand sewing as I know not everyone has access to a sewing machine.


I used the sewing machine to firstly sew my cardstock to a patterned paper border leaving enough of a gap to bend the cardstock edges slightly. Also for the first time I stitched my photo to the matting layers behind and I really like how this looks so will probably do it again.


From the Pink Paislee - Little Adventurer range I die cut a number of circles of different sizes. I added interest to some of these using complimentary coloured thread, either by chain stitching around the edge or by adding french knots to the circles with animals on, adding to the border that was already there.


Adding sewing to embellishments in this way is less scary if you are new to sewing than adding directly to your layout. If you are not familiar with some embroidery stitches there are some good you tube videos you can watch whilst you practise. 

I finished my page with a die cut title and some wood veneer from the Little Adventurer range.

I hope you feel inspired to try sewing on your creations and please do share them with us over on our Facebook page or if you have any sewing related questions we would be happy to help x

Till next time x


Saturday, 15 June 2019

Happy | Charissa Barlow (Guest Designer) | Mixed Media

We're pleased to have Charissa join us as Guest Designer this month for our theme of Mixed Media.

Over to you Charissa.....

Hey everyone, Charissa here.

The Mixed Media theme was perfect for an idea I had using the June Mind the Scrap kits. I used texture paste through a Heidi Swapp word stencil to create my background. I wasn't happy with the colour of my texture paste so allowed the paste to dry and put the stencil back into position and applied gesso through it to whiten up the words. I was much happier with this result. Once this was dry I then added some splashes of Heidi Swapp Colour Shine in gold. I love how the words pop from the back ground. 


I created a border on the left using papers from Paige Evans Horizon collection and Crate Papers All Heart collection. These papers also featured underneath my photo as layers along with some green cardstock.


I then built a cluster around my photo with the All Heart die cut ephemera. To create some dimension and lift I used foam pads under some of the pieces of ephemera and added some twine from my stash into the tag. I then coloured some Moxy stickers with some navy Heidi Swapp Colour Shine and tucked these into the clusters. It was all finished off with some sprinkling bits from Pink Paislees new Indigo and Ivy collection. And not forgetting the date stamp!!


Charissa x

Saturday, 25 May 2019

Friends | Jackie Ashton | Fussy Cutting

Hi scrappers, Jackie here with my layout this month using fussy cutting.


Im not a big fan of fussy cutting, but I always love seeing this technique on other layouts.  So when I sat down and started to cut out the flowers, I found the process came together really quickly, and I love the end result.

Friends ...


For my layout I used a lovely sheet of patterned paper from Maggie Holmes - Sunny Days collection, and cut out several of the flowers.  

I also used this patterned paper also from the same collection, to cut out some of the butterflies.

I started my layout by adding ink to my white cardstock. and added some stamped details over the inked area.

Then I added a few different sheets of patterned paper behind my photograph, which I added to the centre of the page and then arranged the fussy cut flowers and butterflies around the photograph, adding 3D foam under some of the flowers to give them some depth on my page.


To finish the page I added two torn strips of patterned paper to the bottom of my page, and added a small cluster of the cut flowers and a butterfly to this areas.


I hope you can join us this month and give fussy cutting a try, and share your layouts in our Facebook group, or tag is on on Instagramwe would love to see them.


Thanks for stopping by, till next time.

Happy scrapping


Saturday, 18 May 2019

Awesome | Clair Matthews | Fussing Cutting

As soon as I saw this months theme was 'Fussy Cutting' I just knew I had to use one of the lovely Mintay collections - In my opinion you just can't beat their pages of elements to fussy cut!!

https://www.cs-getcrafty.com/online-store/MINTAY-c29938399

I went with the Marina collection to make this layout..


I fussy cut not only the small nautical elements but also the frames for the photos too.


The photos were taken this year when my husband & we went for a little stroll along our local beach so they worked perfectly with this paper collection.


What do you think?...has it inspired you to get those scissors out!!! :)

If you fancy watching here's my Process video:


xxx 

Tuesday, 14 May 2019

Beau Alise | Sarah Costain | Fussy Cutting

 Sarah here today with my take on this months theme of fussy cutting.

I must admit I am not a fan of fussy cutting so this was a challenge for me. I decided to use some rose gold foiled words from a white 12 x 12 sheet and cut them with a small border. The white on white helped disguise my less than perfect cutting skills and my Cutter Bee scissors definitely helped too!!


The rest of the layout was more in my comfort zone with lots of mixed media mostly from one of the Thompsons Craft Supplies kits.


I began by building up layers of watercolour in reds pinks and yellows. Once this had dried I added texture paste on top followed by white gesso to mute the colours slightly to match my papers and embellishments.


I created a paper cluster behind my photo using some lace and cheese cloth for added texture and to soften the layers. Between the layers I added foam to create more dimension and I added a circle embellishment and butterflies to frame my picture.


Using the shape of my watercolour background as a guide I scattered clusters of flowers and gems over the page and tucked in a tag to the paper layers.


As a finishing touch I added splashes of ink to match the rose gold title and some pink and blue Nuvo drops between the flowers.

You can check out the process video of my layout being created in more detail here.


Thanks for joining me and have a Happy Scrappy Day :)

Sarah
ManxyCatCrafts