Showing posts with label Amy Tangerine. Show all posts

Monday, 3 June 2019

SHINE OKAY | Zoe Hailey | Mixed Media


Hi everyone and welcome to my June blog for UKSA's mixed media theme.

Not sure about you, but I never really know what I am going to make when I sit down to produce a mixed media layout and this month I made a few because in my experience, they don't all go to plan!

At the moment I am really loving scrapping with 2x2 photos and although these are far from the best quality pictures, I love how this layout turned out.


I have worked with Amy Tangerine's Shine On collection for the very first time, it just seemed to be perfect for a layout about a walk in the woods with the children.

I created my background using two (of my very under utilised stencils), shimmery goodness and Heidi Swapp's metallic texture paste (which I love because it dries so quickly and I'm too impatient and normally end up smudging my layout!)

I have created some clusters off my page using die cuts, thickers chipboard as well as some wood veneer that I picked up recently. I have also used some of what I call liquid gold as I am getting very near to the end of Heidi Swapp gold colour shine (sob sob!)


Hope you enjoy getting messy with our mixed media theme this month and look forward to seeing what you create.

Zoe


Wednesday, 27 February 2019

Feeling All The Feels | ScrappyNerdUK (Claire) | Punches

I almost gave myself a triple challenge this month. Not only did I use punches (which is our theme this month) but I also challenged myself to use up scraps and incorporate more than one shape in my layout.

Here is how I got on.

I pulled out 4 circle punches for this one. I used a 3inch, 2 inch, 1 inch and 1/2 inch. From my scraps I punched first the largest and then used the next size down until all of my scraps were punched.


I then arranged this down the left side of the page. It was apparent that I didn't have enough larger circles and so I also punched out a couple of circles from vellum which is a great alternative to help fill up blank areas.


Next I chose my photo. This is generally how I scrap and tend to get started with my layout before I then choose my photo. I chose a snapchat picture of me and a friend and just loved all the pretty pinks  from the Dream Big collection from Simple Stories that I knew this photo was right for my layout.

I added in some stickers from the sticker sheet, a few tiny word stickers mainly. I also added in some chipboard stickers from an older Dear Lizzy collection.

So that's 2 challenges done, punches and scraps. Next up was bringing in another shape to work alongside the circles. I chose to go with a square as my photo was square. I decided to use the little 2x2 cut apart from the Dream Big collection and nestled 3 of these into the circle layers.

Finally was my title. I again used a different collection for these. I used the Thicker stickers from Amy Tangerine On A Whim collection and just love the sentiment "Feeling All The Feels".

And a few little flourishes with stickers and chipboard pieces and these layout was finished in about half an hour!!

Thanks for joining me here - be sure to watch the process video for this layout too - Link here:


Claire x


Wednesday, 3 October 2018

#Bao Burger | Terri Morris | Small Photos

Terri here, ready to kick start a new month here on the UK Scrap Addicts blog. This month the focus is on using small photos. The team have got some amazing layouts to showcase and I'm sure you'll enjoy looking at them as much as I do.


Although the trend is for using only one photo per layout, it is also on trend to use small photos. I love using multiple photos but often find myself with only one used.


I used a mix of my favourite techniques for this layout (paint, fussy cutting and stamping!) for this page plus it as features some of my favourite colours!


I'm determined to get some of my older stash used up. So I've made a promise to myself that even if I use the newest collections I have to add some elements from my older supplies.


Thanks for joining us on the blog, don't forget to share your layouts with us over on the Facebook group. We will have a folder for each month's theme so feel free to add it in there.

Happy Scrapping!


Tuesday, 11 September 2018

Colour Run! | RamblingsofGeo | Paint

Hi Everyone, 

I have used water colours for my paint themed layout, it was a technique i learnt at the Amy Tangerine workshop that Birds of a Feather put on last November. 

I did the watercolour technique on some water colour paper i had, which i cut down to 12x12 inch. i then cut it smaller to fit inside a full size 12x12 inch paper sheet.  I gutted the middle of the paper so i didn't waste any. (you can see all of this on the process video). I used some reeves watercolors (like the ones kids get at school in the red palette)


Here are some close ups for you of the layout.


I have also done  a corresponding Smash Book layout to go with this page which you can view here on my own youtube channel - Click here - This was to keep all the memorabila together, like my race number, wrist band, leaflets etc.

The process video is here - CLICK HERE


Wednesday, 15 August 2018

They do! | RamblingsofGeo | Tic-Tac-Toe

Hello,

Georgia here (Aka RamblingsofGeo) with my take on the Tic Tac Toe challenge for August.


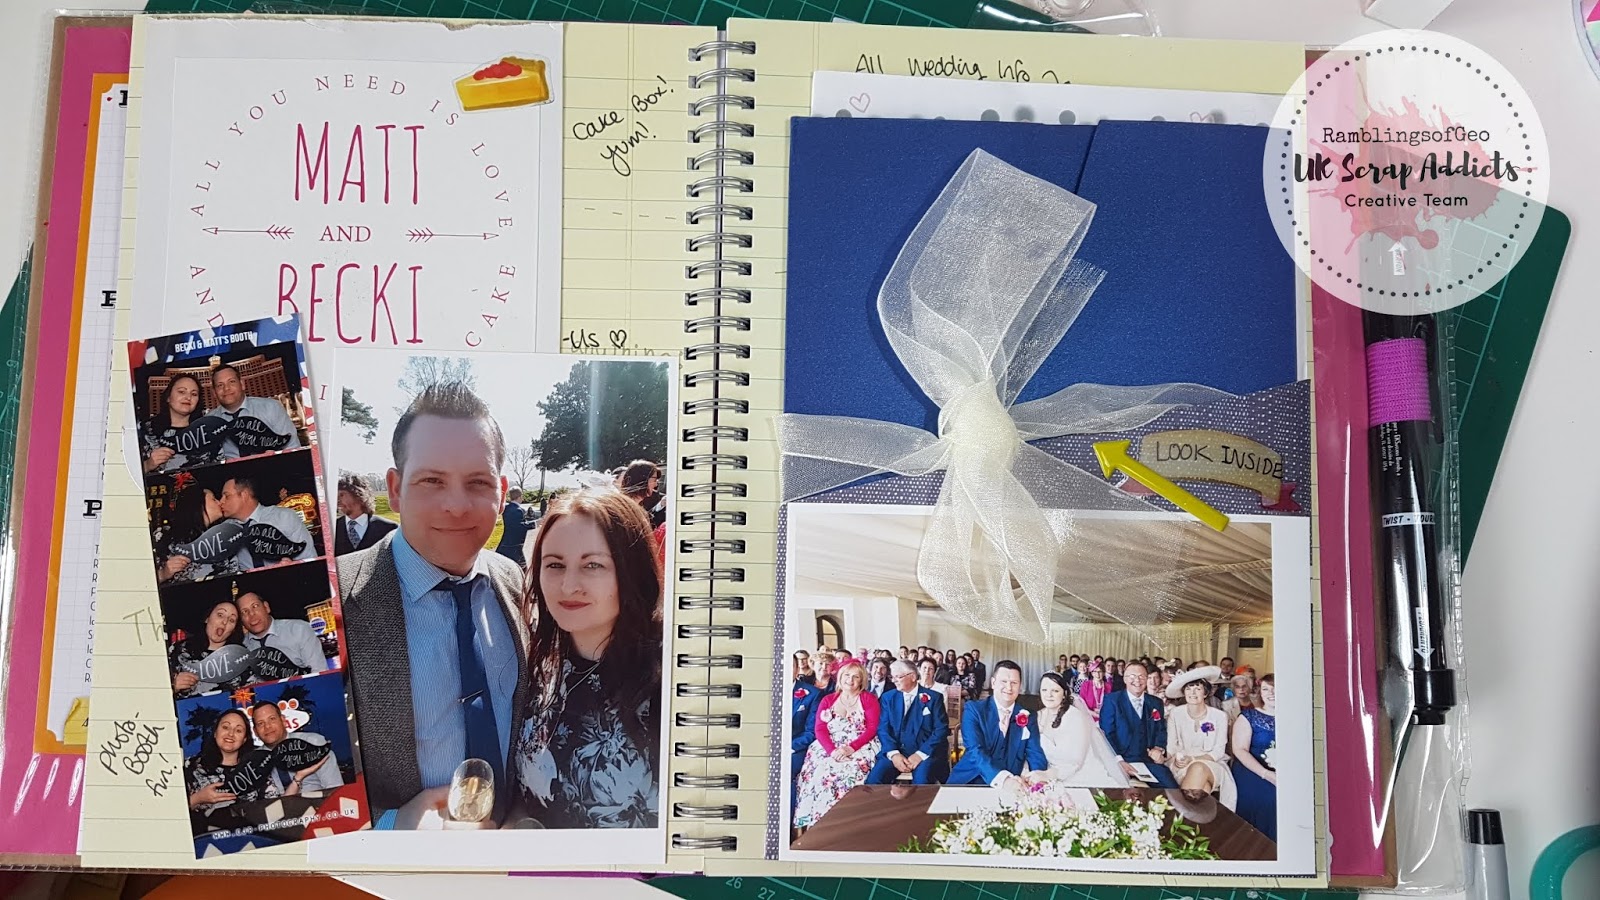
I went for the central line of 'Arrows, Circles, and Washi' and decided to document my friends wedding in my SMASH book.

I covered 4 pages in total, i used stickers from the Amy Tangerine books for my Arrows which you can see on this page.


A pocket page on the right houses the invitation, and ceremony booklet . The pocket is a SMASH branded pocket bought from HobbyCraft awhile go. I stuck a photo over the pocket to decorate it and help it blend in to the layouts. On the left page i used a part of the cake box as my background, and the photo booth photo to document the evening!


I used their save the date as a flap to put part of their ceremony booklet in with  photo of them from their engagement shoot. You can see the stars and strips print which was paper from the burgers in the evening, i took a sheet and cut large circles out to use as my background.


You can see here the double page spread, the left is the Circles page, the right has my Arrows and a strip of pink washi tape is along the side of the photo as i felt it complemented the cupcake casing and flower petals.


 Check out the video on our UK Scrap Addicts youtube channel to see my construct the pages, and see how quickly they come together!


Wednesday, 11 July 2018

Waste Not.... | 6x6 Paper | RamblingsofGeo

Waste Not...

Something different from me this month, a pink happy 12 x 12 layout as its my Birthday today! - woooo 

I am very conscious of the amount of waste that we get from scrapbooking, and you will always find me grabbing things out the table bins at crops, yep, i said it, im a scrappy bin diver, and proud! 

One mans junk, is another mans treasure!

For this layout, i used the branding strips in my 6x6 paper pads to layer up behind my photo to make a nice colourful background. 


I have tried to completely finish a Pink Paislee 6x6 pad, the Fancy Free one. I have 11.5 pages left, and no unused branding strips. Wooo

It feel so good to use things up!


Please also check out the process video of this layout, if you give it a go please leave a comment and share on our facebook group.


<iframe width="560" height="315" src="https://www.youtube.com/embed/JENwFgNOaNw" frameborder="0" allow="autoplay; encrypted-media" allowfullscreen></iframe>


Monday, 11 June 2018

Dinotastic! | RamblingsofGeo | 4x6 Photo

Hello everyone, Welcome to June's theme of 4x6 photos!

4x6 photo layouts, quite easy you would think... however when you document in a SmashBook it's so normal to ram loads of photos in it. Having the opportunity to only use one photo was somewhat of a challenge for me.

I picked a photo of my godchildren at a birthday party as i knew i had a couple of bits of memorabilia to bulk it out with. I used one single 4x6 photo, a leaflet of the party organisers, a cupcake topper, and lots, and LOTS of random embellishments.


Its quite a full on page full of embellishments, but i think i made it work..


If you want to have a look how i threw this together, then check out the video below!

<iframe width="560" height="315" src="https://www.youtube.com/embed/RmkIEtxsE7k" frameborder="0" allow="autoplay; encrypted-media" allowfullscreen></iframe>

Thank you for reading!


Friday, 11 May 2018

Afternoon tea with a difference! | RamblingsofGeo | Monochrome

Hello everyone,

My name's Georgia, this is my first blog post as a Creative member for UKSA, I have a youtube channel called RamblingsofGeo which has Vlogs and scrappy related things on there. 😀

This month's focus is Monochrome, as you will have seen from the other Creative team members posts, its not necessarily black and white, and even less so with my layout, as it's very pink!

I have made a layout to show a day out at the London BB Bakery afternoon tea bus tour I went to for a friend's 30th birthday. I kept leaflets, a cake box, a leaflet/doily, all to use as part of my layout.


Full page

I used the Purple Cutesy Style Smashbook, and picked a random page near the back of the book that was cupcake themed (on the left hand page) The page I used was fairly blank, so i set about creating my layout on it as it went with the book's theming. 


I used a variety of pink embellishments from my stash, above you can see a faux suede bow from the Amy Tangerine Hustle & Heart collection and the pink coffee cup with gold inlay which was also from the same collection. 


I decided to use instax mini photos which i printed off on my Instax share SP-2 printer for my layout. They work quite well for a Smash book, and the Smashbook Mini's as it allows you plenty of room for other memorabilia like leaflets, and tickets. 

The background is made up from a cake box that we were given with our left overs, it was nice and clean which meant I was able to cut it up and stick it in to add some bright pink to the page. I then used a doily, and part of the pink napkin to give it some texture behind the cake photo. 


I hope you enjoyed my very pink Smashbook layout for the Monochrome theme this month.

Don't forget to check out my process video on the UK Scrap Addicts channel, (Click here) and keep an eye out for more Monochrome themed layouts for the rest of May!


Wednesday, 27 September 2017

Epic Fail | Lisa-Jane Johnson | Journalling

It's Lisa-Jane from Pretty My Page here today with my take on getting some journalling onto our layouts.  I'm the first to admit that although I believe scrapbooking should be about the story as much as anything else, sometimes there just isn't a story to tell, and that's fine.  Other times there is a story and we plan to come back to it and add it, but we don't, and that's fine too (there are no scrapbooking police thank goodness!) I am definitely guilty of this!  So for this challenge I chose a photo that had a definite story attached and I made sure I got it down on the page!


I didn't actually have a plan in mind when I was pulling out some papers to go with the photo.  Then I came across this Pink Paislee paper with the diagonal hand writing on and I was inspired to create something similar with my journalling.  I didn't intend to use the actual paper as it was the wrong sort of grey but I'm glad I happened across it.


I wanted to create the journalling on a slight diagonal like the paper but of course you can't do that with a 12x12 piece as you need a bit of extra real estate to allow for the slant.  Luckily the pattern in the paper worked in any direction so I was able to rotate it slightly to give me enough to cover right across.  I trimmed off the corners and then matched up the top and bottom, and voila - I have a diagonal piece that stretches right the way across.  


I wanted to add a contrasting strip in above and below the main piece but it obviously meant I would have the same problem with it not reaching.  The pattern on this piece couldn't be cut on an angle so I broke the strips and stuck the ends down first which left me with a little strategically placed gap to cover up.  I also added some stencilling to add another subtle layer.  I used the Ranger blending tool and the Grunge stencil from the Pretty My Page shop with some Tim Holtz Pumice Stone Distress Ink because the story was partly about the mess in the house during our first lot of renovations.


Before I set to work on the journalling, I wanted to add in any base layers for the clusters so that I knew how much room I had to work with.  I didn't add the rest of the embellishments until afterwards so I could write without being impeded or getting enamel dots stuck to my elbow...  The dots and hearts are from the Pretty My Page shop and the stick pins and metal studs are very old bits from my stash which always makes me feel good :-)


Typically on the day I did the journalling, my arthritis was quite bad in my hands and they did not want to be flexible and allow me to write neatly at all!  I didn't keep to the right slant on the stop half either and I considered redoing the background but, you know, life's too short!  And anyway, the whole story was to do with mess and chaos things being out of place so it's quite fitting really!  In the picture I was taking a moment to try and focus on the positives of the renovations which hadn't gone very well.  We were almost at the point of getting the bath in so I posted this picture on Facebook to say "yay, we are getting somewhere, it's not so bad, etc".


Then 5 minutes later the children were charging around and not heeding my warnings and consequently tipped over the bath bashing them both on the head and trapping them underneath! My son ended up with a huge egg on his head and my daughter was fine until she realised her big brother was getting all the attention and she started howling too!  I do think it is important to journal the not so good things about life too, don't you?!  The journalling here blends with the design because it was intentional in it's placement and the grey background means that the writing doesn't stick out.  I wish my writing was neater but here it becomes part of the design and I'm happy with that.  

Don't forget to enter the journalling challenge on our Facebook page to be in with a chance of winning the prize draw for vouchers for the Pretty My Page shop and as always, we'd love to see what you create so don't forget to hash tag us!

 Now go forth and make pretty pages!


Tuesday, 29 August 2017

Layout | Jackie Ashton | Clustering

Hi everyone, Jackie here with my layout featuring one simple cluster.  

For my layout this month, I’ve continued with a 9x12 layout that will be included into my Paris album and added a cluster of embellishments to the lower part of my page.  I used this cluster as a place to add  the date and location, as this layout is one of several taken whilst at the Efflel Tower, I didn't add any journalling.


My cluster includes several layers - dollie - tag - vellum - wood veneer - puffy stickers - heart shape, all layered together to make a beautiful cluster on my layout.


Hope you like how I have showed that a little cluster can help bring the page together.


Friday, 4 August 2017

Adventure for one | Maria La Chica | Clustering

Hello everyone, and welcome once again to UK Scrap Addicts!

As you may already be aware, this month's topic is clustering, and I have to admit that this is not something that I do very frequently, so it doesn't come up naturally to me! But I think I cracked it at the end... I'll let you be the judge of that!

So here is my layout:


As you can see I have only made two clusters. Some purist scrapbookers say that, like in nature, clusters should come in odd numbers, three being the preferred. However, due to the design in my layout I thought two clusters worked better.

The clusters are made with fussy cut paper embellishments, proving the point that you don't have to necessarily have to have tons of materials to make the most of your layouts!

Here are two more close ups:


I have also made a process video that you can watch on our YouTube channel. Here's the link:


I hope you'll join us in this month's challenge, creating clusters on your layouts. Don't forget there is a £30 voucher from Thompson Craft Supplies up for grabs!

See you very soon everyone!